Les bases de données SQL et plus particulièrement MySQL restent une des pierres angulaires de l’immense majorité des sites internet. MySQL fonctionne très bien out of the box, cependant, dès que la base se trouve assez sollicitée, on s’aperçoit que les réglages par défaut méritent une petite optimisation. Jetons un œil à tout ça !
Récemment, un des serveurs de Peerus commençait à avoir de sacrés pics de load lors des heures de forte charge, avec MySQL pour principal responsable. Une grosse centaine de connexions simultanées et quelques dizaines de requêtes par seconde sur des bases de plusieurs dizaines de giga. C’est un peu plus que le WordPress moyen, mais rien d’ingérable pour un MySQL bien réglé.
Dès lors, avant d’imaginer prendre un serveur plus puissant, sharder les tables ou je ne sais quoi encore, il faut tirer le maximum de notre cher SGBDR. Lire la suite…
Le logiciel pure-ftpd est l’un des serveurs FTP les plus simple à installer et configurer c’est pourquoi si vous cherchez à installer un serveur FTP rapidement sur votre serveur Linux, je ne peux que vous le recommander. Aujourd’hui, nous allons voir comment utiliser pure-ftpd et MySQL simultanément pour permettre la séparation des tâches avec l’enregistrement des comptes utilisateurs dans la base de données et le reste du fonctionnement gérer par pure-ftpd. Le but du tutoriel n’étant pas de vous apprendre à installer et manipuler MySQL, je pars du principe que ce dernier est installé sur la même machine (ou une machine distante) que votre serveur FTP et que vous avez soit MySQL Workbench sous la main ou le client MySQL en ligne de commande pour la partie traitant des manipulations sur la base de donnée.
Installation du serveur Pure-FTPd-mysql
Pour utiliser MySQL avec votre serveur de FTP, il faut que ce dernier ai été compilé avec la commande “–with-mysql“. Heureusement pour nous, plutôt que de ce compliquer la vie à compiler les sources du serveur, nous allons directement installer le paquet tout prêt à l’usage nommé : pure-ftpd-mysql. Même si on vous conseil d’installer “pure-ftpd” ou même qu’on vous demande de le désinstaller si vous l’avez déjà installé, dite oui pour continuer l’installation.
sudo apt install pure-ftpd-mysql
Note : Si vous avez votre serveur FTP déjà en cours de production, l’installation de cette version ne perturbera en rien vos utilisateurs et vous pouvez continuer la suite de ce tutoriel puisque le redémarrage ne sera nécessaire qu’à la fin.
Création de la Base de données
A partir de votre interface PHPMyAdmin ou du client MySQL, vous allez créer un utilisateur ainsi qu’une base de données associés à ce compte.
Création d’un compte utilisateur en requête SQL.
CREATE USER 'pureftpd' identified by 'pwdftp';
Création de la base de donnée et une table qui servira à contenir les comptes utilisateurs.
CREATE DATABASE pureftpd;
Association du compte utilisateur “pureftpd” avec la table “users” en lui attribuant les droits de lecture, écriture, mise à jour et suppression.
GRANT SELECT, INSERT, UPDATE, DELETE ON '*.pureftpd' TO 'pureftpd';
Création de la table où les utilisateurs seront enregistrés.
CREATE TABLE users (
Id int(11) NOT NULL auto_increment PRIMARY KEY,
User varchar(32) NOT NULL default '' UNIQUE KEY,
Password varchar(64) NOT NULL default '',
Uid int(3) NOT NULL default 33,
Gid int(3) NOT NULL default 33,
Dir varchar(255) NOT NULL default '',
QuotaSize int(4) NOT NULL default 250,
ULBandwidth int(2) NOT NULL default 10,
DLBandwidth int(2) NOT NULL default 10
);
One means of restricting client use of MySQL server resources is to set the global max_user_connections system variable to a nonzero value. This limits the number of simultaneous connections that can be made by any given account, but places no limits on what a client can do once connected. In addition, settingmax_user_connections does not enable management of individual accounts. Both types of control are of interest to MySQL administrators.
To address such concerns, MySQL permits limits for individual accounts on use of these server resources:
The number of queries an account can issue per hour
The number of updates an account can issue per hour
The number of times an account can connect to the server per hour
The number of simultaneous connections to the server by an account
Any statement that a client can issue counts against the query limit, unless its results are served from the query cache. Only statements that modify databases or tables count against the update limit.
An “account” in this context corresponds to a row in the mysql.user table. That is, a connection is assessed against the User and Host values in the user table row that applies to the connection. For example, an account 'usera'@'%.example.com' corresponds to a row in the user table that has User and Host values of usera and %.example.com, to permit usera to connect from any host in the example.com domain. In this case, the server applies resource limits in this row collectively to all connections by usera from any host in the example.com domain because all such connections use the same account.
Before MySQL 5.0.3, an “account” was assessed against the actual host from which a user connects. This older method of accounting may be selected by starting the server with the --old-style-user-limits option. In this case, if usera connects simultaneously from host1.example.com andhost2.example.com, the server applies the account resource limits separately to each connection. If usera connects again from host1.example.com, the server applies the limits for that connection together with the existing connection from that host.
To establish resource limits for an account at account-creation time, use the CREATE USER statement. To modify the limits for an existing account, use ALTER USER. (Before MySQL 5.7.6, use GRANT, for new or existing accounts.) Provide a WITH clause that names each resource to be limited. The default value for each limit is zero (no limit). For example, to create a new account that can access the customer database, but only in a limited fashion, issue these statements:
mysql> CREATE USER 'francis'@'localhost' IDENTIFIED BY 'frank'
    ->     WITH MAX_QUERIES_PER_HOUR 20
    ->          MAX_UPDATES_PER_HOUR 10
    ->          MAX_CONNECTIONS_PER_HOUR 5
    ->          MAX_USER_CONNECTIONS 2;
The limit types need not all be named in the WITH clause, but those named can be present in any order. The value for each per-hour limit should be an integer representing a count per hour. For MAX_USER_CONNECTIONS, the limit is an integer representing the maximum number of simultaneous connections by the account. If this limit is set to zero, the global max_user_connections system variable value determines the number of simultaneous connections. Ifmax_user_connections is also zero, there is no limit for the account.
Database replication is a technique where a given database is copied to one or more locations, so that the reliability, fault-tolerance or accessibility of the database can be improved. Replication can be snapshot-based (where entire data is simply copied over to another location), merge-based (where two or more databases are merged into one), or transaction-based (where data updates are periodically applied from master to slaves).
MySQL replication is considered as transactional replication. To implement MySQL replication, the master keeps a log of all database updates that have been performed. The slave(s) then connect to the master, read individual log entries, and perform recorded updates. Besides maintaining a transaction log, the master performs various housekeeping tasks, such as log rotation and access control. When new transactions occur and get logged on the master server, the slaves commit the same transactions on their copy of the master database, and update their position in the master server’s transaction log. This master-to-slave replication process is done asynchronously, which means that the master server doesn’t have to wait for the slaves to catch up. If the slaves are unable to connect to the master for a period of time, they will download and execute all pending transactions when connectivity is re-established.
Database replication allows one to have an exact copy of a live database of a master server at another remote server (slave server) without taking the master server offline. In case the master server is down or having any trouble, one can temporarily point database clients or DNS resolver to the slave server’s IP address, achieving transparent failover. It is must be noted that MySQL replication is not a backup solution. For example, if an unintended DELETE command gets executed in the master server by accident, the same transaction will mess up all slave servers.
In this article, we will demonstrate master-slave based MySQL replication on two Linux computers. Let’s assume that the IP addresses of master/slave servers are 192.168.2.1 and 192.168.2.2, respectively.
Setting up a Master MySQL Server
This part will explain the steps needed on the master server.
First, log in to MySQL, and create test_repl database.
$ mysql -u root -p
mysql> CREATE DATABASE test_repl;
Next, create a table inside test_repl database, and insert three sample records.
mysql> USE test_repl;
mysql> CREATE TABLE employee (EmployeeID int, LastName varchar(255), FirstName varchar(255), Address varchar(255), City varchar(255));
mysql> INSERT INTO employee VALUES(1,"LastName1","FirstName1","Address1","City1"),(2,"Lastname2","FirstName2","Address2","City2"),(3,"LastName3","FirstName3","Address3","City4");
After exiting the MySQL server, edit my.cnf file using your favorite text editor. my.cnf is found under /etc, or /etc/mysql directory.
The server-id option assigns an integer ID (ranging from 1 to 2^23) to the master server. For simplicity, ID 1 and 2 are assigned to the master server and the slave server, respectively. The master server must enable binary logging (with log-bin option), which will activate the replication. Set the binlog-do-db option to the name of a database which will be replicated to the slave server. The innodb_flush_log_at_trx_commit=1 and sync_binlog=1options must be enabled for the best possible durability and consistency in replication.
After saving the changes in my.cnf, restart mysqld daemon.
# systemctl restart mysqld
or:
# /etc/init.d/mysql restart
Log in to the master MySQL server, and create a new user for a slave server. Then grant replication privileges to the new user.
mysql> CREATE USER [email protected];
mysql> GRANT REPLICATION SLAVE ON *.* TO [email protected] IDENTIFY BY 'repl_user_password';
mysql> FLUSH PRIVILEGES;
A new user for the slave server is repl_user, and its password is repl_user_password. Note that the master MySQL server must not bind to the loopback interface since a remote slave server needs to log in to the master server as repl_user. Check this tutorial to change MySQL server’s binding interface.
Finally, check the master server status by executing the following command on the server.
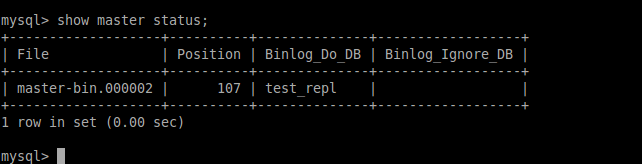
mysql> SHOW MASTER STATUS;
Please note that the first and second columns (e.g., master-bin.000002 and 107) will be used by the slave server to perform master-to-slave replication.
Ce qui permet de réinjecter des données résultantes d’un SELECT * FROM base.table WHERE my_id='66666666'.
Il est évidement possible de faire toutes ces opération sur une instance en précisant son port avec l’option –port (valable pour mysqldump et mysql).
Pour obtenir une liste des utilisateurs mysql, on peut utiliser cette fonction (glanée sur serverfault) :
mygrants()
{
  mysql -B -N -e "SELECT DISTINCT CONCAT(
    'SHOW GRANTS FOR ''', user, '''@''', host, ''';'
    ) AS query FROM mysql.user" |
  mysql |
  sed 's/(GRANT .*)/1;/;s/^(Grants for .*)/## 1 ##/;/##/{x;p;x;}'
}