Archive

Archives pour 02/2024

Outil keychain

14/02/2024 Comments off

I. Introduction

Ce guide ou « cookbook » est orienté pour des distributions de type Debian (dont Ubuntu fait partie), sachant que le principe reste identique sur d’autres distributions Linux. La connexion SSH de chacune des deux machines doit être préalablement configurée et fonctionnelle.

La connexion d’un client SSH vers un serveur SSH est fonction (d’au moins) trois paramètres principaux :

  • l’utilisateur distant ;
  • l’adresse de la machine distante ;
  • le port utilisé pour la connexion.

On appellera « machine A » ou « client » la machine cliente depuis laquelle on cherchera à se connecter sur le serveur SSH de la « machine B ». Les utilisateurs de chaque machine seront nommés respectivement user_a et user_b.

Un tutoriel spécifique à la mise en place d’une connexion SSH se trouve ici.

L’installation du chainage de clés par keychain permettra à l’utilisateur user_a de la machine cliente « machine A » de se connecter sur la « machine B » en tant que user_b sans entrer de mot de passe ou de passphrase.

L’intérêt principal est d’éviter d’entrer un mot de passe ou une passphrase à chaque connexion SSH mais seulement une fois, lors du lancement de votre « machine A », et pas du tout pour vos shells en tâches de fond.

Une application possible est de pouvoir utiliser les ressources du serveur SSH au travers de scripts shell. Par exemple, les scripts de sauvegarde (avec les commandes scp ou rsync utilisant elles-mêmes le protocole SSH) d’une « machine A » vers une « machine B » pourront alors être lancés en tâches de fond (cronjob) sans avoir à se soucier de quoi que ce soit. Presque le bonheur ! On verra comment réaliser cela dans un exemple en fin de ce tutoriel.

Attention cependant à conserver une configuration sécurisée, notamment si vous êtes plusieurs utilisateurs sur la même machine cliente. En particulier, l’utilisateur root ne doit jamais disposer de ce mode de connexion « automatisée ».

Attention cependant à conserver une configuration sécurisée, notamment si vous êtes plusieurs utilisateurs sur la même machine cliente. En particulier, l’utilisateur root ne doit jamais disposer de ce mode de connexion « automatisée ».

Tout le tutoriel est réalisé en ligne de commande mais ces manipulations sont également possibles en mode graphique.

II. Prérequis

L’utilisateur root est requis pour la plupart des installations ci-dessous, même si je n’évoque ou n’explicite pas l’utilisation de « sudo », à envisager dans le cas des distributions Ubuntu. Les utilisateurs user_a et user_b devront exister sur chacune des deux machines, disposer de leurs répertoires HOME (man adduser) respectifs, et idéalement être autorisés à exécuter du script bash (vous pouvez vérifier que c’est le cas dans /etc/passwd).

Attention cependant à conserver une configuration sécurisée, notamment si vous êtes plusieurs utilisateurs sur la même machine cliente. En particulier, l’utilisateur root ne doit jamais disposer de ce mode de connexion « automatisée ».

Exemple sur la machine A

sudo adduser user_a cat /etc/passwd #... d'autres utilisateurs listés user_a:x:1003:1003:,,,:/home/user_a:/bin/bash

II-A. Installer les paquets nécessaires

Machine A : ligne de commande en tant que root

aptitude install ssh openssh-client keychain

Machine B : ligne de commande en tant que root

aptitude install ssh openssh-client keychain
  1. S’il s’agit d’une réinstallation, pensez bien à stopper tous les processus SSH et « purger » l’installation existante avant de procéder à la réinstallation (man aptitude),
  2. aptitude a disparu des installations standards depuis la version ubuntu 10.10. Il faut donc l’installer si vous êtes dans ce cas (avec sudo apt-get pour les « ubuntistes« ).

Lire la suite…

Categories: Réseau, Système Tags: ,

Add a Recent Items Menu to the Dock

13/02/2024 Comments off

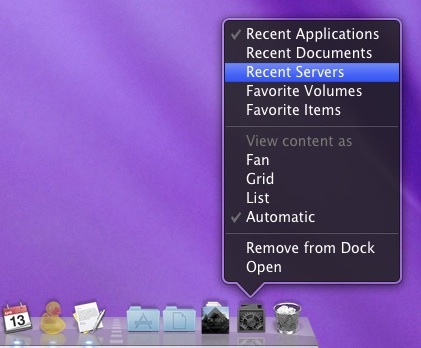
You can add a Recent Items menu to the Mac OS X Dock by using a defaults write command. The default is set to “Recent Applications” but once the Dock item exists you can adjust it to feature other recent items too.

Launch the terminal and enter the following:

defaults write com.apple.dock persistent-others -array-add '{ "tile-data" = { "list-type" = 1; }; "tile-type" = "recents-tile"; }'

That needs to all be on a single line, so if you copy and paste it make sure the command is one string.

You will then need to kill the Dock:

killall Dock

Now right-click on the newly appeared Recent Applications Dock item and you can change it to be Recent Applications, Recent Documents, Recent Servers, Favorite Volumes, or Favorite Items.

recent-items-dock-mac

If you want to remove the Recent Items menu, just drag it out of your Dock.

Categories: Logiciel Tags: , ,

How to Kill Zombie Process?

13/02/2024 Comments off

Source: Linux Addicted

Use Command Check Process:

#top

or

#ps aux

or

#ps -el

or

#ps aux | awk '{ print $8 " " $2 }' | grep -w Z

or

#ps -elf | grep Z

or

#ps -ef | grep firefox

Output:

Z 6502
Z 8320
Z 6985

Use Command kill zombie Process:

# kill -9 6985
Categories: Système Tags: ,

Rename all files which contain the sub-string ‘foo’, replacing it with ‘bar’

12/02/2024 Comments off

Source: commandlinefu.com

Terminal – Rename all files which contain the sub-string ‘foo’, replacing it with ‘bar’

for i in ./*foo*;do mv -- "$i" "${i//foo/bar}";done

Rename all files which contain the sub-string ‘foo’, replacing it with ‘bar’

That is an alternative to command 8368.

Command 8368 is EXTREMELY NOT clever.

  1. Will break also for files with spaces AND new lines in them AND for an empty expansion of the glob ‘*’
  2. For making such a simple task it uses two pipes, thus forking.
  3. xargs(1) is dangerous (broken) when processing filenames that are not NUL-terminated.
  4. ls shows you a representation of files. They are NOT file names (for simple names, they mostly happen to be equivalent). Do NOT try to parse it.

Why? see this :http://mywiki.wooledge.org/ParsingLs

Recursive version:

find . -depth -name "*foo*" -exec bash -c 'for f; do base=${f##*/}; mv -- "$f" "${f%/*}/${base//foo/bar}"; done' _ {} +

Alternatives

ls * | sed -e 'p;s/foo/bar/' | xargs -n2 mv

Renames all files in a directory named foo to bar.

  • foobar1 gets renamed to barbar1
  • barfoo2 gets renamed to barbar2
  • fooobarfoo gets renamed to barobarfoo

NOTE: Will break for files with spaces AND new lines AND for an empty expansion of the glob ‘*’


rename 's/foo/bar/g' ./* $ ls
thisFileIsCalledDAVE
$ rename 's/DAVE/PETE/g' ./*
$ ls
thisFileIsCalledPETE

Would this command line achieve the desired function? My CLI knowledge is not great so this could certainly be wrong. It is merely a suggestion for more experienced uses to critique. Best wishes roly 🙂


for f in *; do mv "$f" "${f/foo/bar}"; done

without sed, but has no problems with files with spaces or other critical characters


ls | sed 'p;s/foo/bar/' | xargs -n2 mv

rename foo bar directory/filename

rename command in my system -Fuduntu running 2.6.38 Linux Kernel- is an ELF 64-bit LSB executable, not a Perl script. man page for rename command shows syntax as « rename from to where » (or something like that), so I am doing just what I have been told…


Categories: Système Tags: ,

How to Use RSA Key for SSH Authentication

12/02/2024 Comments off

If your daily activity requires loging in a lot of Linux systems through SSH, you will be happy to know (if you don’t already) that there’s a way to allow secure, authenticated remote access, file transfer, and command execution without having to remember passwords for each individual host you connect.

The $HOME/.ssh/authorized_keys file contains the RSA keys allowed for RSA authentication. Each line contains one key, which consists of the following fields: options, bits, exponent, modulus and comment. The first field is optional, bits, exponent and modulus fields give the RSA key and the last field isn’t used at all in the authentication process, but it will be somewhat convenient to the user, for instance to know which key is for which machine.

Before we start, make sure your computer has a ssh client installed and the remote Linux system has ssh installed and sshd running, with RSA authentication enabled (RSAAuthentication yes in /etc/ssh/sshd_config).

Lire la suite…

Categories: Réseau, Système Tags: , ,