Archive

Archives pour 12/2023

How to Create a Bootable Install Drive for macOS High Sierra

24/12/2023 Comments off

Some Mac uses like to create a bootable USB installer drive for macOS High Sierra. A bootable install volume of macOS 10.13 allows users to perform a variety of tasks including formatting and clean installs, updating multiple Macs from the same USB flash drive installer (and without re downloading), and to use as a troubleshooting boot drive should the need arise, amongst other benefits for advanced and more technical users.

This walkthrough will detail how to make a bootable USB install drive for macOS High Sierra.

Requirements to Create a macOS High Sierra Bootable USB Installer

To create a functioning macOS High Sierra installer boot drive, you will need the following:

Beyond that you’ll just need a bit of patience and a bit of technical know-how or comfort following technical instructions. Making a USB install drive requires the usage of precise syntax at the command line with superuser privileges, using the wrong syntax could lead to unintended data loss.

How to Make a Bootable USB Installer for macOS High Sierra

    1. Connect the USB flash drive to the Mac, if you need to format it go ahead and do so
    2. Download macOS High Sierra installer application from the App Store* and be sure the complete installer is located in the /Applications/ directory
    3. When the installer has completed downloading, it will automatically launch – quit out of the installer when this occurs
    4. Open the “Terminal” application found in /Applications/Utilities/ directory on the Mac
    5. Enter the following command syntax at the command line, replacing “UNTITLED” with your USB drive name if necessary:

sudo /Applications/Install\ macOS\ High\ Sierra.app/Contents/Resources/createinstallmedia --volume /Volumes/UNTITLED && say Boot Installer Complete

    1. Confirm the syntax is exactly as written, then hit the RETURN key and enter the administrator password to start making the High Sierra installer drive *

  1. Let the installer complete, when finished you will be informed that the process has completed

Once you have created the USB boot installer drive for macOS High Sierra, you can either launch it immediately to install macOS High Sierra on the current Mac, reboot and startup from the USB installer drive, or eject it and use it on another Mac.

* Note: if you are getting a “command not found” error and you are certain your syntax is correct, be sure to check the file size of the “Install macOS High Sierra.app” as found in the /Applications folder. If the file size of the High Sierra installer is not over 5GB then you have the incomplete installer and will need to download the complete macOS High Sierra installer application as described here in order to create a bootable installer drive.

Booting from the macOS High Sierra USB Installer Drive

With the newly created macOS High Sierra USB installer drive connected to the Mac, reboot the computer. Immediately on reboot, start holding down the “OPTION” (ALT) key to load the boot menu. Select the High Sierra installer at this screen.
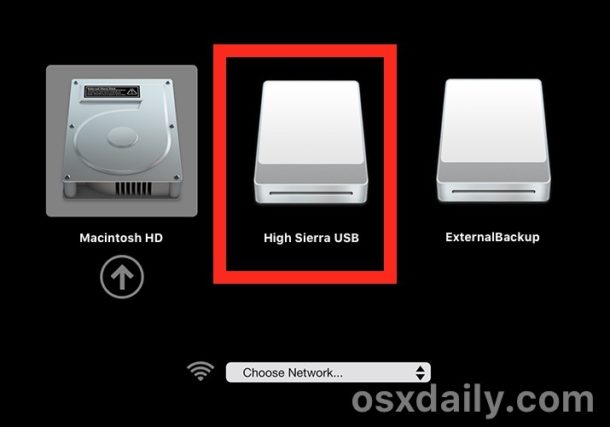
Once booted from the USB drive you can proceed with installing macOS High Sierra, using the Disk Utility tools to format or erase a volume, work with Time Machine, and other similar tasks.
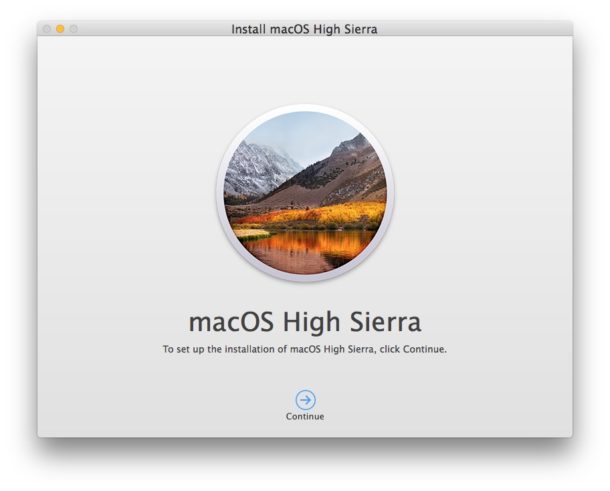
If you had previously created a boot installer for the High Sierra beta you may notice the syntax is different for createinstallmedia is different with the final version, part of that is to accommodate the new file name of the application installer, and the remainder removes the necessity of the –applicationpath flag and directive.

Keep in mind that macOS High Sierra can only be installed onto supported hardware, if you’re uncertain whether or not a particular computer supports the release you can check this list of macOS High Sierra compatible Macs.

Categories: Système Tags:

Linux: 20 Iptables Examples For New SysAdmins

23/12/2023 Comments off

According to the official project site:

netfilter is a set of hooks inside the Linux kernel that allows kernel modules to register callback functions with the network stack. A registered callback function is then called back for every packet that traverses the respective hook within the network stack.

This Linux based firewall is controlled by the program called iptables to handles filtering for IPv4, and ip6tables handles filtering for IPv6. I strongly recommend that you first read our quick tutorial that explains how to configure a host-based firewall called Netfilter (iptables) under CentOS / RHEL / Fedora / Redhat Enterprise Linux. This post lists most simple iptables solutions required by a new Linux user to secure his or her Linux operating system from intruders. Lire la suite…

30 Handy Bash Shell Aliases For Linux / Unix / Mac OS X

23/12/2023 Comments off

An alias is nothing but the shortcut to commands. The alias command allows the user to launch any command or group of commands (including options and filenames) by entering a single word. Use alias command to display a list of all defined aliases. You can add user-defined aliases to ~/.bashrcfile. You can cut down typing time with these aliases, work smartly, and increase productivity at the command prompt.

More about aliases

The general syntax for the alias command for the bash shell is as follows:

Task: List aliases

Type the following command:

alias

Sample outputs:

alias ..='cd ..'
alias amazonbackup='s3backup'
alias apt-get='sudo apt-get'
...

By default alias command shows a list of aliases that are defined for the current user.

Lire la suite…

Categories: Système Tags: , , ,

Top 32 Nmap Command Examples For Sys/Network Admins

22/12/2023 Comments off

The purpose of this post is to introduce a user to the nmap command line tool to scan a host and/or network, so to find out the possible vulnerable points in the hosts. You will also learn how to use Nmap for offensive and defensive purposes.

nmap in actionnmap in action

More about nmap

From the man page:

Nmap (“Network Mapper”) is an open source tool for network exploration and security auditing. It was designed to rapidly scan large networks, although it works fine against single hosts. Nmap uses raw IP packets in novel ways to determine what hosts are available on the network, what services (application name and version) those hosts are offering, what operating systems (and OS versions) they are running, what type of packet filters/firewalls are in use, and dozens of other characteristics. While Nmap is commonly used for security audits, many systems and network administrators find it useful for routine tasks such as network inventory, managing service upgrade schedules, and monitoring host or service uptime.

It was originally written by Gordon Lyon and it can answer the following questions easily:

  1. What computers did you find running on the local network?
  2. What IP addresses did you find running on the local network?
  3. What is the operating system of your target machine?
  4. Find out what ports are open on the machine that you just scanned?
  5. Find out if the system is infected with malware or virus.
  6. Search for unauthorized servers or network service on your network.
  7. Find and remove computers which don’t meet the organization’s minimum level of security.

Lire la suite…

Categories: Réseau, Système Tags:

How to check the file size in Linux/Unix bash shell scripting

22/12/2023 Comments off


How to check file size in unix using wc command

The wc command shows the number of lines, words, and bytes contained in file. The syntax is as follows to get the file size:
wc -c /path/to/file
wc -c /etc/passwd

Sample outputs:

5253 /etc/passwd

You can easily extract the first field either using the cut or awk command:
wc -c /etc/passwd | awk '{print $1}'
Sample outputs:

5253

OR assign this size to a bash variable:

myfilesize=$(wc -c "/etc/passwd" | awk '{print $1}')
printf "%d\n" $myfilesize
echo "$myfilesize"

How to get the size of a file in a bash script using stat command

The stat command shows information about the file. The syntax is as follows to get the file size on GNU/Linux stat:
stat -c %s "/etc/passwd"
OR
stat --format=%s "/etc/passwd"
To assign this size to a bash variable:

myfilesize=$(stat --format=%s "/etc/passwd")
echo "$myfilesize"
## or ##
myFileSizeCheck=$(stat -c %s "/etc/resolv.conf")
printf "My file size = %d\n" $myFileSizeCheck

The syntax is as follows to get the file size on BSD/MacOS stat:
stat -f %z "/etc/passwd"
Please note that if the file is symlink you will get size of that link only with the stat command.

du command example

The syntax is

du --apparent-size --block-size=1  "/etc/passwd"
fileName="/etc/hosts"
mfs=$(du --apparent-size --block-size=1  "$fileName" | awk '{ print $1}')
echo "$fileName size = ${mfs}"

Sample outputs from above commands:

Fig.01: How to check size of a file using a bash/ksh/zsh/sh/tcsh shell?Fig.01: How to check size of a file using a bash/ksh/zsh/sh/tcsh shell?


Find command example

The syntax is:

find "/etc/passwd" -printf "%s"
find "/etc/passwd" -printf "%s\n"
fileName="/etc/hosts"
mysize=$(find "$fileName" -printf "%s")
printf "File %s size = %d\n" $fileName $mysize
echo "${fileName} size is ${mysize} bytes."
Categories: Système Tags: , , , ,