Archive

Articles taggués ‘firewall’

Some iptables modules you probably don’t know about

18/06/2024 Comments off

I admit it, at the beginning of Rusty’s presentation on iptables years ago, I think it was at the Linux Expo or Raleigh back in the ’90s, I thought: “Just what we need, another network filtering system.” This was shortly after we made the change from ipfwadm to ipchains with little benefit (in fact, some lack of functionality, IIRC) and a re-learning. Rusty won me over pretty quickly though…

One of the big features that made it easy to swallow iptables was that it included backwards compatibility with both ipfwadm and ipchains. It also included, as the name suggests, tables, where you can branch off and handle packets by groups. For example, I have a table for detecting bogons (addresses like 192.168.0.0/24 and 10.0.0.0/8), and just have one rule in my main tables that jumps to the bogon check. In other systems, like FreeBSD’s ipfw, you can use gotos, which work about as well as they do in programming.

Another nice thing about iptables is that it has a plugin architecture for adding functionality. This has been used to great effect for things like firewalling weird application-specific protocols like FTP, marking packets or handing them off for shaping, etc… For example, one I mentioned yesterday was “hashlimit” to help protect from SSH attacks.

Let’s look at a few other interesting modules for iptables. Some of them are built-in to the stock kernel, others have to be patched in (requiring a rebuild of iptables in some cases as well as the kernel).

condition (patch?)

With condition, you can easily enable or disable a rule from a script by writing to a file under “/proc/net/ipt_condition”. For example: “iptables -I INPUT -m condition –condition killnet -j DROP”. Then if you “echo 1 >/proc/net/ipt_condition/killnet” the input chain will start dropping packets. Then “echo 0” will re-enable input packets.

connrate (patch?)

This includes a “–connrate min:max” and matches when a connection (managed by the conntrack module) is within the range. An optional “!” can appear before the rate to invert the sense of the match. You could, for example, start dropping packets if a particular connection is above a certain rate, for example.

iprange (built-in)

The iprange module allows you to specify source and/or destination addresses as ranges. While the built-in “-s” and “-d” will take a netmask, this can work with an arbitrary range of addresses, for example: “iptables -I INPUT -m iprange -s 192.168.1.5-192.168.1.100 -j ACCEPT”, that isn’t an address range that can be specified by “192.168.1.0/25” sort of syntax.

length (built-in)

Match a rule based on the packet length as a range.

limit (built-in)

Limit a match based on a rate and burst rate. For example, logging can be handy but also offers the opportunity for a denial of service by hitting your logs hard. “iptables -A INPUT -m limit –limit 10/min –limit-burst 30 -j LOG –log-prefix « Dropping:” would add a log target to the end of the input chain. This will log up to 10 messages a minute, with initial bursts of up to 30 messages. You’d normally use this at the end of an INPUT chain which has a default REJECT or DROP policy.

mac (built-in)

A rule which matches based on the MAC address the packet came from. For example, you could allow packets which have your name server’s IP on them, but come from another MAC address (one way of spoofing packets).

Lire la suite…

Firewall rules for transmission

17/06/2024 6 commentaires

Source: AskUbuntu

I have transmission installed, which listens on the default port 51413.

I have tried opening everything for this port.

iptables:

Chain INPUT (policy ACCEPT)
target prot opt source destination
ACCEPT tcp -- anywhere anywhere tcp dpt:ssh
ACCEPT icmp -- 'Server IP' anywhere state NEW,RELATED,ESTABLISHED icmp echo-request
ACCEPT icmp -- anywhere anywhere state RELATED,ESTABLISHED icmp echo-reply
ACCEPT udp -- anywhere anywhere state RELATED,ESTABLISHED udp spt:domain dpts:1024:65535
ACCEPT tcp -- anywhere anywhere tcp spt:http
ACCEPT tcp -- anywhere anywhere tcp dpt:http
ACCEPT udp -- anywhere anywhere udp spt:bootpc dpt:bootps
ACCEPT tcp -- anywhere anywhere tcp dpt:9091
ACCEPT tcp -- anywhere anywhere tcp dpt:51413
ACCEPT udp -- anywhere anywhere udp dpt:51513
ACCEPT tcp -- anywhere anywhere tcp spt:51413
ACCEPT udp -- anywhere anywhere udp spt:51413
LOGGING all -- anywhere anywhere
DROP all -- anywhere anywhere

Chain FORWARD (policy ACCEPT)
target prot opt source destination

Chain OUTPUT (policy ACCEPT)
target prot opt source destination
ACCEPT tcp -- anywhere anywhere tcp spt:ssh
ACCEPT icmp -- anywhere anywhere state NEW,RELATED,ESTABLISHED icmp echo-request
ACCEPT icmp -- anywhere anywhere state RELATED,ESTABLISHED icmp echo-reply
ACCEPT udp -- anywhere anywhere udp dpt:domain
ACCEPT tcp -- anywhere anywhere tcp dpt:http
ACCEPT tcp -- anywhere anywhere tcp spt:http 
ACCEPT udp -- anywhere anywhere udp spt:bootps dpt:bootpc
ACCEPT tcp -- anywhere anywhere tcp spt:9091
ACCEPT tcp -- anywhere anywhere tcp spt:51413
ACCEPT udp -- anywhere anywhere udp spt:51413
ACCEPT tcp -- anywhere anywhere tcp dpt:51413
ACCEPT udp -- anywhere anywhere udp dpt:51413
LOGGING all -- anywhere anywhere
DROP all -- anywhere anywhere

Chain LOGGING (2 references)
target prot opt source destination
LOG all -- anywhere anywhere limit: avg 12/min burst 5 LOG level warning prefix "FirewallDrops: "
DROP all -- anywhere anywhere

If I flush the tables:

iptables -F

it then works, so I imagine there is something I’m missing in iptables.

Logging output:

/var/log/kern.log:May  5 18:43:32 StretchSvr kernel: [    9.258012] FirewallDrops: IN= OUT=lo SRC=127.0.0.1 DST=127.0.0.1 LEN=72 TOS=0x00 PREC=0xC0 TTL=64 ID=2371 PROTO=ICMP TYPE=3 CODE=3 [SRC=127.0.0.1 DST=127.0.0.1 LEN=44 TOS=0x00 PREC=0x00 TTL=64 ID=2370 DF PROTO=UDP SPT=51413 DPT=80 LEN=24 ] 
/var/log/kern.log:May  5 18:43:32 StretchSvr kernel: [    9.298081] FirewallDrops: IN=eth0 OUT= MAC='Svr MAC Address' SRC=62.210.137.203 DST='Svr IP Address' LEN=44 TOS=0x00 PREC=0x00 TTL=53 ID=55801 PROTO=UDP SPT=1337 DPT=51413 LEN=24
/var/log/kern.log:May  5 18:43:32 StretchSvr kernel: [    9.305079] FirewallDrops: IN=eth0 OUT= MAC='Svr MAC Address' SRC=31.172.63.226 DST='Svr IP Address' LEN=44 TOS=0x00 PREC=0x00 TTL=50 ID=0 DF PROTO=UDP SPT=80 DPT=51413 LEN=24 
/var/log/kern.log:May  5 18:44:53 StretchSvr kernel: [   90.444453] FirewallDrops: IN=eth0 OUT= MAC='Svr MAC Address' SRC=62.210.137.203 DST='Svr IP Address' LEN=44 TOS=0x00 PREC=0x00 TTL=54 ID=55802 PROTO=UDP SPT=1337 DPT=51413 LEN=24 
/var/log/kern.log:May  5 18:44:53 StretchSvr kernel: [   90.453131] FirewallDrops: IN=eth0 OUT= MAC='Svr MAC Address' SRC=31.172.63.225 DST='Svr IP Address' LEN=44 TOS=0x00 PREC=0x00 TTL=50 ID=0 DF PROTO=UDP SPT=6969 DPT=51413 LEN=24 
/var/log/kern.log:May  5 18:44:53 StretchSvr kernel: [   90.456361] FirewallDrops: IN=eth0 OUT= MAC='Svr MAC Address' SRC=31.172.63.226 DST='Svr IP Address' LEN=44 TOS=0x00 PREC=0x00 TTL=50 ID=0 DF PROTO=UDP SPT=80 DPT=51413 LEN=24 
/var/log/kern.log:May  5 18:44:53 StretchSvr kernel: [   90.458255] FirewallDrops: IN=eth0 OUT= MAC='Svr MAC Address' SRC=31.172.63.252 DST='Svr IP Address' LEN=44 TOS=0x00 PREC=0x00 TTL=51 ID=0 DF PROTO=UDP SPT=80 DPT=51413 LEN=24 
/var/log/kern.log:May  5 18:45:01 StretchSvr kernel: [   98.435703] FirewallDrops: IN= OUT=lo SRC=127.0.0.1 DST=127.0.0.1 LEN=72 TOS=0x00 PREC=0xC0 TTL=64 ID=2373 PROTO=ICMP TYPE=3 CODE=3 [SRC=127.0.0.1 DST=127.0.0.1 LEN=44 TOS=0x00 PREC=0x00 TTL=64 ID=2372 DF PROTO=UDP SPT=51413 DPT=80 LEN=24 ] 
/var/log/syslog:May  5 18:43:32 StretchSvr kernel: [    9.258012] FirewallDrops: IN= OUT=lo SRC=127.0.0.1 DST=127.0.0.1 LEN=72 TOS=0x00 PREC=0xC0 TTL=64 ID=2371 PROTO=ICMP TYPE=3 CODE=3 [SRC=127.0.0.1 DST=127.0.0.1 LEN=44 TOS=0x00 PREC=0x00 TTL=64 ID=2370 DF PROTO=UDP SPT=51413 DPT=80 LEN=24 ] 
/var/log/syslog:May  5 18:43:32 StretchSvr kernel: [    9.298081] FirewallDrops: IN=eth0 OUT= MAC='Svr MAC Address' SRC=62.210.137.203 DST='Svr IP Address' LEN=44 TOS=0x00 PREC=0x00 TTL=53 ID=55801 PROTO=UDP SPT=1337 DPT=51413 LEN=24 
/var/log/syslog:May  5 18:43:32 StretchSvr kernel: [    9.305079] FirewallDrops: IN=eth0 OUT= MAC='Svr MAC Address' SRC=31.172.63.226 DST='Svr IP Address' LEN=44 TOS=0x00 PREC=0x00 TTL=50 ID=0 DF PROTO=UDP SPT=80 DPT=51413 LEN=24 
/var/log/syslog:May  5 18:44:53 StretchSvr kernel: [   90.444453] FirewallDrops: IN=eth0 OUT= MAC='Svr MAC Address' SRC=62.210.137.203 DST='Svr IP Address' LEN=44 TOS=0x00 PREC=0x00 TTL=54 ID=55802 PROTO=UDP SPT=1337 DPT=51413 LEN=24 
/var/log/syslog:May  5 18:44:53 StretchSvr kernel: [   90.453131] FirewallDrops: IN=eth0 OUT= MAC='Svr MAC Address' SRC=31.172.63.225 DST='Svr IP Address' LEN=44 TOS=0x00 PREC=0x00 TTL=50 ID=0 DF PROTO=UDP SPT=6969 DPT=51413 LEN=24 
/var/log/syslog:May  5 18:44:53 StretchSvr kernel: [   90.456361] FirewallDrops: IN=eth0 OUT= MAC='Svr MAC Address' SRC=31.172.63.226 DST='Svr IP Address' LEN=44 TOS=0x00 PREC=0x00 TTL=50 ID=0 DF PROTO=UDP SPT=80 DPT=51413 LEN=24 
/var/log/syslog:May  5 18:44:53 StretchSvr kernel: [   90.458255] FirewallDrops: IN=eth0 OUT= MAC='Svr MAC Address' SRC=31.172.63.252 DST='Svr IP Address' LEN=44 TOS=0x00 PREC=0x00 TTL=51 ID=0 DF PROTO=UDP SPT=80 DPT=51413 LEN=24 

Any help appreciated.

Categories: Réseau, Sécurité Tags: ,

Linux Iptables: HowTo Block or Open HTTP/Web Service Port 80 & 443

17/06/2024 Comments off

Source: nixCraft

By default Apache webserver listen on port 80 (http) and port 443 (https i.e. secure http). Apache webserver uses the TCP protocol to transfer information/data between server and browser. The default Iptables configuration does not allow inbound access to the HTTP (80) and HTTPS (443) ports used by the web server. This post explains how to allow inbound and outbound access to web services under Linux.

You can edit /etc/sysconfig/iptables file under RHEL / CentOS / Fedora Linux. Add the following lines, ensuring that they appear before the final LOG and DROP lines for the RH-Firewall-1-INPUT chain to open port 80 and 443:

-A RH-Firewall-1-INPUT -m state --state NEW -p tcp --dport 80 -j ACCEPT
-A RH-Firewall-1-INPUT -m state --state NEW -p tcp --dport 443 -j ACCEPT

Finally, restart the firewall:

# service iptables restart

If you’ve your own shell script, try:

/sbin/iptables -A INPUT -m state --state NEW -p tcp --dport 80 -j ACCEPT
/sbin/iptables -A INPUT -m state --state NEW -p tcp --dport 443 -j ACCEPT

Allow incoming http/web traffic at port 80

SERVER_IP="202.54.10.20"
iptables -A INPUT -p tcp -s 0/0 --sport 1024:65535 -d $SERVER_IP --dport 80 -m state --state NEW,ESTABLISHED -j ACCEPT
iptables -A OUTPUT -p tcp -s $SERVER_IP --sport 80 -d 0/0 --dport 1024:65535 -m state --state ESTABLISHED -j ACCEPT

Allow incoming https/secure web traffic at port 443

SERVER_IP="202.54.10.20"
iptables -A INPUT -p tcp -s 0/0 --sport 1024:65535 -d $SERVER_IP --dport 443 -m state --state NEW,ESTABLISHED -j ACCEPT
iptables -A OUTPUT -p tcp -s $SERVER_IP --sport 443 -d 0/0 --dport 1024:65535 -m state --state ESTABLISHED -j ACCEPT

Allow outgoing http/web service traffic to port 80

SERVER_IP="202.54.10.20"
iptables -A OUTPUT -p tcp -s $SERVER_IP --sport 1024:65535 -d 0/0 --dport 80 -m state --state NEW,ESTABLISHED -j ACCEPT
iptables -A INPUT -p tcp -s 0/0 --sport 80 -d $SERVER_IP --dport 1024:65535 -m state --state ESTABLISHED -j ACCEPT

Allow outgoing https/secure web service traffic to port 443

SERVER_IP="202.54.10.20"
iptables -A OUTPUT -p tcp -s $SERVER_IP --sport 1024:65535 -d 0/0 --dport 443 -m state --state NEW,ESTABLISHED -j ACCEPT
iptables -A INPUT -p tcp -s 0/0 --sport 443 -d $SERVER_IP --dport 1024:65535 -m state --state ESTABLISHED -j ACCEPT
Categories: Réseau, Sécurité Tags: ,

Using Iptables to Block Brute Force Attacks

16/06/2024 Comments off

Source: MDLog:/sysadmin

We can use the iptables recent module to write some iptables rules that can block brute force attacks. In order to use this method you need a kernel and iptables installation that includesipt_recent. If your linux distribution doesn’t include the ipt_recent module or you are using a custom compiled kernel you might need to first include the iptables recent patch that can be found on the author’s website or in the iptables patch-o-matic area. If you are using Debian/Ubuntu you don’t need to do anything special as this is already included in your system.

Let’s see how we can use the iptables recent module to block brute force attacks agains ssh. Let’s see a simple example:

iptables -N SSHSCAN
iptables -A INPUT -p tcp --dport 22 -m state **--state NEW** -j SSHSCAN
iptables -A SSHSCAN -m recent --set --name SSH
iptables -A SSHSCAN -m recent --update **--seconds 300** **--hitcount 3** --name SSH -j DROP

This will basically allow only 3 NEW connections (as matched by the state NEW) in the timeframe of 300sec (5min). Any new connection will be automatically dropped.

The main disadvantage of using this method is that it will not make any distinction betweensuccessful and failed logins. If you are not careful and open too many connections yourself you might found yourself locked out. One walk-around for this issue is to whitelist our own administrative ips (still if we can do this for all the locations that need to connect to the system, then we can protect ourselves with simple firewall rules and we don’t need this added complexity). So at least for the hosts that we can (static ips) we should do this (replace with as many lines needed containing $WHITE_LIST_IP):

iptables -N SSHSCAN
** iptables -A INPUT -p tcp --dport 22 -s $WHITE_LIST_IP -j ACCEPT**
iptables -A INPUT -p tcp --dport 22 -m state --state NEW -j SSHSCAN
iptables -A SSHSCAN -m recent --set --name SSH
iptables -A SSHSCAN -m recent --update --seconds 300 --hitcount 3 --name SSH -j DROP

Even if we lock ourselves out, our existing connections will remain up since we are matching only on NEW connections. If needed we can take appropriate actions.

In case we want to have the blocked hosts logged, then we will have to add another iptables rule:

iptables -N SSHSCAN
iptables -A INPUT -p tcp --dport 22 -s $WHITE_LIST_IP -j ACCEPT
iptables -A INPUT -p tcp --dport 22 -m state --state NEW -j SSHSCAN
iptables -A SSHSCAN -m recent --set --name SSH
iptables -A SSHSCAN -m recent --update --seconds 300 --hitcount 3 --name SSH -j LOG --log-level info --log-prefix "SSH SCAN blocked: "
iptables -A SSHSCAN -m recent --update --seconds 300 --hitcount 3 --name SSH -j DROP

You can peek at the internal database kept by the module, by looking inside:/proc/net/ipt_recent/* (DEFAULT will contain default matches; in our example the name of the file is SSHSCAN):

cat /proc/net/ipt_recent/SSHSCAN

This solution is very effective and easy to implement. You just add the needed iptables rules to your existing firewall setup and you are set. Still, it has many limitations when compared with the other methods shown: like limited time frames, it will not differentiate against failed/successful logins, etc.

References:  http://www.netfilter.org/documentation/HOWTO/netfilter-extensions-HOWTO-3.html#ss3.16

Connect to Blocked Ports with SSH Tunneling

13/06/2024 Comments off

SSH Tunneling – Get Through Your Firewall to Other Ports

http://www.uptimemadeeasy.com/wp-content/uploads/2014/02/SSH_Traffic_Only.jpg

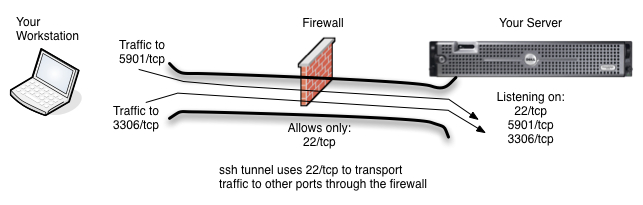
Typical Scenario is that only the ssh port (tcp/22) and http (tcp/80) are allowed into a machine. All other traffic is blocked.

Do you have a server on the other side of a firewall that you can ssh to, but to which you cannot reach on other ports. Let’s imagine, for example, that your server has ports 80/tcp and 22/tcp open, but you want to be able to get to your database port (3306/tcp) or your vnc port (5901/tcp) which are blocked by the firewall. Grr. What can you do? Use ssh tunneling, of course.

SSH Tunneling is Similar to VPN

http://www.uptimemadeeasy.com/wp-content/uploads/2014/02/ssh_tunnel.jpg

Ssh allows you to tunnel traffic to other ports through the firewall using your ssh Connection

Ssh allows you to tunnel your communication to other ports and services on your server through your ssh connection to the server.  This means that traffic that would normally be blocked by your firewall or iptables can now reach its destination.  This of course, all assumes that you have a login to the server and are able to ssh to it from your network or internet location.

SSH Tunneling Uses a Local Port

The idea behind ssh tunneling is that you know which port(s) you want to access on the server and that you also setup a local port on your workstation for you to connect to on your side of the tunnel.  When using SSH Tunneling, you will direct your client applications, in this example case MySQL Workbench and VNC Viewer, to the local ports on your workstation which you configured in your ssh client.  SSH will then transport the traffic to the local port through its tunnel to the server port you are hoping to reach.

Ssh Command Line (CLI) Port Configuration

When using ssh from the command line in a linux, unix, OSX or other command line environment, you will use the -L option to map local ports to remote ports on the server.  In the example below, Mary is logging in to server1.uptimemadeeasy.com with ssh and is mapping local port 8675 on her workstation to the MySQL port (tcp/3306) on the server.  Note that the name localhost is in reference to server1.uptimemadeeasy.com.

ssh -l mary server1.uptimemadeeasy.com -L 8675:localhost:3306

Mary will then supply the password when requested and she will notice with netstat -an that port 8675 on her local workstation is now being used.  She can then point her MySQL Workbench client at her local machine (localhost) port 8675.  Her traffic to her local port 8675 will then be transported through her ssh tunnel to the server port 3306.
Mary can now verify that her local port (8675) is listening locally using netstat:

$ netstat -an | grep 8675
TCP 127.0.0.1:8675 0.0.0.0:0 LISTENING
TCP [::1]:8675 [::]:0 LISTENING

We get output telling us that the local workstation is now listening on port 8675 on both ipv4 and ipv6. Lire la suite…

Categories: Réseau, Système Tags: , ,