Archive

Articles taggués ‘firewall’

How to save rules of the iptables?

24/01/2021 Comments off
iptables-save

Saving iptables rules for reboot

On a server, iptables rules don’t reload automatically at reboot. You need to reload the rules using ax executable shell scripture a dedicated utility that will load them at the same time as the program itself, i.e. with the kernel.

Depending of the version of Linux you use, you can select different methods:

sudo su
iptables-save > /etc/iptables.rules

In /etc/network/if-pre-up.d/iptables, put:

#!/bin/sh
iptables-restore < /etc/iptables.rules
exit 0

After, in /etc/network/if-post-down.d/iptables, put:

#!/bin/sh
iptables-save -c > /etc/iptables.rules
if [ -f /etc/iptables.rules ];
       then iptables-restore < /etc/iptables.rules
fi
exit 0

After, give permission to the scripts:

sudo chmod +x /etc/network/if-post-down.d/iptables sudo chmod +x /etc/network/if-pre-up.d/iptables

Another scenario is to is to install iptables-persistent:

sudo apt-get install iptables-persistent

After it’s installed, you can save/reload iptables rules anytime:

    sudo /etc/init.d/iptables-persistent save 
    sudo /etc/init.d/iptables-persistent reload

Or if you use Ubuntu server 16.04, things are simpler:

The installation as described above works without a problem, but the two commands for saving and reloading above do not seem to work with a 16.04 server. The following commands work with that version:

    sudo netfilter-persistent save
    sudo netfilter-persistent reload

Tutorial: Using VMWare ESXi and PFsense as a network firewall/router

01/01/2021 Comments off

vmware esxi

Using VMWare ESXi and PFsense as a network firewall/router

In most networks, you will have dedicated hardware to function as your “edge” (firewall/router). This is typically for the best, but there are always cases where you can’t put out that dedicated hardware. Sometimes it’s for cost reasons and sometimes it’s for complexity. In my particular case, I was installing an ESXi server in a datacenter and only had 2 amps of power to work with, of which my server took up ~1.8amps at peak load. So cost came into play and we simply couldn’t afford to put in dedicated hardware that could push enough bits. In such cases, it is possible the setup ESXi on the network edge, in a reasonably secure fashion, with PFSense acting as a firewall.

vmware_vsphereThe most important requirement to this project is that your VMWare ESXi server has at least two network ports on it. One will be the WAN port, one will be the LAN port. Also throughout this tutorial I will use PFSense as my firewall/router OS of choice, however it is just an example that can be easily swapped out with any other virtualized firewall product. Some options include Palo Alto Networks, Fortinet, and even generic *NIX operating systems with the right forwarding/firewall setup.

Section 1 – VMWare Setup

Step 1 – Install & Connect to ESXi

  • You should already have ESXi setup and connected via the VSphere client on Windows.
  • It’s recommended that you static the IP address of the VMWare Management interface, if you’ve not done so already.
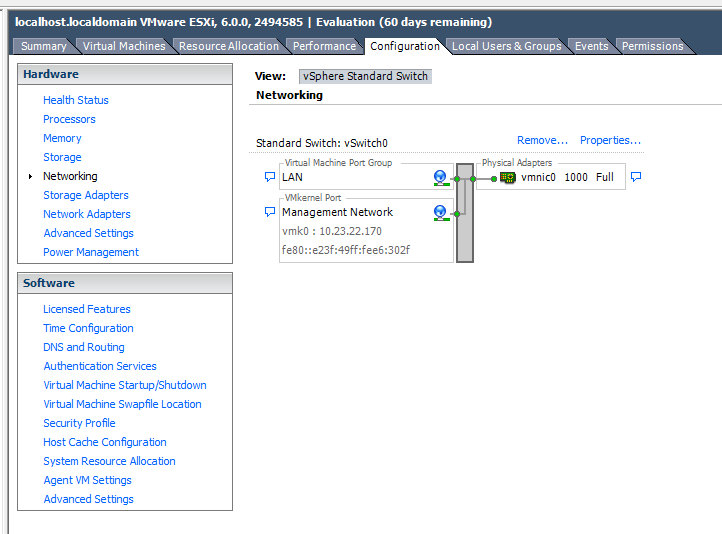
  • Go to Configuration > Networking
  • Rename the vSwitch interface you’re using to “LAN”
2015-08-25-18_23_50-esxi1
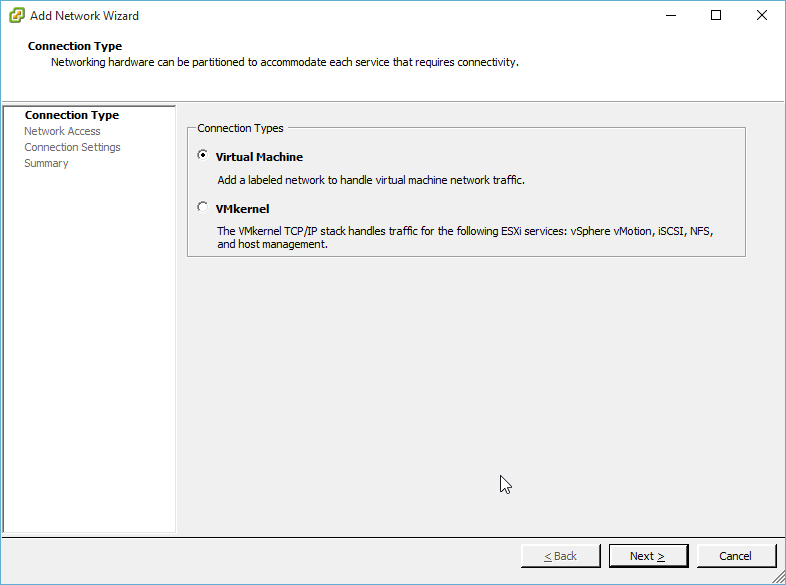
Step 2 – Add new interface
You want “Virtual Machine” type
2015-08-25-18_24_15-Add-Network-Wizard
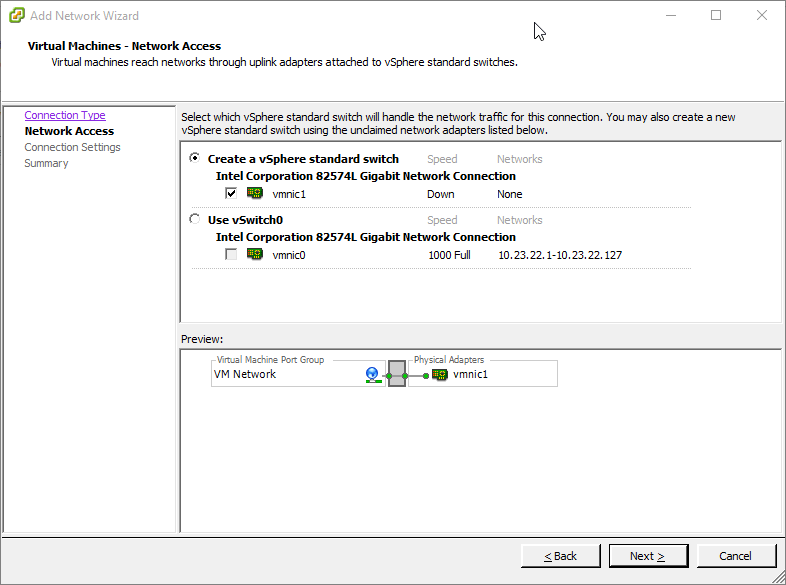
Step 3 – Select NIC
You want to select your unused NIC (assuming you only have two)
2015-08-25-18_25_11-Add-Network-Wizard
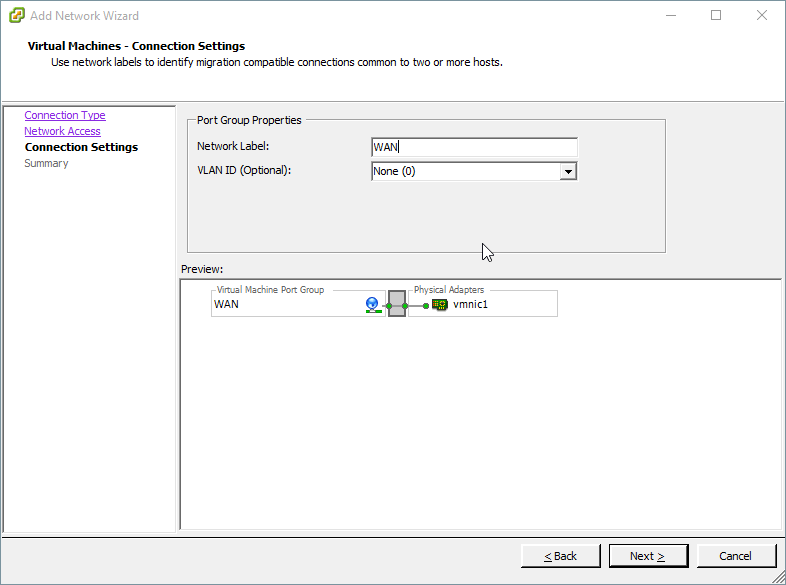
Step 4 – Name it
This is your “WAN” interface
2015-08-25-18_25_35-Add-Network-Wizard
Step 5 – Confirm you’ve got two networks
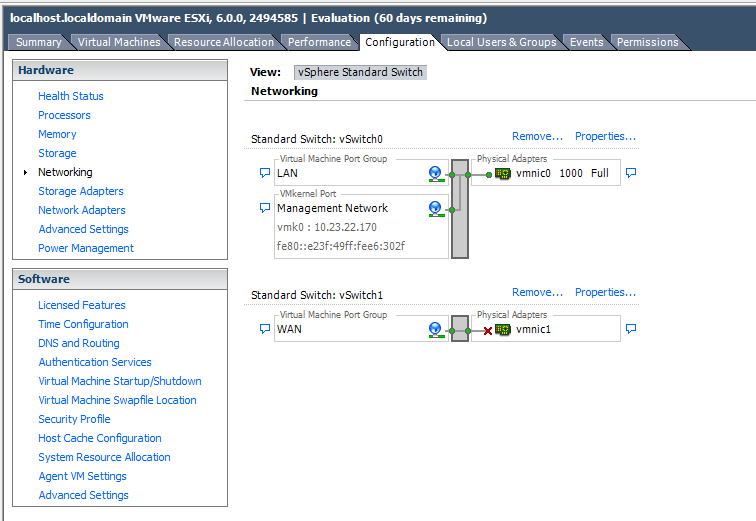
You’ll notice that we’ve got two vSwitches now. The “LAN” switch has the Management network and is connected currently. The “WAN” switch has nothing, and the adapter is disconnected.
2015-08-25-18_26_06-VMware

Section 2 – Virtual Machine Setup

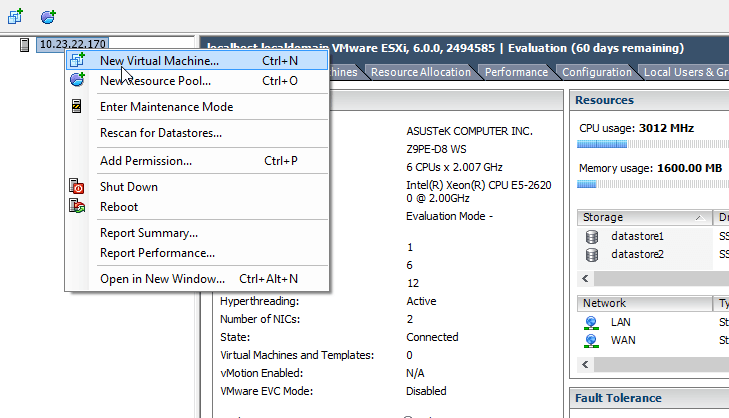
Step 1 – New VM2015-08-25-18_29_17-New-VM
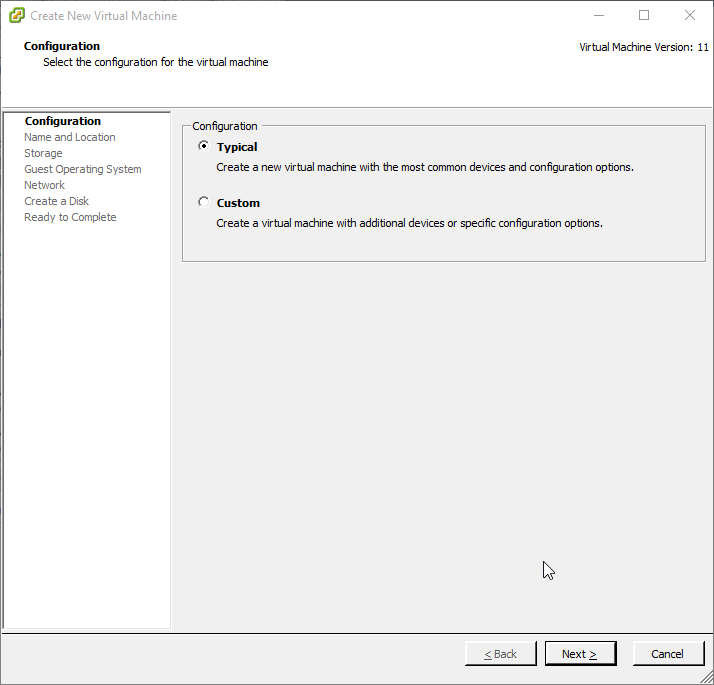
Step 2 – Typical Setup2015-08-25-18_29_31-Create-New-Virtual-Machine
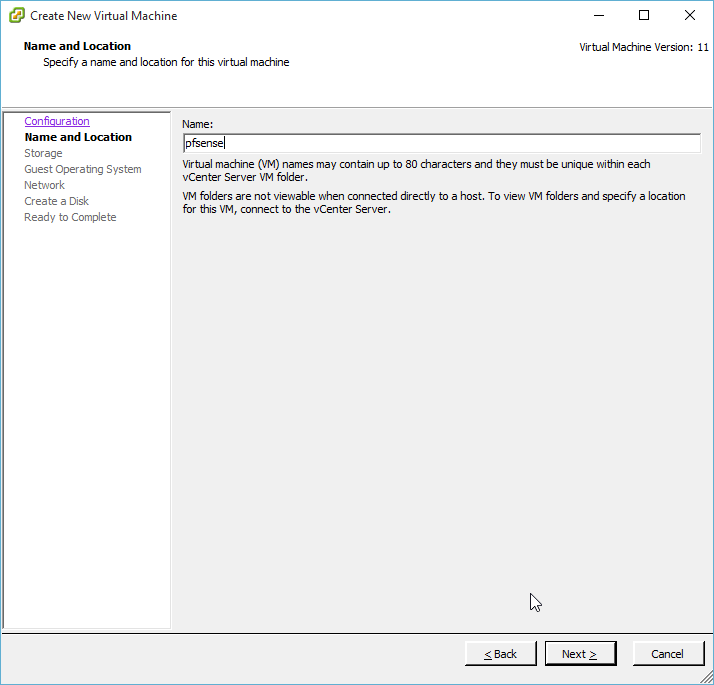
Step 3 – Name your VM2015-08-25-18_29_39-Create-New-Virtual-Machine
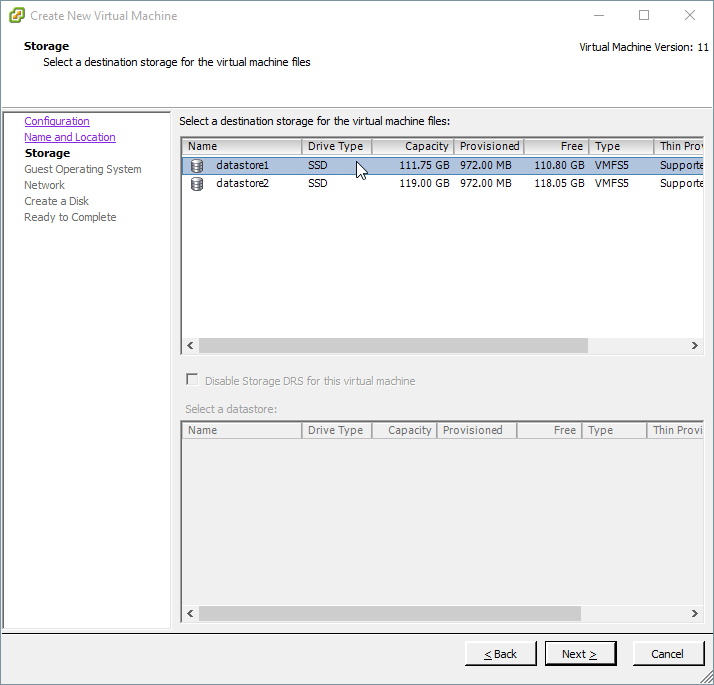
Step 4 – Select Datastore2015-08-25-18_29_46-Create-New-Virtual-Machine
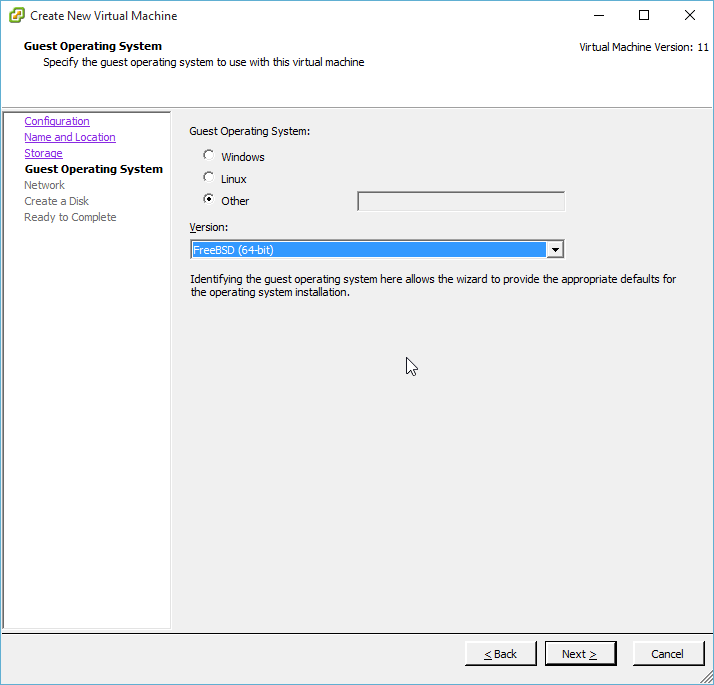
Step 5 – OS Type
If you’re using PFSense, select “Other” and “FreeBSD 64bit”
2015-08-25-18_29_57-Create-New-Virtual-Machine
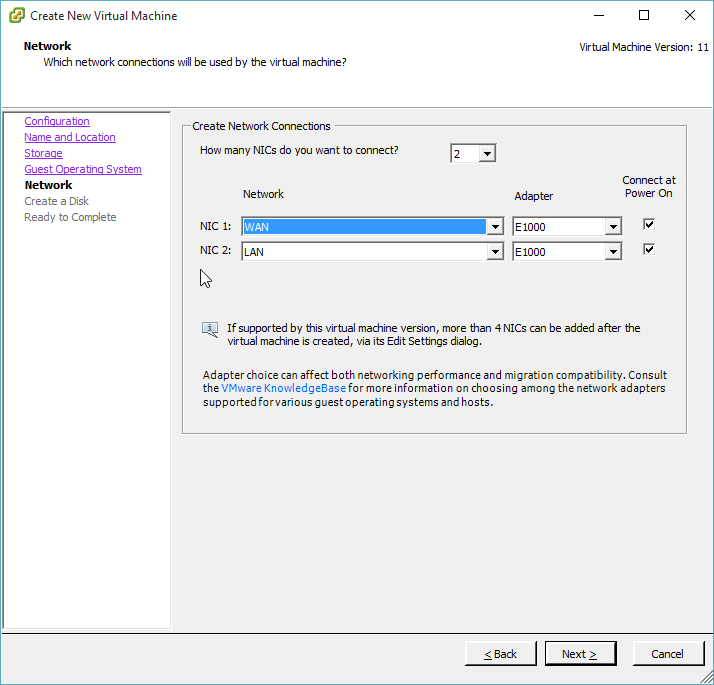
Step 6 – Two NICs
Unlike most VMs with 1 NIC, add 2 NICs to this VM.
Make sure one adapter is on “WAN” network and one adapter is on “LAN” network.
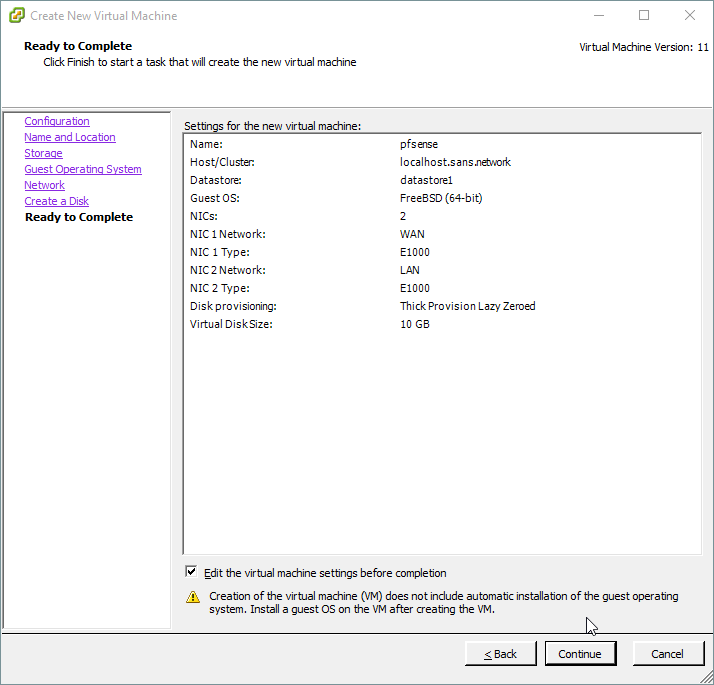
2015-08-25-18_30_18-Create-New-Virtual-Machine
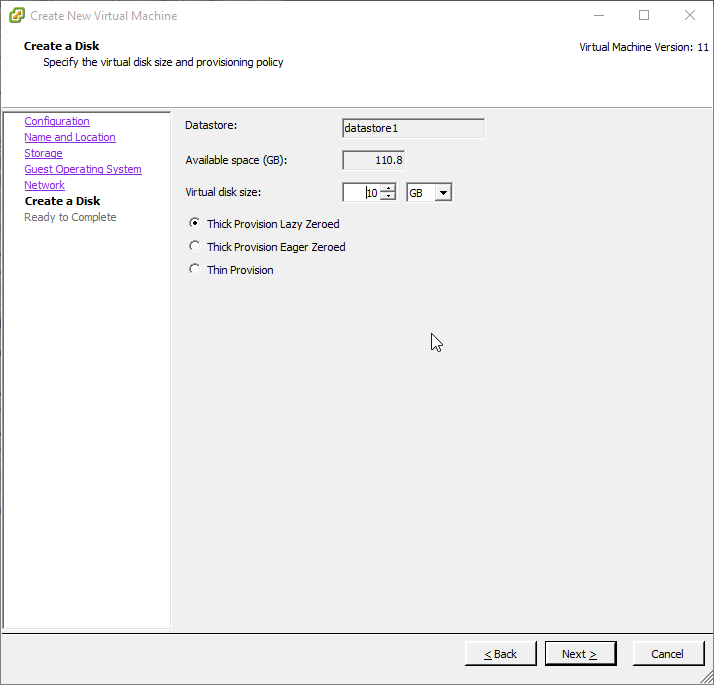
Step 7 – Allocated HD
PFSense doesn’t need much space, but it should be allocated a 2:1 for swap (e.g. 4096 MB swap file for 2048 MB of RAM), plus some extra space for packages and logs may be useful.
2015-08-25-18_30_38-Create-New-Virtual-Machine
Step 8 – Edit before completion2015-08-25-18_30_46-Create-New-Virtual-Machine
Step 9 – Final settings
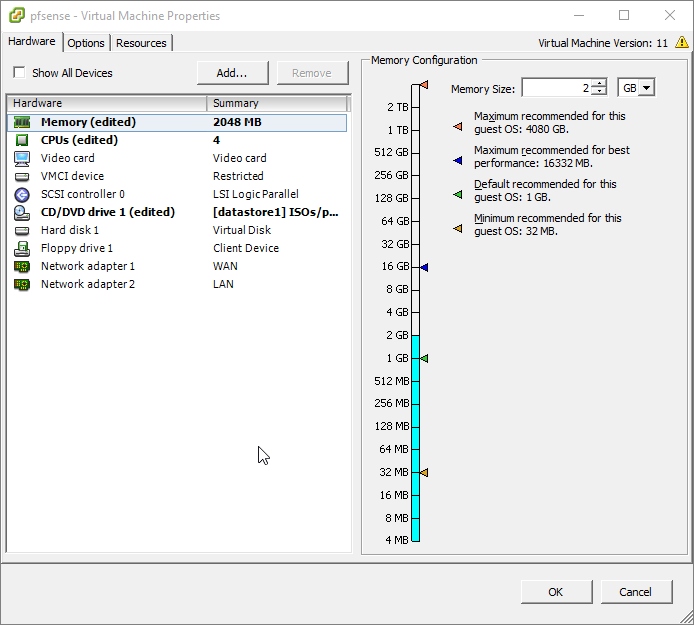
As this is my firewall, I want to make sure it is plenty fast. So I opted for 4 cores and 2 GB RAM. Also attach the CD drive to PFSense installer (be it datastore ISO or real USB/Optical drive).
2015-08-25-18_31_54-pfsense-Virtual-Machine-Properties
Step 8 – Verify Network
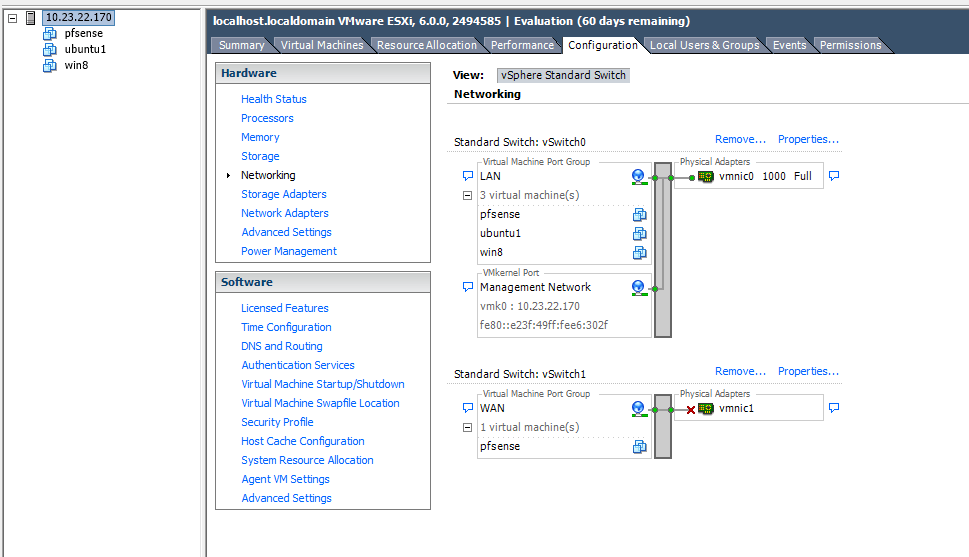
Hop back to Configuration > Networking and you should see something like this. Note: various VMs are all attached to the LAN vSwitch, however only PFsense VM is attached to both WAN & LAN (just like a real firewall).
2015-08-25-18_33_31-VMWare-Verify
Step 9 – VM Startup
Go to Configuration > VM Startup/Shutdown
Click Properties
2015-08-31-12_30_32-Store
Step 10 – Set PFSense to first boot order
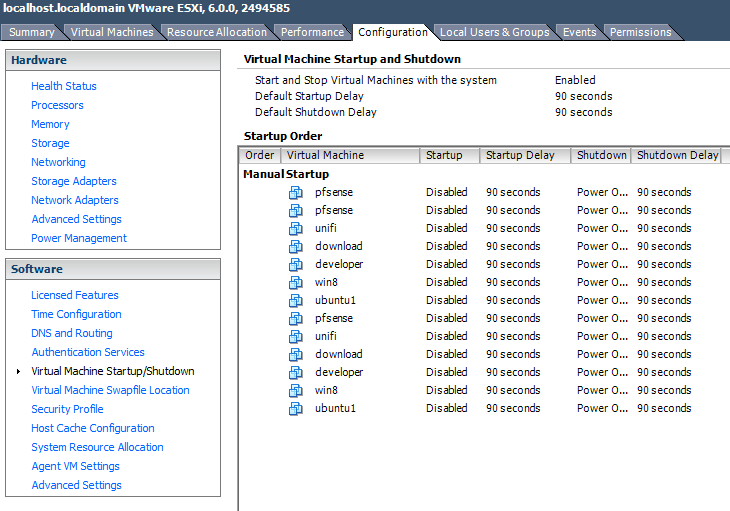
You may have other VMs that you want to auto-start, but as this is your firewall, it should be the first to start.
2015-08-31-12_31_05-Virtual-Machine-Startup-and-Shutdown

Section 3 – PFSense

Step 1 – Install PFSense
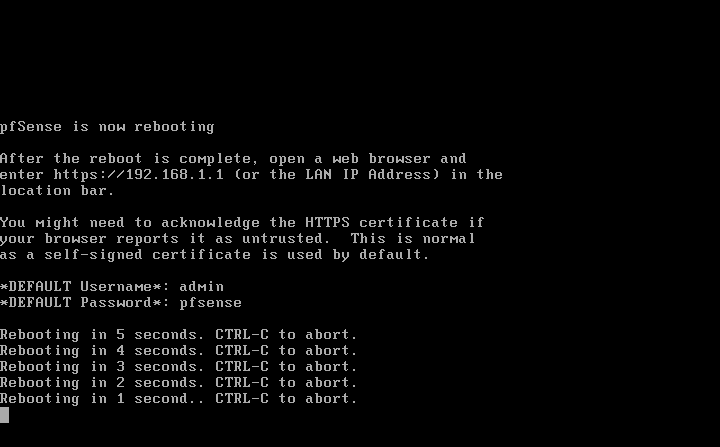
Once you’ve installed PFSense, it will automatically configure its local interface to 192.168.1.1
pfsense-install1
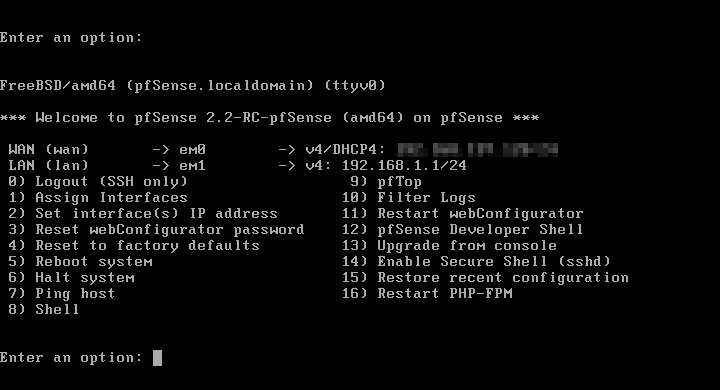
Step 2 (Optional) – Change local network
You can reconfigure the local network either via web interface (at the aforementioned IP: http://192.168.1.1) or command line
pfsense-installer
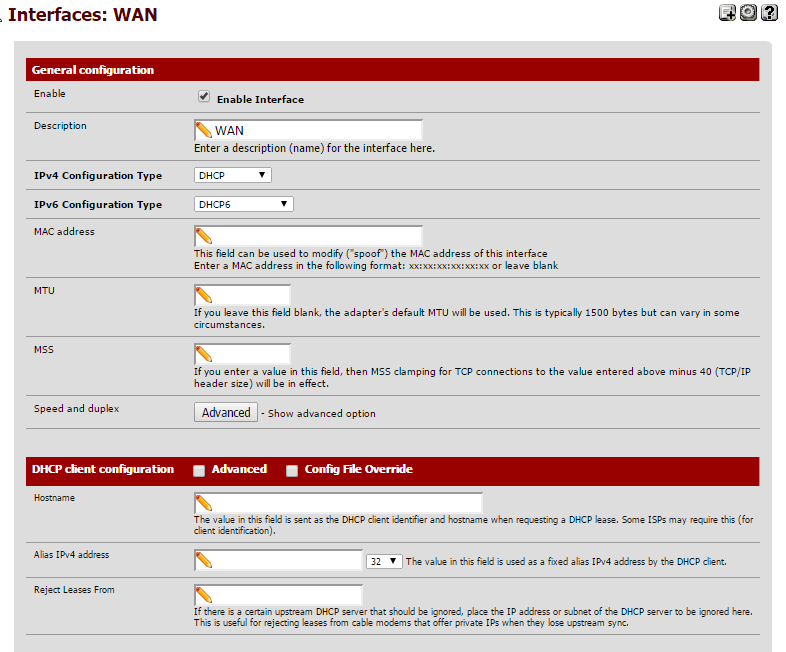
Step 3 – Configure WAN
Again, this can be configured either via the web, or command line.
2015-08-31-12_19_39-pfSense-Interfaces_-WAN
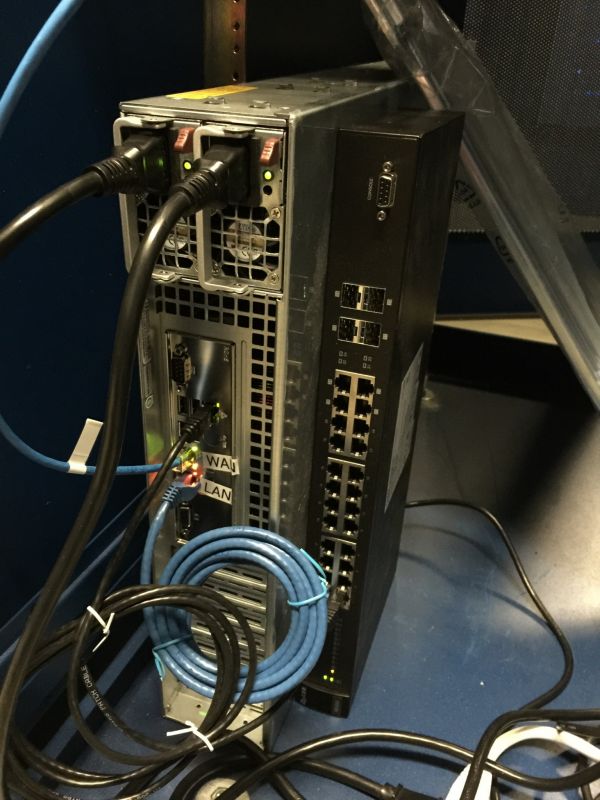
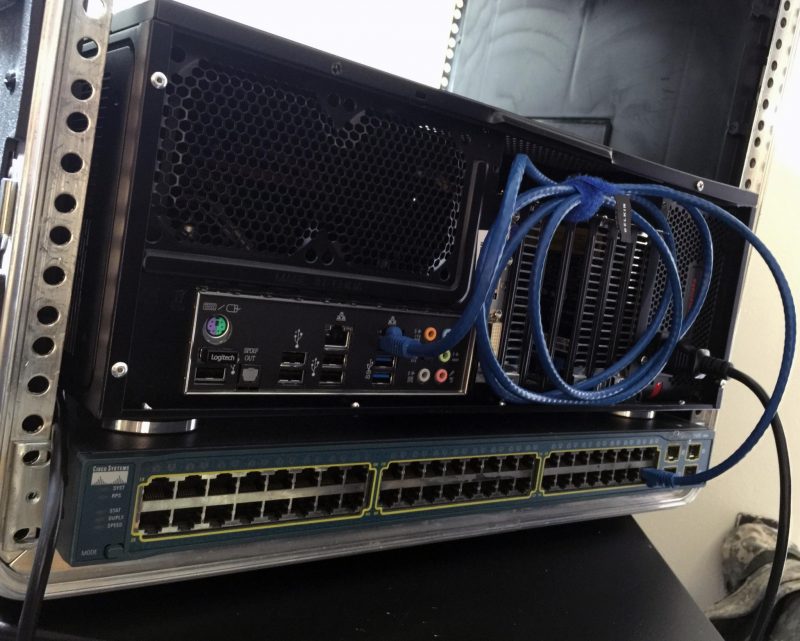
Step 4 – Plug in WAN cable2015-08-19-13.59.53
Step 5 – Test
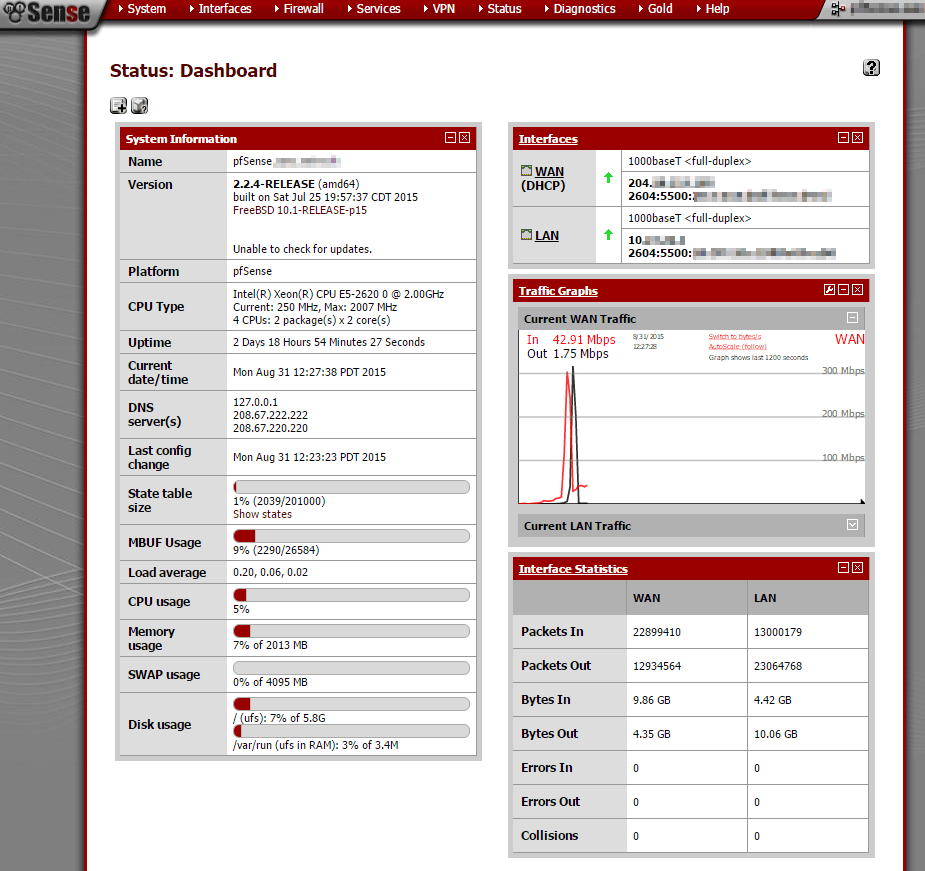
If you’ve got the ports configured properly (i.e. WAN hardware is WAN in VMWare and WAN in PFSense), you should be able to connect to the internet.
2015-08-31-12_27_35-pfSense-Status_-Dashboard

There are two big questions after building a setup like this, the first is security. Since PFSense is the host to provide an interface on the WAN, it should be the only method of ingress into your network. With no VMware management interface on the WAN, there should be no way for an outside party to access ESXi directly. I’ve used this setup successfully (and safely) before, as have others. However, you always need to balance your particular security concerns with the cost of dedicated devices.

The second question is remote management/maintenance/failure. Managing ESXi remotely is easy, if you setup a VPN on your PFSense VM. Without that (or similar) you will not be able to remotely manage the box (by design). But what happens if there is a failure either in the VMWare hardware or the PFSense virtual machine? That’s the big failing point of this setup – you’re down. If, for whatever reason, PFsense dies – your network is offline and you cannot remotely manage it. If this hardware is installed in a dateacenter, you’d need to either get in there yourself or remote hands reboot. Something to keep in mind when balancing the cost issue. OF course, if it’s local (say you use this at home), then it’s not such a big deal.
IMG_07121I will note that this is the setup I use in my home network, which doubles as my homelab. Having a VM for a firewall gives me a lot of flexibility, like adding an entirely separate vSwitched network for experimental VMs. I can also swap out the firewall VM for another one with next to no downtime. It also allows me to skip one more piece of hardware at home which would add to my otherwise hefty powerbill.

Source: obviate.io

Categories: Réseau, Sécurité, Tutoriel Tags:

Change the firewall manually to make your Synology more safe!

08/03/2016 Comments off

Source: Changzhou Chen

The default firewall in the Control Panel is so poor because of the poor design of Synology’s firewall policy. You can not use the white list in the global environment if you have both IPv4 or IPv6 network environment. To decrease the risk of being hacked, I’ve decided to change the firewall manually. We should use iptables and ip6tables to change both IPv4 and IPv6 firewall. If you don’t have the need for IPv6 network environment, you can ignore the ip6tables part.

Warning: If you don’t have enough IT experience, you should run the following sections carefully. Maybe you will lose your connection to your Synology and find it hard to connect to it again.

I wrote some IPv4 rules, the following code section is part of the rule file, you can run the iptables-save to export the rule file:

DiskStation> iptables-save > ipv4
# For your simple reference, I delete the
# unuseful part of rule file which exported by iptables-save. The following
# part is completely different from the file exported by iptables-save.
DiskStation> cat ipv4
*filter
:INPUT DROP # Drops all inbound connections that doesn't use the following rules
:FORWARD ACCEPT # It may be default, you can ignore it
:OUTPUT ACCEPT # It may be default, you can ignore it
-A INPUT -i lo -j ACCEPT # Allows all loopback (lo0) traffic
-A INPUT -m state --state ESTABLISHED,RELATED -j ACCEPT # Accepts all established inbound connections
-A INPUT -s 192.168.1.1/255.255.255.0 -j ACCEPT # Allows your Intranet inbound connections
-A INPUT -s 1.2.3.4 -j ACCEPT # Allows the specified ip address inbound connections
COMMIT

After run the iptables-restore and iptables -L, you can see the following result:

DiskStation> iptables-restore < ipv4
DiskStation> iptables -L
Chain INPUT (policy DROP)
target     prot opt source               destination
DEFAULT_INPUT  all  --  anywhere             anywhere
Chain FORWARD (policy ACCEPT)
target     prot opt source               destination
Chain OUTPUT (policy ACCEPT)
target     prot opt source               destination
Chain DEFAULT_INPUT (1 references)
target     prot opt source               destination
ACCEPT     all  --  anywhere             anywhere
ACCEPT     all  --  anywhere             anywhere             state RELATED,ESTABLISHED
ACCEPT     all  --  192.168.1.0/24       anywhere
ACCEPT     all  --  1.2.3.4              anywhere

Lire la suite…