Archive

Articles taggués ‘firewall’

What is a Distributed Firewall?

24/11/2023 Comments off

In the post “What is Network Virtualization?” I described a model where the application’s complete L2-L7 virtual network is decoupled from hardware and moved into a software abstraction layer for the express purpose of automation and business agility. In this post I’ll focus on network security, and describe an imminent firewall form factor enabled by Network Virtualization — the Distributed Firewall.

ALL YOUR PACKET ARE BELONG TO US

If InfoSec ruled the world … well, OK, maybe not the world … if InfoSec ruled the data center network design, and if money was no object, we would probably have something like this. Every server in the data center directly connected to its own port on one massive firewall. Every packet sent from every server would be inspected against a stateful security policy before going anywhere. And every packet received by every server would pass one final policy check before hitting the server’s NIC receive buffer. The firewall wouldn’t care about the IP address of the servers, for the simple reason that it’s directly connected to every server. E.g. “The server on this port can talk to the server on that port, on TCP port X”. And if that wasn’t good enough, the firewall knows everything about the servers connected to it, and can create rules around a rich set of semantics. All of this with no performance penalty. That would be awesome, right?

Let’s pretend money was not the issue. How would you design this massive omnipresent data center firewall? I can think of three ways off hand.

  1. You design a monstrous power sucking stateful firewall chassis with thousands of line-rate ports. At this point it’s time to route a ghastly mess of cables from every server to this centralized mega firewall core chassis – but that’s somebody else’s problem. Oh, and don’t forget you’ll need two of those bad boys for “redundancy”. Your monster firewall is pretty freaking awesome at security, but only so-so at basic L2 and L3 networking. But so what — the network team can learn to like it or find a new job. And if you run out of ports … no worries; just wait another few years for a bigger chassis and do the rip/replace routine.
  2. You design a line rate stateful firewall ToR switch. Rip out the network team’s favorite ToR and put this one in its place. Tell them to stop throwing a fit and just deal with it. You’ll have hundreds of these ToR firewalls to manage and configure consistently. No problem … just let the network team re-apply for their jobs as firewall engineers.

Go ahead and pinch yourself now. This is nothing but a fantasy nightmare.

The interests of security often poorly translate into networking. Comprehensive security ~= Compromisednetworking.

What about design #3? More on that in a minute. (Hint: title of the post)

In the real world, rest assured we do have firewalls to provide some security. But this security is not ubiquitous, nor is it assured. Instead, we have firewalls (physical or virtual) hanging off the network somewhere catching steered packets – and we can only hope the network was configured correctly to steer the right traffic to the right policy.

In this post we’ll briefly review the physical and virtual firewall, followed by a discussion on the Distributed Firewall.
Lire la suite…

Categories: Logiciel, Réseau Tags:

Change the IPTables log file

21/11/2023 Comments off

An important aspect of any firewall are the log files. Iptables on Linux provides logging functionality, however by default, it will get outputted to the /var/log/messages log file. This can clutter things up, and make it hard to check the logs.

If you want to change the file that IPTables logs to, you need to set up your iptables rules to output a log prefix. Rsyslog will then be configured to pick up this prefix, and output the information to a custom log file, containing just the iptables log information.
Install rsyslog if it is not already installed.

$ sudo apt-get install -y rsyslog

Lire la suite…

Categories: Réseau, Système Tags: , , ,

Voyage au centre du noyau: Traffic Control, la QoS

18/11/2023 Comments off

Gérer la QoS.

On peut aujourd’hui largement envisager d’héberger un ou plusieurs services sur son serveur à domicile, et des mouvements comme auto-hebergement.fr l’on bien illustré. Reste le problème de la bande passante en upload, qui bien que largement suffisante pour héberger des serveurs web, email, jabber ou autre, reste à utiliser intelligemment.

Linux fournit cette intelligence, sous forme d’un scheduler de paquets nommé Traffic Control (TC, pour les intimes), et l’objectif de cet article est de présenter cette technologie et sa mise en place dans un cas d’étude d’hébergement Web, DNS et même BitTorrent. Notons au passage que bon nombre de scripts et programmes existent pour simplifier la mise en place de la QoS (Quality of Service). Citons Wondershaper, Shorewall, ADSL-Optimizer par exemple. Cet article n’en parlera pas, car l’objectif est ici de faire mais aussi de comprendre comment ça marche sous le capot, et pour ça, il faut démonter le moteur et mettre les mains dans le cambouis.

1. Traffic Control, la QoS, les bases

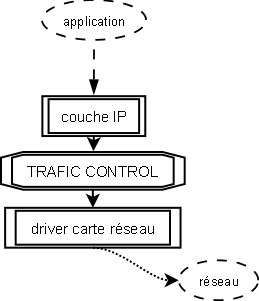
Traffic Control travaille sur les paquets sortant du noyau. Il n’a pas, initialement, pour objectif de contrôler le trafic des paquets entrants. Cette portion de code du noyau se situe entre la couche IP et le pilote du matériel qui transmet sur le réseau. On est donc très bas dans les couches. En réalité, c’est Traffic Control qui est constamment en charge de transmettre au driver de la carte réseau le paquet à envoyer.

figure1-tcgeneral

Cela signifie, en fait, que le module TC – le scheduler de paquet – est en permanence activé dans le noyau, même quand vous ne pensez pas l’utiliser. Par défaut, ce scheduler maintient une queue (prononcer kiou, une file d’attente) similaire à FIFO dans laquelle le premier paquet entré est donc le premier sortit.

La base de TC est la Queuing Discipline (qdisc) qui représente la politique de scheduling appliquée à une queue. Il existe différentes qdisc. Comme pour le scheduling processeur, on retrouve les méthodes FIFO, FIFO à plusieurs files, FIFO avec hash et round robin (SFQ). On a également un système Token Bucket Filter (TBF) qui attribue des jetons (tokens) à une qdisc pour en limiter le débit (pas de token = pas de transmission = on attend d’avoir un jeton disponible). Cette dernière politique a ensuite été étendue à un TBF hiérarchique, le HTB (Hierarchical Token Bucket). Les politiques que nous allons étudier ici sont TBF, qui pose les fondamentaux, SFQ et HTB. Nous allons également jeter un coup d’oeil à la politique par défaut, que, tout Monsieur Jourdain que nous sommes, nous utilisons sans le savoir: pfifo_fast.

1.1 Premier contact

Jean-Kevin est pressé, il n’a pas de temps à perdre, et tout de suite maintenant, il doit limiter la bande passante sortante de son serveur web à 200kbits par secondes (25ko/s). Au diable la théorie, on y reviendra plus tard, mettons tout de suite les mains dans le cambouis. La mécanique que nous allons mettre en place est simple. Nous allons utiliser une règle Netfilter pour marquer les paquets qui nous intéressent. Ensuite, nous allons fournir à TC une politique qui s’appliquera sur les paquets contenant la marque définie. C’est parti.

1.2 Netfilter MARK

Netfilter permet d’interagir directement avec la structure représentant un paquet dans le noyau. Cette structure, le sk_buff, possède un champ « __u32 nfmark » que l’on va renseigner et qui sera lu par le filtre de TC pour sélectionner la classe de destination du paquet. La règle iptables suivante va appliquer la marque ’80’ sur les paquets sortant (chaine OUTPUT) ayant pour port source le port 80:

# iptables -t mangle -A OUTPUT -o eth0 -p tcp --sport 80 -j MARK --set-mark 80

On peut vérifier que cette règle est bien appliquée aux paquets sortants en visualisant les statistiques de Netfilter.

# iptables -L OUTPUT -t mangle -v
Chain OUTPUT (policy ACCEPT 74107 packets, 109M bytes)
 pkts bytes target prot opt in  out  source   destination
73896  109M MARK   tcp  --  any eth0 anywhere anywhere    tcp spt:www MARK xset 0x50/0xffffffff

1.3 Deux classes dans un arbre

Le binaire /sbin/tc est compris dans le package iproute (sous Debian). Un simple aptitude suffit à l’installer, s’il ne l’est pas déjà. Nous allons créer un arbre dont la racine appliquera la politique HTB. Cet arbre va contenir deux classes: une pour notre trafic marqué, l’autre pour tout le reste et qui sera donc considérée par défaut.

# tc qdisc add dev eth0 root handle 1: htb default 20
# tc class add dev eth0 parent 1:0 classid 1:10 htb rate 200kbit ceil 200kbit prio 1 mtu 1500
# tc class add dev eth0 parent 1:0 classid 1:20 htb rate 1024kbit ceil 1024kbit prio 2 mtu 1500

Les deux classes filles sont raccrochés à la racine. Ces classes possèdent un débit garantie (rate) et un débit maximal opportuniste (ceil). Si la bande passante n’est pas utilisée, alors une classe pourra monter son débit jusqu’à la valeur de ceil. Sinon c’est la valeur de rate qui s’applique. Cela veut dire que la somme des valeurs de rate doit correspondre à la bande passante disponible. Dans le cas d’un upload ADSL classique chez un fournisseur correct, cela sera d’environ 1024kbits (dans le meilleur des cas, éloignement du DSLAM, etc…).

Nous avons maintenant d’un côté un arbre de contrôle de trafic, et d’un autre côté du marquage de paquets. Il reste donc à relier les deux. Cela est fait avec les règles de filtrage de TC. Ces règles sont très simples. On dit à TC de prendre en charge (handle) les paquets portant la marque 80 et de les envoyer (fw flowid) à la classe correspondante. Un point important toutefois, un filtre doit être rattaché à la racine « root » de l’arbre. Sinon, il n’est pas pris en compte.

# tc filter add dev eth0 parent 1:0 protocol ip prio 1 handle 80 fw flowid 1:10

Faisons maintenant le test avec NetCat, on ouvre un port en écoute qui renvoi des zéro. C’est basique et parfait pour tester notre politique. On lance donc :

# nc -l -p 80 < /dev/zero

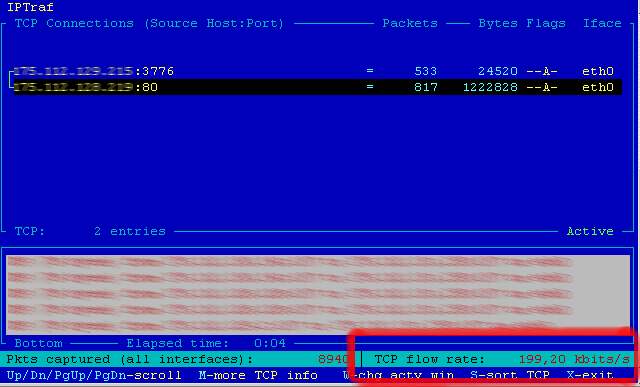
Et sur une autre machine, on lance un telnet vers le port 80 de la machine en écoute. L’outil iptraf permet de visualiser la connexion en cours et, surtout, son débit (voir figure 2).

figure2-debitqos

Comme on le voit dans l’encadré rouge, en bas à droite, le débit de la connexion est de 199,20kbps. On s’approche de beaucoup des 200kbps, la précision dépendant quelques paramètres que nous allons étudier. Si l’on teste une connexion du même type sur un autre port, on verra un débit limité à 1024kbps, ce qui correspond au débit de la classe par défaut qui s’applique à tous les paquets non marqués.

Lire la suite…

SIP Server IPTABLES Sample firewall Rules !

15/11/2023 Comments off

SIP Server protection

IPtables rules

iptables -I INPUT -p udp -m udp –dport 5060 -m string –string "REGISTER sip:" –algo bm -m recent –set –name VOIP –rsource
iptables -I INPUT -p udp -m udp –dport 5060 -m string –string "REGISTER sip:" –algo bm -m recent –update –seconds 60 –hitcount 12 –rttl –name VOIP –rsource -j DROP
iptables -I INPUT -p udp -m udp –dport 5060 -m string –string "INVITE sip:" –algo bm -m recent –set –name VOIPINV –rsource
iptables -I INPUT -p udp -m udp –dport 5060 -m string –string "INVITE sip:" –algo bm -m recent –update –seconds 60 –hitcount 12 –rttl –name VOIPINV –rsource -j DROP
iptables -I INPUT -p udp -m hashlimit –hashlimit 6/sec –hashlimit-mode srcip,dstport –hashlimit-name tunnel_limit -m udp –dport 5060 -j ACCEPT
iptables -I INPUT -p udp -m udp –dport 5060 -j DROP

# RTP – the media stream
# (related to the port range in /etc/asterisk/rtp.conf)
iptables -A INPUT -p udp -m udp –dport 10000:20000 -j ACCEPT

# MGCP – if you use media gateway control protocol in your configuration
iptables -A INPUT -p udp -m udp –dport 2727 -j ACCEPT

Sample script

#!/bin/bash
EXIF="eth0"
# Clear any existing firewall stuff before we start
/sbin/iptables –flush
# As the default policies, drop all incoming traffic but allow all
# outgoing traffic. This will allow us to make outgoing connections
# from any port, but will only allow incoming connections on the ports
# specified below.
# Allow connections from my machines
/sbin/iptables -A INPUT -p tcp -i $EXIF -m state –state NEW -s 109.161.251.214 -j ACCEPT
/sbin/iptables –policy INPUT DROP
/sbin/iptables –policy OUTPUT ACCEPT
# Allow all incoming traffic if it is coming from the local loopback device
/sbin/iptables -A INPUT -i lo -j ACCEPT
# Accept all incoming traffic associated with an established connection, or a "related" connection
/sbin/iptables -A INPUT -i $EXIF -m state –state ESTABLISHED,RELATED -j ACCEPT
# Check new packets are SYN packets for syn-flood protection
/sbin/iptables -A INPUT -p tcp ! –syn -m state –state NEW -j DROP
# Drop fragmented packets
/sbin/iptables -A INPUT -f -j DROP
# Drop malformed XMAS packets
/sbin/iptables -A INPUT -p tcp –tcp-flags ALL ALL -j DROP
# Drop null packets
/sbin/iptables -A INPUT -p tcp –tcp-flags ALL NONE -j DROP
# Allow connections to port (4501) – ssh. You can add other ports you need in here
/sbin/iptables -A INPUT -p tcp -i $EXIF –dport 4501 -m state –state NEW -j ACCEPT
# Allow connections to port (4500) – Webmin . You can add other ports you need in here
/sbin/iptables -A INPUT -p tcp -i $EXIF –dport 4500 -m state –state NEW -j ACCEPT
# Allow connections to port (80&443) – www. You can add other ports you need in here
/sbin/iptables -A INPUT -p tcp -i $EXIF –dport 80 -m state –state NEW -j ACCEPT
/sbin/iptables -A INPUT -p tcp -i $EXIF –dport 443 -m state –state NEW -j ACCEPT
# Allow connections from my machines
/sbin/iptables -A INPUT -p tcp -i $EXIF -m state –state NEW -s 80.241.212.93 -j ACCEPT
# Allow SIP connections
/sbin/iptables -A INPUT -p udp -i $EXIF –dport 5060 -m udp -j ACCEPT
/sbin/iptables -A INPUT -p tcp -i $EXIF –dport 5060 -m tcp -j ACCEPT
/sbin/iptables -A INPUT -p udp -i $EXIF –dport 10000:20000 -m udp -j ACCEPT
# Allow icmp input so that people can ping us
/sbin/iptables -A INPUT -p icmp –icmp-type 8 -m state –state NEW -j ACCEPT
# Log then drop any packets that are not allowed. You will probably want to turn off the logging
#/sbin/iptables -A INPUT -j LOG
/sbin/iptables -A INPUT -j REJECT

Source: Ahmad Sabry ElGendi

http://sysadminman.net/blog/2008/iptables-for-asterisk-49

http://www.voip-info.org/wiki/view/Asterisk+firewall+rules

Categories: Réseau, Sécurité Tags: ,

Neat tricks with iptables

10/11/2023 Comments off

tricks iptablesNeat tricks with iptables: The past few months have seen me digging deep into the world of TCP/IP and firewalls. It has been a fascinating journey into packet queueing and TCP headers, three-way handshakes and ICMP broadcasts.

The result of this research has been the ongoing creation of a firewall to protect my laptop against open networks, and my Internet server from port scanning and DoS attacks. I’m pretty certain I haven’t even scratched the surface yet, but I have found some settings to protect against the most common attacks. Below I’ll summarize the major pieces of my new firewall, and the logic behind it.

Address spoofing: win with iptables

The easiest way to fool a server is to construct a packet that whose source address is faked, or spoofed. This is surprisingly easy to do. To craft packets, I use a very powerful network analysis tool called Scapy. Scapy will allow you to create packets on the fly, transmit them, and scan your network for any response.

For example, let’s say I’m on my local network (which I am right now, as I write this), connected via wireless as192.168.15.113. I’m going to interact with the router, which is at 192.168.15.1. For the purposes of analysis, I’ve also setup a virtual machine running on 192.168.15.114, so I can see what happens when I spoof the packet.

So, let’s say I spoof an ICMP echo-request packet, sent to .1 (router) from .113 (me) but spoofed as if it had come from .114 (virtual machine). In Scapy this is quite easy to do. I run two scapy session in two terminal windows. In the first I type:

>>> send(IP(src="192.168.15.114", dst="192.168.15.1")/ICMP())
.
Sent 1 packets.

Although my machine is at .113, I’m telling scapy to set the source address for the ICMP echo-request packet to.114, which is the host I want to attack. I’m sending this “ping” to the router, which should now send its response back to .114 instead of me.

In my other terminal window, I run scapy again, this time in promiscuous mode as a packet sniffer. Promiscuous mode means that it will capture all packets seen on the network, not just those destined for my own machine. Here’s what I see:

>>> sniff(filter="icmp")
^C
>>> _.show()
0000 Ether / IP / ICMP 192.168.15.114 > 192.168.15.1 echo-request 0
0001 Ether / IP / ICMP 192.168.15.1 > 192.168.15.114 echo-reply 0

I ran the sniffer, then did the ping, then stopped the sniffer by pressing Control-C. I can see that two ICMP packets were seen during the sniff. By showing the contents of these packets, I can see both the packet that I transmitted, and the response – which came back to .114!

That’s a spoof. How can it be used to attack someone? Read on in the next section, since what we just did forms the basis for a smurf attack.

Some packet spoofs, however, are more obvious. For example, a packet coming from the Internet bound for a private IP address or certain broadcast addresses, such as address beginning with 192.168 or 224. These are never valid, so it’s a good idea to drop such packets immediately upon receipt. Here are the iptables rules to do this:

# Reject packets from RFC1918 class networks (i.e., spoofed)
iptables -A INPUT -s 10.0.0.0/8     -j DROP
iptables -A INPUT -s 169.254.0.0/16 -j DROP
iptables -A INPUT -s 172.16.0.0/12  -j DROP
iptables -A INPUT -s 127.0.0.0/8    -j DROP

iptables -A INPUT -s 224.0.0.0/4      -j DROP
iptables -A INPUT -d 224.0.0.0/4      -j DROP
iptables -A INPUT -s 240.0.0.0/5      -j DROP
iptables -A INPUT -d 240.0.0.0/5      -j DROP
iptables -A INPUT -s 0.0.0.0/8        -j DROP
iptables -A INPUT -d 0.0.0.0/8        -j DROP
iptables -A INPUT -d 239.255.255.0/24 -j DROP
iptables -A INPUT -d 255.255.255.255  -j DROP

Here’s the same thing, now for ipfw users:

# Verify the reverse path to help avoid spoofed packets.  This means any
# packet coming from a particular interface must have an address matching the
# netmask for that interface.
ipfw add 100 deny all from any to any not verrevpath in

# Deny all inbound traffic from RFC1918 address spaces (spoof!)
ipfw add 110 deny all from 192.168.0.0/16 to any in
ipfw add 120 deny all from 172.16.0.0/12 to any in
ipfw add 130 deny all from 10.0.0.0/8 to any in
ipfw add 140 deny all from 127.0.0.0/8 to any in

ipfw add 150 deny all from 224.0.0.0/4 to any in
ipfw add 160 deny all from any to 224.0.0.0/4 in
ipfw add 170 deny all from 240.0.0.0/5 to any in
ipfw add 180 deny all from any to 240.0.0.0/5 in
ipfw add 190 deny all from 0.0.0.0/8 to any in
ipfw add 200 deny all from any to 0.0.0.0/8 in
ipfw add 210 deny all from any to 239.255.255.0/24 in
ipfw add 220 deny all from any to 255.255.255.255 in

Lire la suite…

Categories: Réseau, Sécurité Tags: ,