Archive

Articles taggués ‘commands’

Using Bash Arrays with Examples

12/08/2021 Comments off

bash-scripting-32-638Arrays can be a useful tool when coding your bash scripts.  The simplest way that I can define an array is to state that an array is a variable for a multi-instance dataset.

For example, a variable is used when there is a single value from a dataset like the IP Address of a server.  However, an array can be used to store all of the IP Addresses in your server room.

Speaking of IP Addresses and bash arrays, my last article (Detect and Block WordPress Brute Force Login Attacks) includes a script which is an example of how an array can be used in bash scripting.

Because arrays can be so useful in bash scripting, I thought that I would put together the following article detailing ways of Using Bash Arrays with Examples.

Initializing Bash Arrays or Assigning Values to Arrays

For arrays to be useful, we need to be able to assign values to them.  We assign values to an array by listing the array along with its instance number as shown below.  This method will assign each instance of the array one by one.

#!/bin/bash
myarray[0]=Hello
myarray[1]=World,
myarray[3]=Happy
myarray[4]=Friday

# Display all instances of the array
echo ${myarray[*]}

We can see above that in addition to being able to assign the values one by one, we can reference all array instances with an asterisk (*).  Another way to display all instances of the array is to use the following “echo ${myarray[@]}”

We run the script and get:

$ ./arrays.sh
Hello World, Happy Friday

We can also retrieve individual instances of an array by specifying the individual array instance number.  We modify the above script slightly to retrieve a couple of the instances.

#!/bin/bash
myarray[0]=Hello
myarray[1]=World,
myarray[3]=Happy
myarray[4]=Friday

# Display all instances of the array
echo ${myarray[0]} ${myarray[4]}

We run the script again and we get:

$ ./arrays.sh
Hello Friday

Lire la suite…

Categories: Système, Tutoriel Tags: , , ,

HowTo: Linux Check Password Strength With Cracklib-check Command

06/06/2021 Comments off

check password strengthUsing the same password on different servers allows attackers to access your accounts if cracker manage to steal your password from a less secure server. This is true for online website accounts too. So solution is to create unique passwords for server accounts like your email, sftp and ssh accounts. General guideline to create a strong and unique password is as follows:

Creating a strong and unique password for Linux or Unix-like systems

  1. Create a password with mix of numbers, special symbols, and alphabets.
  2. Make sure your password is hard to guess. You can use tool such as makepasswd to create hard to guess password.
  3. Do not use simple words like « password« , « 123456« , « 123abc » or « qwerty« .
  4. Use a unique password for all your server accounts.
  5. A minimum password length of 12 to 14 characters should be used. See how to configure CentOS / RHEL / Fedora Linux based server password quality requirements.
  6. Generating passwords randomly where feasible. You can do this with a simple shell scriptfunction.
  7. If possible use two-factor authentication.
  8. Use pam_crack to ensure strong passwords and to check passwords against a dictionary attack.

But, how do you test the effectiveness of a password in resisting guessing and brute-force attacks under Linux? The answer is simple use cracklib-check command.

Install cracklib on a Linux based system

Type the following yum command to install on RHEL and friends:
# yum install cracklib

Type the following apt-get command to install on Debian/Ubuntu and friends:
# apt-get install libcrack2

Lire la suite…

TransmissionHowTo

02/05/2021 Comments off

Transmission Command Line

The BitTorrent protocol can be used to reduce the server and network impact of distributing large files. Rather than downloading a file from a single source server, the BitTorrent protocol allows users to join a « swarm » of hosts to download and upload from each other simultaneously.

Transmission is designed for easy, powerful use. We’ve set the defaults to Just Work and it only takes a few clicks to configure advanced features like watch directories, bad peer blocklists, and the web interface. When Ubuntu chose Transmission as its default BitTorrent client, one of the most-cited reasons was its easy learning curve.

This How-to focuses on CLI (Command Line Interface) and the Web interface

Transmission has been configured to work out of the box on a desktop. Because this how-to is designed for Ubuntu server we need to manually allow remote access. Lire la suite…

Categories: Logiciel, Tutoriel Tags:

Comment créer un tunnel SSH inverse

02/03/2021 Comments off

Parfois que nous avons besoin de vous connecter via SSH à un autre ordinateur, nous trouvons que cet ordinateur que nous comptions SSH dans (ce que nous allons appeler « destiny ») peuvent utiliser NAT et, par conséquent, il doesn ' t compte avec une adresse IP publique que nous pourrions utiliser pour se connecter à lui, ou il peut être derrière un pare-feu qui a gagné ' t permettent l'accès de l'extérieur.

Si le « destin » peut réussir à établir une connexion SSH vers un autre ordinateur qui n'est accessible, nous pouvons utiliser ce deuxième ordinateur afin d'établir un tunnel SSH inverse à notre ordinateur « destiny », nous allons appeler ce deuxième ordinateur « origine » (même si elle n'est pas réellement l'ordinateur que nous allons utiliser pour gérer à distance les « cibles », mais qu'un pont).

Un tunnel SSH inverse fonctionne en connectant « destinée » à « l'origine » et puis en se servant cette connexion SSH dans « destin » de n'importe quel ordinateur connecté à « l'origine ». Ce tunnel SSH inverse devrait fonctionner dans la plupart des distributions Linux sans problème.

Alors, laisse supposer que nous avons à présent deux ordinateurs :

« L'origine » IP : aaa.bbb.ccc.ddd

« Destiny » IP : inconnue ou non disponible

Tout d'abord, nous établissons la connexion SSH de "destinée" à « l'origine », qui permet la fonctionnalité SSH inverse avec le paramètre – r :

SSH r 61999:localhost:22 [email protected]

Le premier nombre (61999) indique quel port on va pour utiliser « origine » pour vous connecter à « destiny », localhost est le nom de domaine que nous utiliserons pour cela aussi bien, et le dernier numéro (22) indique quel port est le « destin » écouter pour SSH.

Une fois que cette connexion est établie, et être connecté à le "origine" (peu importe si nous sommes connectés local ou à distance), nous pouvons établir la connexion au « destin » :

SSH p 61999 destiny_user@localhost

Effectivement, nous pouvons utiliser un ordinateur avec un accès SSH permanent comme un pont entre des ordinateurs qui ne sont pas autrement accessibles par l'intermédiaire de SSH. N'importe quel ordinateur connecté à le « origine » peut se connecter à autres ordinateurs avec inversion de tunneling SSH activé.


Categories: Réseau, Système, Tutoriel Tags: , ,

8 Practical Examples of Linux Xargs Command for Beginners

28/01/2021 Comments off

The Linux xargs command may not be a hugely popular command line tool, but this doesn’t take away the fact that it’s extremely useful, especially when combined with other commands like findand grep. If you are new to xargs, and want to understand its usage, you’ll be glad to know that’s exactly what we’ll be doing here.

Before we proceed, please keep in mind that all the examples presented in this tutorial have been tested on Ubuntu 14.04 LTS. Shell used is Bash, and version is 4.3.11.

1. How Xargs command works?

Well, before jumping onto its usage, it’s important to understand what exactly Xargs does. In layman’s terms, the tool – in its most basic form – reads data from standard input (stdin) and executes the command (supplied to it as argument) one or more times based on the input read. Any blanks and spaces in input are treated as delimiters, while blank lines are ignored. 


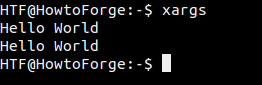
If no command is supplied as argument to xargs, the default command that the tool executes is echo. For example, in the following example, I just executed ‘xargs’ and entered ‘Hello World’ on stdin. As I pressed Ctrl+D (to tell xargs that we’re done with the input), the echocommand was automatically executed, and ‘Hello World’ was printed again.

How xargs command works

2. How to use xargs with another command?

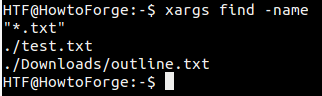
While echo is the default command xargs executes, you can explicitly specify any other command. For example, you can pass the find command along with its ‘-name’ option as argument to xargs, and then pass the name of the file (or type of files) you want find to search as input through stdin.

Here’s the complete command in question:

xargs find -name

For example, we provided « *.txt » in input through stdin, which means we want the find command to search all .txt files in the current directory (as well as its subdirectories).

Here’s the command in action:

Combine xargs with other commands

Lire la suite…

Categories: Système, Tutoriel Tags: , ,