How To Configure Redis Caching to Speed Up WordPress on Ubuntu 14.04

15/06/2024 Categories: Logiciel Tags: , Comments off

Introduction

redisRedis is an open-source key value store that can operate as both an in-memory store and as cache. Redis is a data structure server that can be used as a database server on its own, or paired with a relational database like MySQL to speed things up, as we’re doing in this tutorial.

For this tutorial, Redis will be configured as a cache for WordPress to alleviate the redundant and time-consuming database queries used to render a WordPress page. The result is a WordPress site which is much faster, uses less database resources, and provides a tunable persistent cache. This guide applies to Ubuntu 14.04.

While every site is different, below is an example benchmark of a default WordPress installation home page with and without Redis, as configured from this guide. Chrome developer tools were used to test with browser caching disabled.

Default WordPress home page without Redis:

804ms page load time

Default WordPress home page with Redis:

449ms page load time

Note: This implementation of Redis caching for WordPress relies on a well-commented but third-party script. The script is hosted on DigitalOcean’s asset server, but was developed externally. If you would like to make your own implementation of Redis caching for WordPress, you will need to do some more work based on the concepts presented here.

Redis vs. Memcached

Memcached is also a popular cache choice. However, at this point, Redis does everything Memcached can do, with a much larger feature set. This Stack Overflow page has some general information as an overview or introduction to persons new to Redis.

How does the caching work?

The first time a WordPress page is loaded, a database query is performed on the server. Redis remembers, or caches, this query. So, when another user loads the WordPress page, the results are provided from Redis and from memory without needing to query the database.

The Redis implementation used in this guide works as a persistent object cache for WordPress (no expiration). An object cache works by caching the SQL queries in memory which are needed to load a WordPress page.

When a page loads, the resulting SQL query results are provided from memory by Redis, so the query does not have to hit the database. The result is much faster page load times, and less server impact on database resources. If a query is not available in Redis, the database provides the result and Redis adds the result to its cache.

If a value is updated in the database (for example, a new post or page is created in WordPress) the Redis value for that query is invalidated to prevent bad cached data from being presented.

If you run into problems with caching, the Redis cache can be purged by using the flushall command from the Redis command line:

redis-cli

Once you see the prompt, type:

flushall

Additional Reference: WordPress Object Cache Documentation

Prerequisites

Before starting this guide, you’ll need to set up a sudo user and install WordPress.

  • Ubuntu 14.04 Droplet (1 GB or higher recommended)
  • Add a sudo user
  • Install WordPress. This guide has been tested with these instructions, although there are many ways to install WordPress


Lire la suite…

Categories: Logiciel Tags: ,

Running Commands on a Remote Linux / UNIX Host

14/06/2024 Categories: Système Tags: , , Comments off

Remote Linux Commands

commands remote linuxYou would like to execute a command on a remote Linux/FreeBSD/Solaris/UNIX host and have the result displayed locally. Once result obtained it can be used by local script or program. A few examples:
=> File system and disk information

=> Get user information

=> Find out all running process

=> Find out if particular service is running or not etc

You can use rsh or ssh for this purpose. However, for security reason you should always use the ssh and NOT rsh. Please note that remote system must run the OpenSSH server.

Syntax for running command on a remote host:
ssh [USER-NAME]@[REMOTE-HOST] [command or script]

Where,

  • ssh: ssh (SSH client) is a program for logging into a remote machine and for executing commands on a remote machine.
  • USER-NAME: Remote host user name.
  • REMOTE-HOST: Remote host ip-address or host name, such as my-site.com.
  • command or script: Command or shell script is executed on the remote host instead of a login shell.

Examples

(A) Get disk information from a server called my-site.com:
$ ssh [email protected] df -h

(B) List what ports are open on remote host
$ ssh [email protected] netstat -vatn

(C) Reboot remote host:
$ ssh [email protected] reboot

(D) Restart mysql server (please note enclosed multiple command line arguments using a single or double quotes)
$ ssh [email protected] '/etc/init.d/mysql restart'

(E) Get memory information and store result/output to local file /tmp/memory.status:
$ ssh [email protected] 'free -m' > /tmp/memory.status

(G) You can also run multiple command or use the pipes, following command displays memory in format of « available memory = used free memory » :
$ ssh [email protected] free -m | grep "Mem:" | awk '{ print "Total memory (used free): " $3 " " $4 " = " $2 }'

See how to configure ssh for password less login using public key based authentication.

=> Related: shell script to get uptime, disk usage, cpu usage, RAM usage, system load, etc. from multiple Linux servers and output the information on a single server in a html format.

Source: NixCraft

Categories: Système Tags: , ,

Let’s Encrypt

14/06/2024 Categories: Système Tags: , Comments off

How It Works

Anyone who has gone through the trouble of setting up a secure website knows what a hassle getting and maintaining a certificate can be. Let’s Encrypt automates away the pain and lets site operators turn on and manage HTTPS with simple commands.

No validation emails, no complicated configuration editing, no expired certificates breaking your website. And of course, because Let’s Encrypt provides certificates for free, no need to arrange payment.

This page describes how to carry out the most common certificate management functions using the Let’s Encrypt client. You’re welcome to use any compatible client, but we only provide instructions for using the client that we provide.

If you’d like to know more about how this works behind the scenes, check out our technical overview.

Installing Let’s Encrypt

Note: Let’s Encrypt is in beta. Please don’t use it unless you’re comfortable with beta software that may contain bugs.

If your operating system includes a packaged copy of letsencrypt, install it from there and use the letsencrypt command. Otherwise, you can use our letsencrypt-auto wrapper script to get a copy quickly:

$ git clone https://github.com/letsencrypt/letsencrypt
$ cd letsencrypt
$ ./letsencrypt-auto --help

letsencrypt-auto accepts the same flags as letsencrypt; it installs all of its own dependencies and updates the client code automatically (but it’s comparatively slow and large in order to achieve that).

How To Use The Client

The Let’s Encrypt client supports a number of different “plugins” that can be used to obtain and/or install certificates. A few examples of the options are included below:

If you’re running Apache on a recent Debian-based OS, you can try the Apache plugin, which automates both obtaining and installing certs:

./letsencrypt-auto --apache

On other platforms automatic installation is not yet available, so you will have to use the certonly command. Here are some examples:

To obtain a cert using a “standalone” webserver (you may need to temporarily stop your exising webserver) for example.com and www.example.com:

./letsencrypt-auto certonly --standalone -d example.com -d www.example.com

To obtain a cert using the “webroot” plugin, which can work with the webroot directory of any webserver software:

./letsencrypt-auto certonly --webroot -w /var/www/example -d example.com -d www.example.com -w /var/www/thing -d thing.is -d m.thing.is

The this will obtain a single cert for example.com, www.example.com, thing.is, and m.thing.is; it will place files below /var/www/example to prove control of the first two domains, and under /var/www/thing for the second pair.

Lire la suite…

Categories: Système Tags: ,

MySQL – Migrate Users from Server to Server

13/06/2024 Categories: Bases de données Tags: , , , Comments off

mysql migrate usersSometimes we need to migrate our databases to a new MySQL server.  It is easy to move the databases, but without the users and their permissions, our new databases would be worthless.  Below is a step-by-step on migrating MySQL users to a new MySQL server

Step 1 – Create a Query List That We Can Use to Get Grants for All Users

I use these options so that I wouldn’t get any formatting characters that I would have to manually delete later.

  • -N skip column names in the output
  • -p password – Asks me to type the password so nobody can get it from the command line history
  • -s  silent mode – less formatting output that we don’t want like “|” and “-“

So, let’s get a list of the users in a query that we can use to get the grants.  Our query will be output into the “myfile” file

$ mysql -uroot -N -p -s > myfile
Enter password:
select Distinct CONCAT(‘show grants for `’, user, ‘`@`’, host, ‘`;’) as query from mysql.user;
quit

If we want to see what our query file look like, we can take a quick peek:

[root@classes-dev-mysql ~]# cat myfile
show grants for `user1`@`%`;
show grants for `user2`@`%`;
show grants for `user3`@`10.%`;
show grants for `user4`@`10.%`;
show grants for `jeff`@`10.%`;

Step 2 – Create the MySQL Grant File

We don’t have quite what we want and need yet.  We are looking for a query that will create all of our users on the new MySQL server.  We need to run the query that we just created and it will give us the query that we will use later to create the users.  It will create our grant permission statements in a file named “grantfile”

[root@classes-dev-mysql ~]# mysql -uroot -N -p -s -r < myfile > grantfile
Enter password:

We can take a peek at what our grantfile contains:

$ cat grantfile
GRANT USAGE ON *.* TO ‘user1’@’%’ IDENTIFIED BY PASSWORD ‘5ea9af6g6t27032f’
GRANT ALL PRIVILEGES ON `database1`.* TO ‘user1’@’%’
GRANT USAGE ON *.* TO ‘user2’@’10.%’ IDENTIFIED BY PASSWORD ‘2a123b405cbfe27d’
GRANT SELECT ON `database1`.`table1` TO ‘user2’@’10.%’GRANT ALL PRIVILEGES ON *.* TO ‘user3’@’10.%’ IDENTIFIED BY PASSWORD ‘753af2za1be637ea’
GRANT SELECT, INSERT, UPDATE, DELETE ON *.* TO ‘user3’@’10.%’ IDENTIFIED BY PASSWORD ’08ad9be605rfgcb’…

Step 3 – Create Users and Grant MySQL Permissions on the New MySQL Machine

Now we are done working on the source machine.  We need to copy our file named “grantfile” over to the new machine.

$ scp grantfile [email protected]:/home/myuser

Next, we login to the destination or the new MySQL machine that we are building and run the “grantfile” in MySQL to create our users on the new MySQL machine.

$ mysql -uroot -p < ./grantfile

That’s it.  As long as our databases are named the same in the new MySQL, our users should be ready to use the copy of the databases in the new MySQL machine.

Source: Uptime Made Easy

Connect to Blocked Ports with SSH Tunneling

13/06/2024 Categories: Réseau, Système Tags: , , Comments off

SSH Tunneling – Get Through Your Firewall to Other Ports

http://www.uptimemadeeasy.com/wp-content/uploads/2014/02/SSH_Traffic_Only.jpg

Typical Scenario is that only the ssh port (tcp/22) and http (tcp/80) are allowed into a machine. All other traffic is blocked.

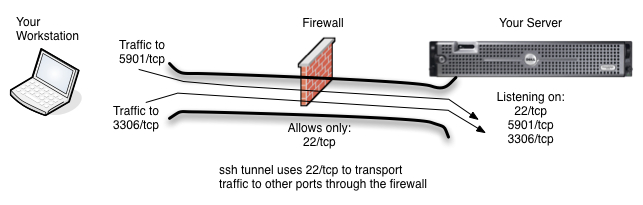
Do you have a server on the other side of a firewall that you can ssh to, but to which you cannot reach on other ports. Let’s imagine, for example, that your server has ports 80/tcp and 22/tcp open, but you want to be able to get to your database port (3306/tcp) or your vnc port (5901/tcp) which are blocked by the firewall. Grr. What can you do? Use ssh tunneling, of course.

SSH Tunneling is Similar to VPN

http://www.uptimemadeeasy.com/wp-content/uploads/2014/02/ssh_tunnel.jpg

Ssh allows you to tunnel traffic to other ports through the firewall using your ssh Connection

Ssh allows you to tunnel your communication to other ports and services on your server through your ssh connection to the server.  This means that traffic that would normally be blocked by your firewall or iptables can now reach its destination.  This of course, all assumes that you have a login to the server and are able to ssh to it from your network or internet location.

SSH Tunneling Uses a Local Port

The idea behind ssh tunneling is that you know which port(s) you want to access on the server and that you also setup a local port on your workstation for you to connect to on your side of the tunnel.  When using SSH Tunneling, you will direct your client applications, in this example case MySQL Workbench and VNC Viewer, to the local ports on your workstation which you configured in your ssh client.  SSH will then transport the traffic to the local port through its tunnel to the server port you are hoping to reach.

Ssh Command Line (CLI) Port Configuration

When using ssh from the command line in a linux, unix, OSX or other command line environment, you will use the -L option to map local ports to remote ports on the server.  In the example below, Mary is logging in to server1.uptimemadeeasy.com with ssh and is mapping local port 8675 on her workstation to the MySQL port (tcp/3306) on the server.  Note that the name localhost is in reference to server1.uptimemadeeasy.com.

ssh -l mary server1.uptimemadeeasy.com -L 8675:localhost:3306

Mary will then supply the password when requested and she will notice with netstat -an that port 8675 on her local workstation is now being used.  She can then point her MySQL Workbench client at her local machine (localhost) port 8675.  Her traffic to her local port 8675 will then be transported through her ssh tunnel to the server port 3306.
Mary can now verify that her local port (8675) is listening locally using netstat:

$ netstat -an | grep 8675
TCP 127.0.0.1:8675 0.0.0.0:0 LISTENING
TCP [::1]:8675 [::]:0 LISTENING

We get output telling us that the local workstation is now listening on port 8675 on both ipv4 and ipv6. Lire la suite…

Categories: Réseau, Système Tags: , ,