Punching holes into firewalls

07/02/2024 Categories: Réseau, Sécurité Tags: , Comments off

5b3f38bb3b78c6acd6bbfe3dfb33a470-pearlsquareFirewalls are heavily used to secure private networks (home or corporate). Usually, they are used to protect the network from:

  • intrusions from outsiders
  • misuse from insiders

In a TCP/IP environment, the typical corporate firewall configuration is to block everything (both incoming and outgoing), and give access to the internet only through a HTTP proxy. The proxy usually has filtering capabilities (censors URLs and file types), and access to the proxy often requires credentials (login/password). This gives greater contol to the network administrator over what and who is going in and out of the network.

Still, this should not considered a ultimate weapon, and network administrators should not rely on the firewalls only.

Encapsulation is the basis of networking. For example, HTTP is encapsulated by TCP, TCP is encapsulated by IP, and IP is often encapsulated in PPP or Ethernet.
Encapsulating protocols in an unsual way is often reffered as tunnelling.

As soon as you let a single protocol out, tunelling allows to let anything go through this protocol, and thus through the firewall.

This paper demonstrates how to encapsulate any TCP-based protocol (SMTP, POP3, NNTP, telnet…) into HTTP, thus bypassing the firewall protection/censorship (depending on your point of view)

A word of warning:

In many countries and corporate environments, bypassing a firewall is forbidden and exposes you to sanctions, redundancy, legal proceedings and – in some countries – death penalty.
You are warned.

Nevertheless, in some countries this kind of firewall/proxy bypassing is the only way to ensure free speech (such as China or United Arab Emirates where the government severly censors the internet and where firewall bypassing is a national sport.)

Now you known what you’re doing, let’s move on.


The problem

Say you want to fetch your mail from your ISP mail server. You usually simply connect to port 110 on the POP server of your ISP.
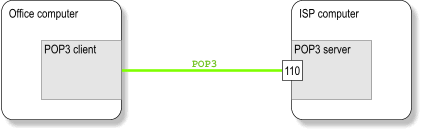
punch1


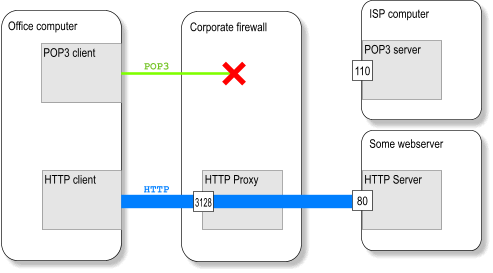
Trouble: there is a Big Bad firewall which blocks everything.
punch2

Well… it does not exactly block everything: it lets HTTP out through a proxy.
Let’s encapsulate our POP3 connection into HTTP.


The tools

We need:

  • A computer on the internet which has unrestricted access to the internet, such as a home ADSL computer.
  • GNU HTTP Tunnel (http://www.nocrew.org/software/httptunnel.html). It encapsulates TCP into HTTP requests.
  • SSH is a secure shell (http://www.openssh.com). It provides secure (and compressed) channels between two hosts using SSL. Besides providing a shell (like telnet), it also provides file copy (scp) and TCP port forwarding (tunnelling). We will use the port forwarding feature.


Why not use GNU HTTP Tunnel alone ?

In principle, only HTTP Tunnel is necessary. But this is not desirable:

  • the tunnel is public: anyone can use your tunnel. Your could be held liable for what anybody has done with your tunnel.
  • the tunnel is cleartext: anyone can spy on your connection. Your passwords (SMTP, POP3, telnet…) are transmitted in clear text.
  • the tunnel is not protected: anyone can alter the datastream.
  • you have to run a new instance of the HTTP Tunnel client and the server for each new tunnel you want to set up.

This is where ssh come in. ssh provides:

  • authentication (only authorised users can use the tunnel)
  • privacy (no one can spy on what’s going through the tunnel)
  • integrity (no one can tamper data going through the tunnel)
  • easy tunnel set-up (you can create a new tunnel with a single ssh command on the client side).

These tools are available on Unix/Linux and Windows environments.


The whole chain

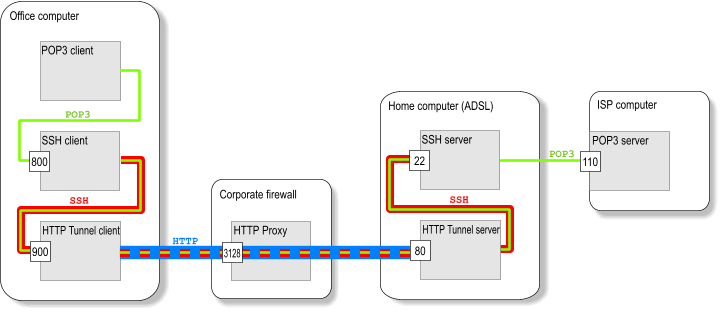
Let’s see how this works. Here is the full chain:
punch3

Technically speaking, once this chain is established, connecting to OfficeComputer:800 is identical to connecting to pop3server:110.
The mail client will not see the difference.

  • On the office computer:
    • TCP data sent to port 800 is encrypted by ssh, which forwards data to port 900.
    • ssh stream sent to port 900 is chunked in individual HTTP requests by the HTTP Tunnel client and sent to the home computer through the proxy.
  • On the home computer:
    • the HTTP Tunnel server receives HTTP requests, decapsulates and re-assembles the ssh stream and forwards it to port 22 (to the ssh server).
    • the ssh server decrypts the datastream and forwards it to the pop3server on port 110.

As TCP is a bi-directionnaly datastream, once established, the TCP connection can pass data back and forth through the HTTP proxy.

Lire la suite…

Categories: Réseau, Sécurité Tags: ,

Refresh Launchpad in Mac OS X 10.7 Lion

07/02/2024 Categories: Logiciel Tags: , Comments off

Source: osxdaily.com

hide-apps-in-launchpad-osxlionLaunchpad is OS X 10.7′s iOS-like app launcher, it’s a nice utility but it does have some quirky behavior in Lion. One of the major issues is that sometimes apps won’t appear in Launchpad at all, or when you delete an app it doesn’t disappear as it’s supposed to. If you run into this, try this tipleft in the comments about LaunchPad Control about refreshing Launchpad and its contents.

Relaunching Launchpad

Launchpad is attached to the Dock app, so the easiest way to relaunch LaunchPad is to kill the Dock from the command line:

killall Dock

Both the Dock and Launchpad will relaunch and that should clear up most minor issues with app persistence.

Refresh Launchpad Contents

If relaunching alone hasn’t fixed LaunchPad and apps are still not showing up, try deleting Launchpads database files located inside your home ~/Library directory, which forces them to rebuild. The directory path you are looking for is:

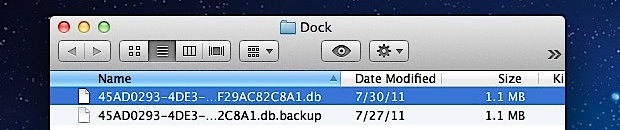
~/Library/Application Support/Dock/

The fastest way to get there is by using Command+Shift+G in the Finder to access the “Go To Folder” function, then just paste that directory path in. You will see a folder like this:

launchpad-database-files

If you want to back these up you can, otherwise just delete them by dragging the .db files to the Trash, and then kill the Dock again from the Terminal to force the databases to regenerate.

killall Dock

Take note that you will lose any custom icon placement and folders that are setup within Launchpad, because that information is stored in the database file you are trashing.


One-Line Terminal Command to Refresh Launchpad Contents

If you are comfortable with the command line, you can also do this entire process through the Terminal with the following commands:

rm ~/Library/Application\ Support/Dock/*.db ; killall Dock

If you want control over exactly what shows up in Launchpad rather than just creating a bunch of folders, use the third party System Preference Launchpad Control, it’s free and works as a sql frontend to the Launchpad database.


Categories: Logiciel Tags: ,

How to convert .rmvb to .avi (on PowerPC and Intel Macs)?

06/02/2024 Categories: Logiciel, Système Tags: , , Comments off

The good news is it’s very easy. The bad news is you’ll need a PowerPC Mac.A big thank you to Bluemint for pointing out an Universal Binaries version of the Real Codec is actually available, making the conversion possible on both PowerPC and Intel Mac. The instructions below are herewith updated.

What you’ll need:

  1. ffmpegX – It’s a Mac OS X graphic user interface designed to easily operate more than 20 powerful Unix open-source video and audio processing tools
  2. mpeg2enc – Download to your Downloads folder.
  3. mencoder & mplayer – Download and decompress the zip file.

Setup:

The first time you launch ffmpegX it’ll ask you to locate three components (items 2 & 3 above). Click on the respective “Locate” buttons to tell ffmpegX where they are. After that, enter your Mac OS X login password (ffmpegX won’t work if your login password is empty) and click the “Install” button.

Download and Install the Real Codec (Universal Binaries)

  1. Download the “Mac OS X x86″ binary codec package from one of these links on this page.
  2. Unzip the downloaded zip file and install the codec package.
  3. Select “Go to folder …” from Finder’s “Go” menu.
  4. Type “/usr/local/lib/” in the input text field and click “Go”
  5. You should see a “codecs” folder in the new window.
  6. Drag the “codecs” folder to your Desktop, and rename it to “reallib”.
  7. Move the “reallib” folder to “/Library/Applications Support/ffmpegx/”.

Performing the conversion to .avi

UB Rockz on any valid unicode Path/Filename.

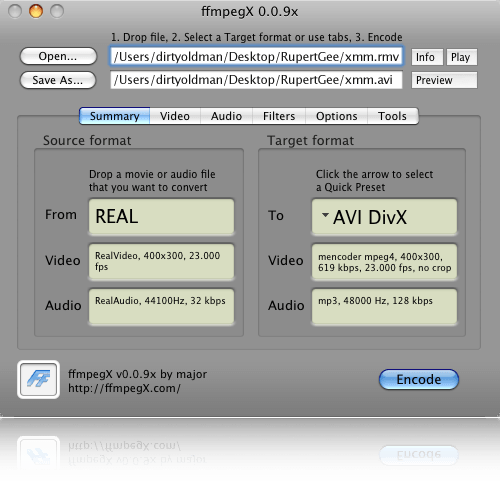
ffmpegx-rmvb
Drag and drop your rmvb file into the “From” well and just click the “Encode” button to start encoding. Unless you’re an expert user, do not be tempted to change any settings when converting a .rmvb file.

In other words, for a successful run, just drag, drop, and click Encode. What more can you ask for?

Footnotes:

  • Re-launch ffmpegX if you messed up the default settings.
  • You can close ffmpegX’s main window after clicking Encode; a new stand-alone Progress window shows you the progress.
  • Repeat the process to convert more files.
  • The “Play” button plays the .rmvb.
  • The “Preview” button plays the (partially) converted .avi file.
  • Press the Return key to stop playback.
  • You can download and install MPlayer to play your .rmvb files. However, it has a bug whereby it only plays video and totally ignores embedded links and other wonderful added features Real is famous for.
Categories: Logiciel, Système Tags: , ,

How to Bulk Rename Files in Linux (Terminal or GUI)

06/02/2024 Categories: Système Tags: , Comments off

Source: Webmaster tips

There are several ways to bulk rename files in Linux. If you want to bulk rename files with a GUI tool, try Thunar file manager, or Krename.

Tip: To install Thunar on Ubuntu/Debian, type sudo apt-get install thunar in a terminal. To install Krename, type sudo apt-get install krename.
How to bulk rename files from the terminal

If you have a directory of files that you would like to bulk rename, you can use the rename command from the terminal.
UPDATE: I believe the Perl-based rename command is only available on Debian-based Linux distros, but there are instructions on adding it to other distros below.

The syntax for the rename command is:

rename [ -v ] [ -n ] [ -f ] perlexpr [ files ]

-v means « verbose » and it will output the names of the files when it renames them. It is a good idea to use this feature so you can keep track of what is being renamed. It is also a good idea to do a test run with -n which will do a test run where it won’t rename any files, but will show you a list of files that would be renamed.

The « perlexpr » part of the command is a Perl expression. Don’t panic yet…
The « rename » command in action

Here is an example of the rename command:

rename -n ’s/\.htm$/\.html/’ *.htm

The -n means that it’s a test run and will not actually change any files. It will show you a list of files that would be renamed if you removed the -n. In the case above, it will convert all files in the current directory from a file extension of .htm to .html.

If the output of the above test run looked ok then you could run the final version:

rename -v ’s/\.htm$/\.html/’ *.htm

The -v is optional, but it’s a good idea to include it because it is the only record you will have of changes that were made by the rename command as shown in the sample output below:

$ rename -v 's/\.htm$/\.html/' *.htm
 3.htm renamed as 3.html
 4.htm renamed as 4.html
 5.htm renamed as 5.html

The tricky part in the middle is a Perl substitution with regular expressions, highlighted below:

rename -v ’s/\.htm$/\.html/’ *.htm

Tip: There is an intro to Perl regular expressions here.

Basically the « s » means substitute. The syntax is s/old/new/ — substitute the old with the new.

A . (period) has a special meaning in a regular expression — it means « match any character ». We don’t want to match any character in the example above. It should match only a period. The backslash is a way to « escape » the regular expression meaning of « any character » and just read it as a normal period.

The $ means the end of the string. \.htm$ means that it will match .htm but not .html.

It’s fairly basic — substitute .htm with .html:

's/\.htm$/\.html/'

The last part of the command, highlighted below, means to apply the rename command to every file that ends with .htm (the * is a wildcard).

rename -v ’s/\.htm$/\.html/’ *.htm

Other Examples

Maybe you have a digital camera that takes photos with filenames something like 00001234.JPG, 00001235.JPG, 00001236.JPG. You could make the .JPG extension lowercase with the following command executed from the same directory as the images:

rename -v 's/\.JPG$/\.jpg/' *.JPG

Here is the output of the above command:

$ rename -v 's/\.JPG$/\.jpg/' *.JPG
 00001111.JPG renamed as 00001111.jpg
 00001112.JPG renamed as 00001112.jpg
 00001113.JPG renamed as 00001113.jpg

That is simple enough, as it is similar to the .html example earlier. You could also bulk rename them with something descriptive at the beginning like this:

Tip: Before trying more complicated renaming like in the example below, do a test run with the -n option as described at the beginning of this tutorial.

rename -v 's/(\d{8})\.JPG$/BeachPics_$1\.jpg/' *.JPG

That will change filenames that have the pattern ########.JPG (8 numbers and capital .JPG) to something like BeachPics_########.jpg (the same 8 numbers and changing the extension to lowercase .jpg). Here is a test run with the -n option:

$ rename -n 's/(\d{8})\.JPG$/BeachPics_$1\.jpg/' *.JPG
 00001111.JPG renamed as BeachPics_00001111.jpg
 00001112.JPG renamed as BeachPics_00001112.jpg
 00001113.JPG renamed as BeachPics_00001113.jpg

Here’s a quick breakdown of the Perl substitution with the regular expression above.

The highlighted section below means to count 8 digits. The parentheses mean to save those 8 digits for later because they are going to be used again in the second half of the substitution:

's/(\d{8})\.JPG$/BeachPics_$1\.jpg/'

In the highlighted section below, it adds the string BeachPics, and underscore, and then the text in parentheses from the first half of the substitution. $1 will insert the string from the first set of parentheses that it finds — in this case the 8 digits. If you have more than one set of parentheses you can access the second set with the Perl variable $2 and so on.

's/(\d{8})\.JPG$/BeachPics_$1\.jpg/'

Final Refinement

The following variation would make even cleaner-looking filenames. See if you can figure out how it works:

$ rename -n 's/\d{5}(\d{3})\.JPG$/BeachPics_$1\.jpg/' *.JPG
 00000123.JPG renamed as BeachPics_123.jpg
 00000124.JPG renamed as BeachPics_124.jpg
 00000125.JPG renamed as BeachPics_125.jpg

Learning Perl Regular Expressions

You can learn more about Perl regex here and in the Perl regular expression documentation, and the quickstart. Also check out this regex cheatsheet. You can learn more about the rename command by typing man rename in the terminal.
Adding the Rename Command to Non-Debian Distros

The following information was provided by Dan Fego on how to add the Perl-based rename command to non-Debian Linux distros:
I did the following [on Gentoo], though I’m aware there’s both more concise and generic ways to do it. This was just my path of discovery.

[the following commands are from Ubuntu]

# which rename
 /usr/bin/rename
 # ls -l /usr/bin/rename
 lrwxrwxrwx 1 root root 24 Dec 2 02:13 /usr/bin/rename ->
 /etc/alternatives/rename
 # ls -l /etc/alternatives/rename
 lrwxrwxrwx 1 root root 16 Dec 6 00:29 /etc/alternatives/rename ->
 /usr/bin/prename
 # ls -l /usr/bin/prename
 -rwxr-xr-x 1 root root 2987 Dec 4 04:18 /usr/bin/prename

Once I had the final link in the chain [on Ubuntu], I knew which file to copy [to Gentoo], though really I didn’t need to follow it all that way. The reason I did to begin with was because I tried to copy it with the filesystem mounted, and it referred to absolute paths which didn’t exist outside of the Ubuntu environment. The prename script is fully self-contained, assuming you’ve got Perl on your system (which just about any self-respecting Linux distro does).

The code from Ubuntu’s rename/prename is here (Gutsy Gibbon).

Categories: Système Tags: ,

Postfix + fail2ban = win

05/02/2024 Categories: Logiciel, Réseau, Système Tags: , , , , , Comments off
source: http://blog.dp.cx/25/postfix-fail2ban-win

Recently, I had to lease a new server. My old one was ok, but it was 5 years old, and showing it’s age. The most recent bout of problems was due to postfix, and a specific domain that I host mail for.

I had previously set up Policyd in an attempt to stop the influx of spam before it ever hit the server, but it wasn’t doing anything at this point. So approximately 800 messages per minute were getting directly to Postfix, and then running queries against MySQL (I use virtual maps for users, aliases, domains, etc). 99% of these messages were to non-existant users, so Postfix would bounce them. But the little 2.0GHz Celeron couldn’t handle it. The load shot up to 8 for around 3 weeks, and stayed there. I wish the fail2ban idea had come to me sooner… Lire la suite…