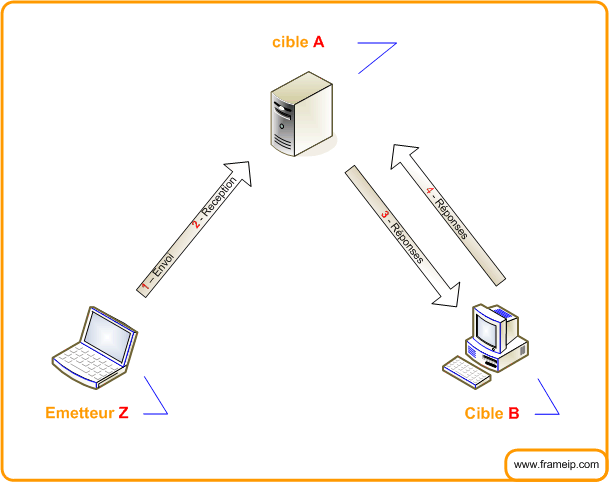
La saturation du nombre d’ouverture de session TCP en cours.
2 – Le fonctionnement
2.1 – Schéma
2.2 – Envoi du SYN
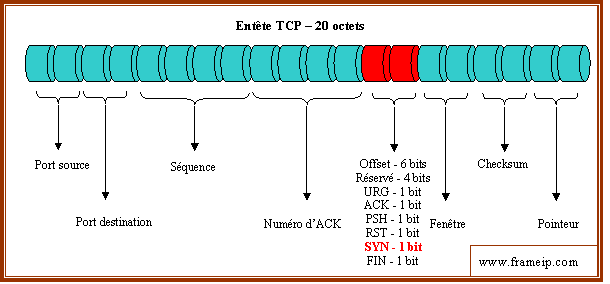
Le fonctionnement est de générer une trame TCP de demande de synchronisation à destination de la cible. Cette demande de synchronisation SYN est la première étape d’une ouverture de session TCP. Voici le schéma de l’entête TCP avec ce fameux flag SYN basé sur 1 bit :
Les 5 autres flags doivent être positionnés à 0.
2.3 – Réception par la cible A
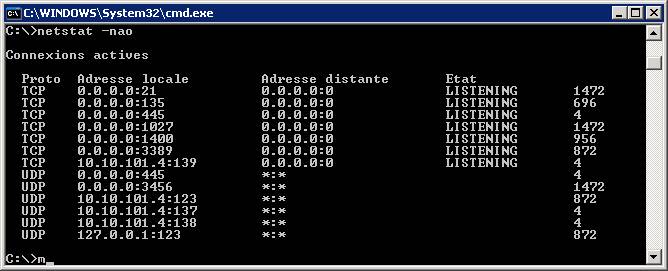
La cible recevant la synchronisation TCP mémorise cette demande nécessitant donc de la mémoire et du processeur. Voici l’état des connexions d’un Windows XP avant la réception d’un Synflood :
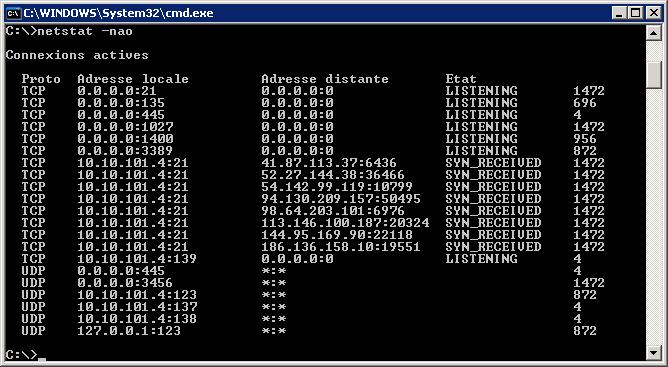
Et voici après la réception des demandes de SYN :
La cible passe les requêtes reçues en SYN_RECEIVED. Cet état est temporaire, le temps de durée de vie est variable en fonction de la pile IP.
Dans mon exemple, la cible tourne sur une station XP limitée en nombre de sessions simultanée. Ceci ayant pour conséquence l’indisponibilité temporaire du port ciblé.
* testé depuis la machine ayant effectuée le Synflood
To demonstrate how iptables can perform network address translation this how-to shows how to use it to implement a over-simplified load balancer. In practice we would use a daemon such as HAProxy allowing IP tables to check packets before forwarding them.
Using the method presented in this tutorial packets get forwarded without going through the INPUT, FORWARD and OUTPUT chains.
iptables is a powerful tool that is used to create rules for how incoming or outgoing packets are handled. It keeps track of a packets state – there is NEW, ESTABLISHED, RELATED, INVALID and UNTRACKED. It can make filtering decisions based on the packets header data and the payload section of the packet, for these purposes iptables even has regular expression matching.
On top of that iptables has extensions that can be used to filter packets based on a packets history so we can keep track of packets and sessions. We can set filters to only trigger at specific times, parse the packet contents and header information searching for specific patterns, differentiate protocols such as tcp, udp, icmp, etc.
For load balancing behavior we want the incoming packets on one machine to be routed to another machine. iptables has extentions that helps us achieve this aim but we also need to muck around with its internal PREROUTING and POSTROUTING table, which is not recommended as this could potentially pose a security risk. lets use iptables to route all traffic coming in on an interface eth0 with a destination port 80 and route it to another IP address:
Allow IP forwarding
(Note: if your testing this on the same box your doing this on it won’t work, you need at least 3 machines to test this out, virtual ones work nicely)
First we enable ipv4 forwarding or this will not work: # echo "1" > /proc/sys/net/ipv4/ip_forward
XOR
# sysctl net.ipv4.ip_forward=1
next we add a filter that changes the packets destination ip and allows us to masquerade:
The above filter gets added to iptables PREROUTING chain. The packets first go through the filters in the PREROUTING chain before iptables decides where they go. The above filter says all packets input into eth0 that use tcp protocol and have a destination port 80 will have their destination address changed to 1.2.3.4 port 80. The DNAT target in this case is responsible for changing the packets Destination IP address. Variations of this might include mapping to a different port on the same machine or perhaps to another interface all together, that is how one could implement a simple stateful vlan (in theory).
The masquerade option acts as a one to many NAT server allowing one machine to route traffic with one centralized point of access. This is similar to how many commercial firewalls and network routers function.
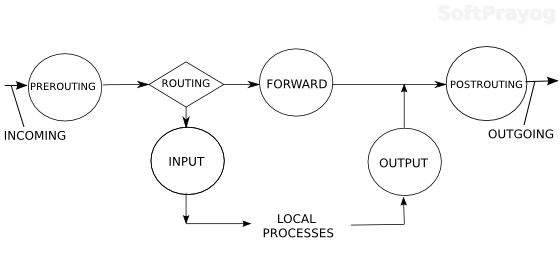
The above ruleset results in all incoming packets to dport 80 traversing the iptables chains in a straight line from INCOMING to OUTGOING in the image below, effectively bypassing any rules we might have had in our INPUT chain. If we were to choose to implement nat like this we would need to implement those – our desired INPUT filter rules – on the machines where traffic is forwarded OR add them to the FORWARD chain if we want to block things before they are forwarded (Note: packets might go through FORWARD chain in both directions so direction needs to be considered when writing filters for this chain).
Path incoming packets take through iptables chains
We have discovered a vulnerability in a number of providers that allows an attacker to expose the real IP address of a victim. “Port Fail” affects VPN providers that offer port forwarding and have no protection against this specific attack. Perfect Privacy users are protected from this attack.
This IP leak affects all users: The victim does not need to use port forwarding, only the attacker has to set it up.
We have tested this with nine prominent VPN providers that offer port forwarding. Five of those were vulnerable to the attack and have been notified in advance so they could fix this issue before publication. However, other VPN providers may be vulnerable to this attack as we could not possibly test all existing VPN providers.
Details about the leak
The attacker needs to meet the following requirements:
Has an active account at the same VPN provider as the victim
Knows victim’s VPN exit IP address (can be obtained by various means, e.g. IRC or torrent client or by making the victim visit a website under the attackers control)
The attacker sets up port forwarding. It makes no difference whether the victim has port forwarding activated or not.
Attacker connects to same server 1.2.3.4 (knows victim’s exit through IRC or other means)
Attacker activates Port Forwarding on server 1.2.3.4, example port 12345
Attacker gets the victim to visit 1.2.3.4:12345 (for example via embedding <img src=”http://1.2.3.4:12345/x.jpg”> on a website)
This connection will reveal the victim’s real IP to the attacker because of the “1.2.3.4/32 -> 192.168.0.1” vpn route.
The crucial issue here is that a VPN user connecting to his own VPN server will use his default route with his real IP address, as this is required for the VPN connection to work. If another user (the attacker) has port forwarding activated for his account on the same server, he can find out the real IP addresses of any user on the same VPN server by tricking him into visiting a link that redirects the traffic to a port under his control.
Also note that due to the nature of this attack all VPN protocols (IPSec, OpenVPN, PPTP, etc.) and all operating systems are affected.
Mitigation
Affected VPN providers should implement one of the following:
Have multiple IP addresses, allow incoming connections to ip1, exit connections through ip2-ipx, have portforwardings on ip2-ipx
On Client connect set server side firewall rule to block access from Client real ip to portforwardings that are not his own.
Many system administrators seem to have problems with the concepts of pipes and redirection in a shell. A coworker recently asked me how to deal with log files. How to find the information he was looking for. This article tries to shed some light on it.
Input / Output of shell commands
Many of the basic Linux/UNIX shell commands work in a similar way. Every command that you start from the shell gets three channels assigned:
STDIN (channel 0): Where your command draws the input from. If you don’t specify anything special this will be your keyboard input.
STDOUT (channel 1): Where your command’s output is sent to. If you don’t specify anything special the output is displayed in your shell.
STDERR (channel 2): If anything wrong happens the command will send error message here. By default the output is also displayed in your shell.
Try it yourself. The most basic command that just passes everything through from STDIN to STDOUT is the ‘cat’ command. Just open a shell and type ‘cat’ and press Enter. Nothing seems to happen. But actually ‘cat’ is waiting for input. Type something like “hello world”. Every time you press ‘Enter’ after a line ‘cat’ will output your input. So you will get an echo of everything you type. To let ‘cat’ know that you are done with the input send it an ‘end-of-file’ (EOF) signal by pressing Ctrl-D on an empty line.
The pipe(line)
A more interesting application of the STDIN/STDOUT is to chain commands together. The output of the first command becomes the input of the second command. Imagine the following chain:
The contents of the file /var/log/syslog are sent (as input) to the grep command. grep will filter the stream for lines containing the word ‘postfix’ and output that. Now the next grep picks up what was filtered and filter it further for the word ‘removed’. So now we have only lines containing both ‘postfix’ and ‘removed’. And finally these lines are sent to ‘wc -l’ which is a shell command counting the lines of some input. In my case it found 27 of such lines and printed that number to my shell. In shell syntax this reads:
The ‘|’ character is called pipe. A sequence of such commands joined together with pipes are called pipeline.
Useless use of ‘cat’
Actually ‘cat’ is supposed to be used for concatenating files. Like “cat file1 file2”. But some administrators abuse the command to put something into a pipeline. That’s bad style and the reason why Randal L. Schwartz (a seasoned programmer) used to hand out virtual “Useless use of cat” awards. Shell commands usually can take a filename as the last argument as an input. So this would be right:
grep something /var/log/syslog | wc -l
While this works but is considered bad style:
cat /var/log/syslog | grep something | wc
Or if you knew that grep even has a “-c” option to count lines the whole task could be done with just grep:
Today though, we’re going to spend a little time looking at Layer 7, or what we call an HTTP Flood Attack.
An HTTP flood attack is a type of Layer 7 application attack that utilizes the standard valid GET/POST requests used to fetch information, as in typical URL data retrievals (images, information, etc.) during SSL sessions. An HTTP GET/POST flood is a volumetric attack that does not use malformed packets, spoofing or reflection techniques. – DDoSAttacks.biz
If you’re wondering, yes, we deal with these every day, and we protect our client websites via our Website Firewall.
Today I’m going to share with you some details on a rather large DDoS attack that leveraged the following HTTP request flood attack to wreak havoc on a clients website. I’ll also share the steps we took to mitigate the issue.
Layer 7 DDoS – HTTP Flood Attacks
The first thing to understand about Layer 7 attacks is that they require more understanding about the website and how it operates. The attacker has to do some homework and create a specially crafted attack to achieve their goal. Because of this, these types of DDoS attacks require less bandwidth to take the site down and are harder to detect and block.
Layer 7 DDoS – Part 1: Random URLs
This specific client came to us after his site was down for almost a week. They tried other services to protect their website with not much luck. As soon as he switched his DNS to us, we gained a much deeper appreciation and started to see why.
He was getting thousands of requests like these every second:
To be more exact, he was getting 5,233 HTTP requests every single second. From different IP addresses around the world.
What is important to note here is how this worked against the client’s platform. The client’s website was built on WordPress. The uniqueness of the requests were bypassing the caching system, forcing the system to render and respond to every request. This was bringing about system failures as the server quickly became overwhelmed by the requests.
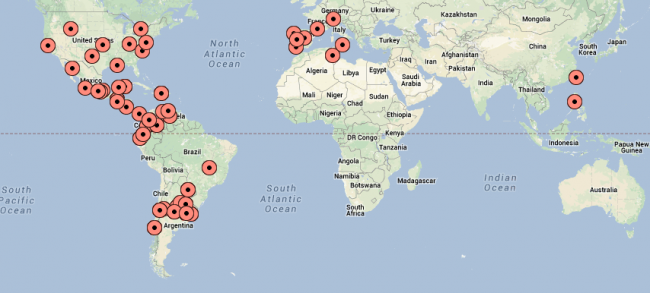
For illustration purposes, here is a quick geographic distribution of the IP’s hitting the site. This is for 1 second in the attack. Yes, every second these IP’s were changing.
Stopping the DDoS: Once we identified the type of attack, blocking was easy enough. By default, they were not passing our anomaly check, causing the requests to get blocked at the firewall. One of the many anomalies we look for are valid user agents, and if you look carefully you see that the requests didn’t have one. Hopefully, you’ll also noticed that the referrers were dynamic and the packets were the same size, another very interesting signature. Needless to say, this triggered one of our rules, and within minutes his site was back and the attack blocked.