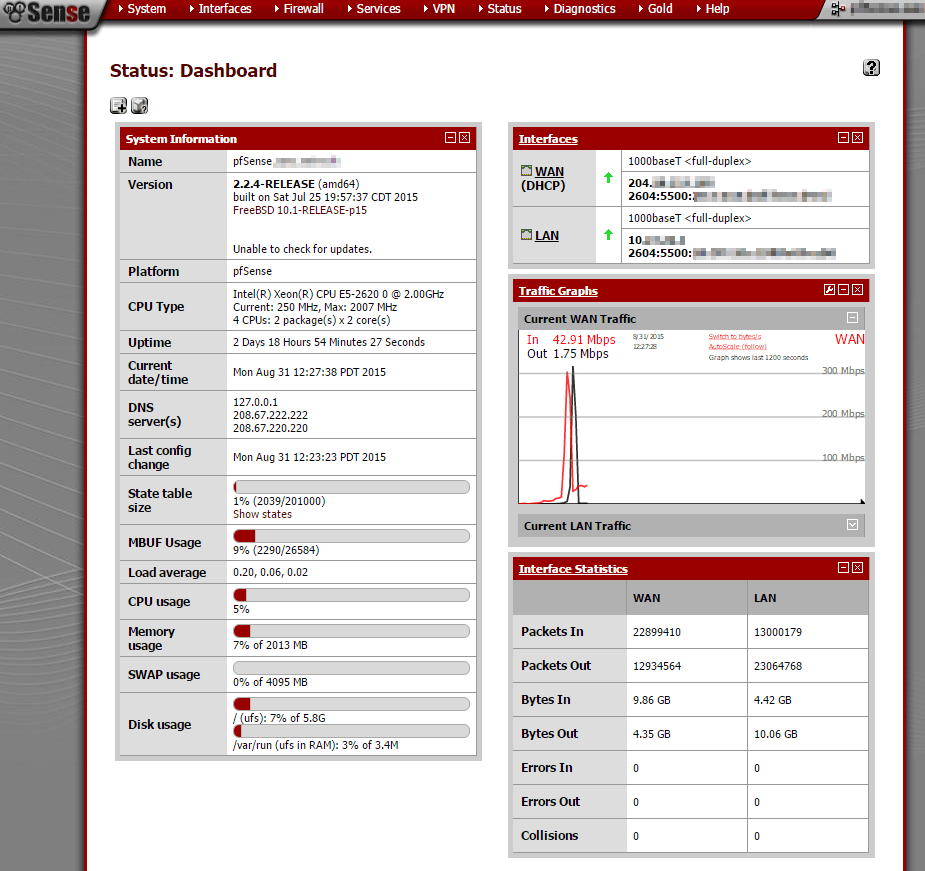
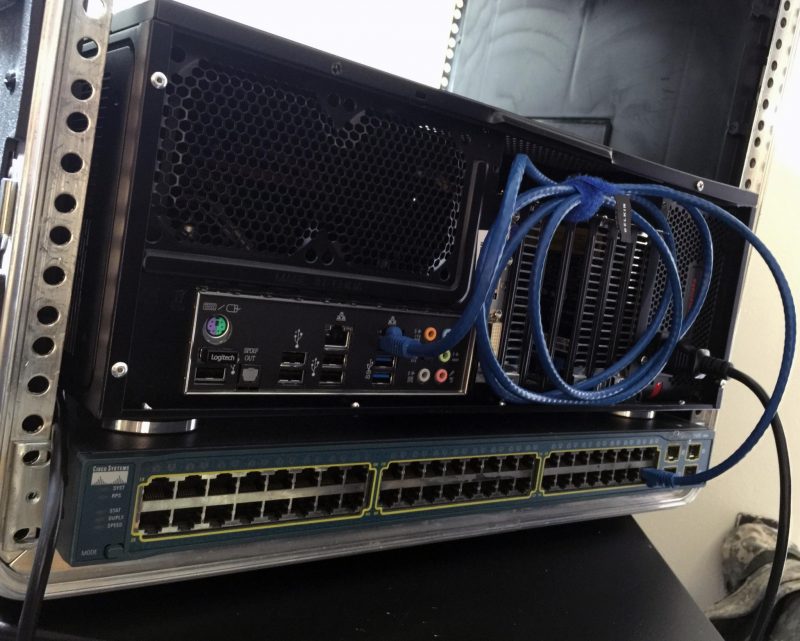
UFW, ou Pare-feu simple, est une interface iptablesqui vise à simplifier le processus de configuration d’un pare-feu. Bien iptablesqu’il s’agisse d’un outil solide et flexible, il peut être difficile pour les débutants d’apprendre à l’utiliser pour configurer correctement un pare-feu. Si vous cherchez à commencer à sécuriser votre réseau et que vous ne savez pas quel outil utiliser, UFW peut être le bon choix pour vous.
Ce tutoriel vous montrera comment configurer un pare-feu avec UFW sur Ubuntu 16.04.
UFW est installé par défaut sur Ubuntu. S’il a été désinstallé pour une raison quelconque, vous pouvez l’installer avec sudo apt-get install ufw.
Étape 1 – Utilisation d’IPv6 avec UFW (facultatif)
Ce didacticiel est écrit avec IPv4 à l’esprit, mais fonctionnera pour IPv6 aussi longtemps que vous l’activez. Si votre serveur Ubuntu a activé IPv6, assurez-vous que UFW est configuré pour prendre en charge IPv6 afin qu’il gère les règles de pare-feu pour IPv6 en plus d’IPv4. Pour ce faire, ouvrez la configuration UFW avec nanoou votre éditeur préféré.
sudo nano /etc/default/ufw
Assurez-vous ensuite que la valeur de IPV6est yes. Ça devrait ressembler à ça:
/ etc / default / ufw extrait
...
IPV6=yes
...
Enregistrez et fermez le fichier. Désormais, lorsque UFW est activé, il sera configuré pour écrire les règles de pare-feu IPv4 et IPv6. Cependant, avant d’activer UFW, nous voulons nous assurer que votre pare-feu est configuré pour vous permettre de vous connecter via SSH. Commençons par définir les politiques par défaut.
The Web Server is a crucial part of web-based applications. Apache Web Server is often placed at the edge of the network hence it becomes one of the most vulnerable services to attack. Having default configuration supply many sensitive information which may help hacker to prepare for an attack the web server.
The majority of web application attacks are through XSS, Info Leakage, Session Management and PHP Injection attacks which is due to weak programming code and failure to sanitize web application infrastructure. According to the security vendor Cenzic, 96% of tested applications have vulnerabilities. Below chart from Cenzic shows the vulnerability trend report of 2013.
This practical guide provides you the necessary skill set to secure Apache Web Server. In this course, we will talk about how to Harden & Secure Apache Web Server on Unix platform. Following are tested on Apache 2.4.x and I don’t see any reason it won’t work with Apache 2.2.x.
We will call Apache installation directory /opt/apache as $Web_Server throughout this course.
You are advised to take a backup of existing configuration file before any modification.
1.1 Audience
This is designed for Middleware Administrator, Application Support, System Analyst, or anyone working or eager to learn Hardening & Security guidelines. Fair knowledge of Apache Web Server & UNIX command is mandatory. This is seven page guide, click on Next to proceed. You may navigate through table of contents at right hand side.
Using VMWare ESXi and PFsense as a network firewall/router
In most networks, you will have dedicated hardware to function as your “edge” (firewall/router). This is typically for the best, but there are always cases where you can’t put out that dedicated hardware. Sometimes it’s for cost reasons and sometimes it’s for complexity. In my particular case, I was installing an ESXi server in a datacenter and only had 2 amps of power to work with, of which my server took up ~1.8amps at peak load. So cost came into play and we simply couldn’t afford to put in dedicated hardware that could push enough bits. In such cases, it is possible the setup ESXi on the network edge, in a reasonably secure fashion, with PFSense acting as a firewall.
The most important requirement to this project is that your VMWare ESXi server has at least two network ports on it. One will be the WAN port, one will be the LAN port. Also throughout this tutorial I will use PFSense as my firewall/router OS of choice, however it is just an example that can be easily swapped out with any other virtualized firewall product. Some options include Palo Alto Networks, Fortinet, and even generic *NIX operating systems with the right forwarding/firewall setup.
Section 1 – VMWare Setup
Step 1 – Install & Connect to ESXi
You should already have ESXi setup and connected via the VSphere client on Windows.
It’s recommended that you static the IP address of the VMWare Management interface, if you’ve not done so already.
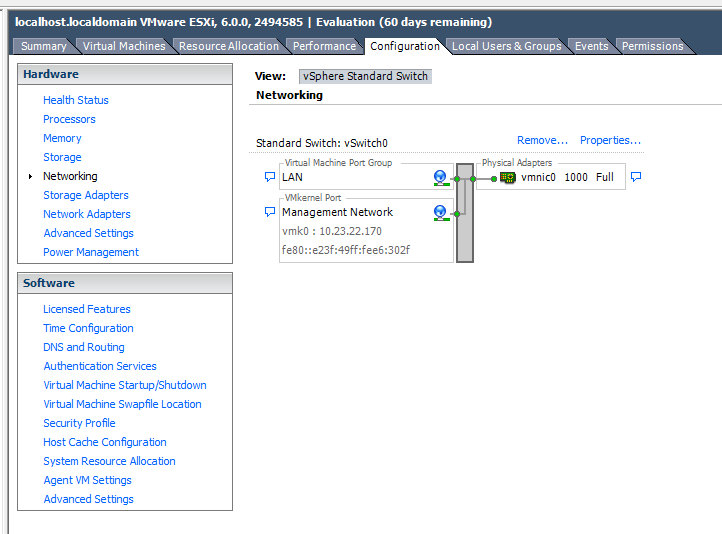
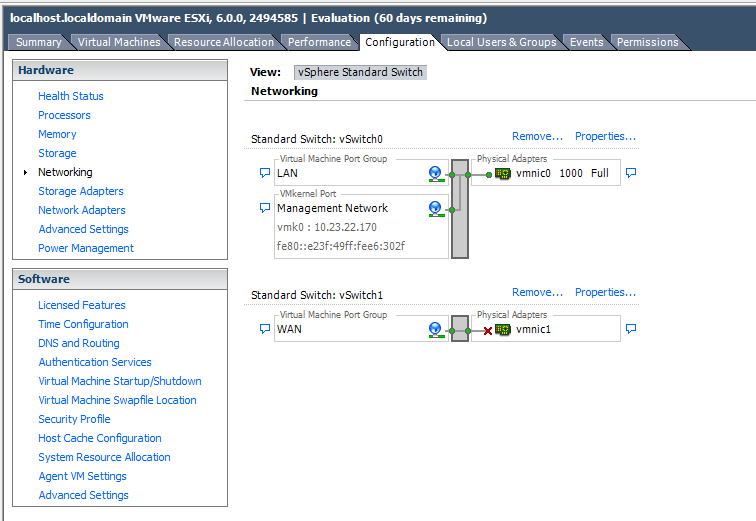
Go to Configuration > Networking
Rename the vSwitch interface you’re using to “LAN”
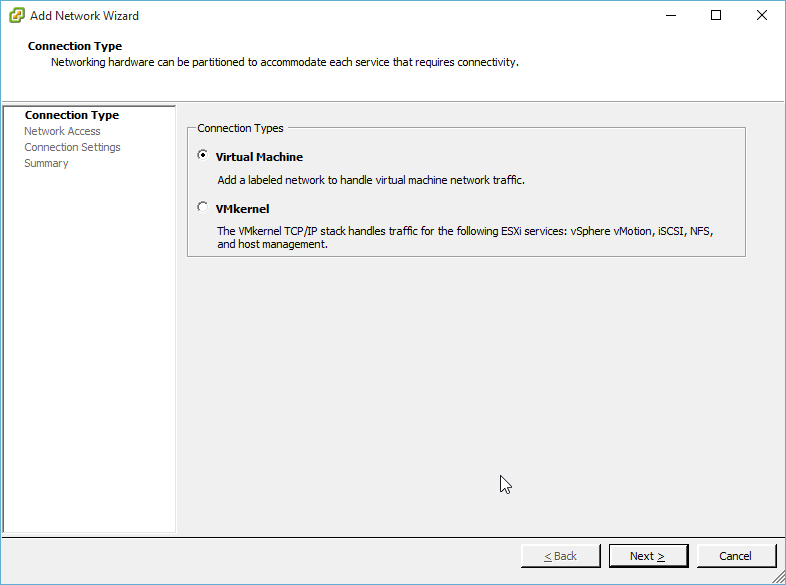
Step 2 – Add new interface You want “Virtual Machine” type
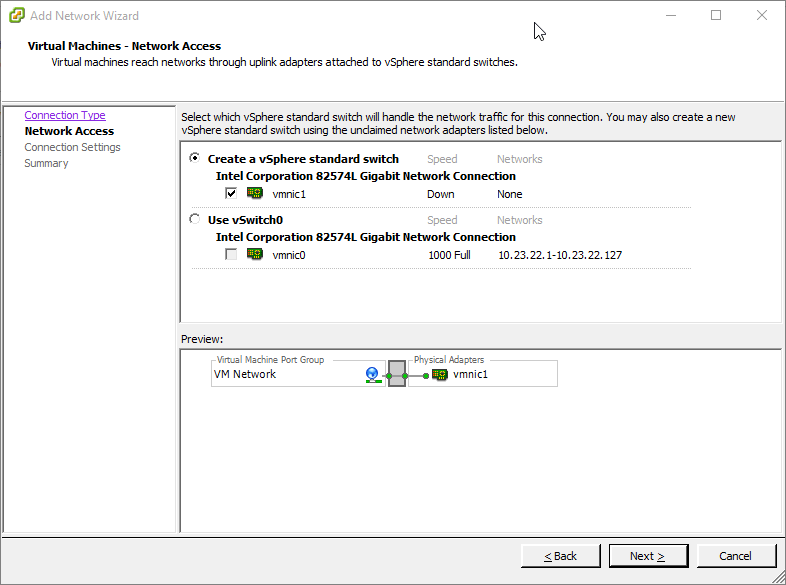
Step 3 – Select NIC You want to select your unused NIC (assuming you only have two)
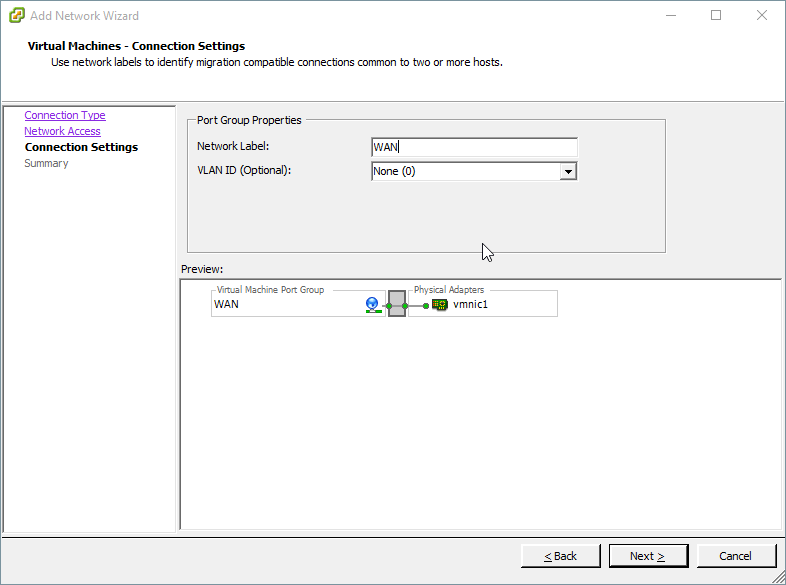
Step 4 – Name it This is your “WAN” interface
Step 5 – Confirm you’ve got two networks You’ll notice that we’ve got two vSwitches now. The “LAN” switch has the Management network and is connected currently. The “WAN” switch has nothing, and the adapter is disconnected.
Section 2 – Virtual Machine Setup
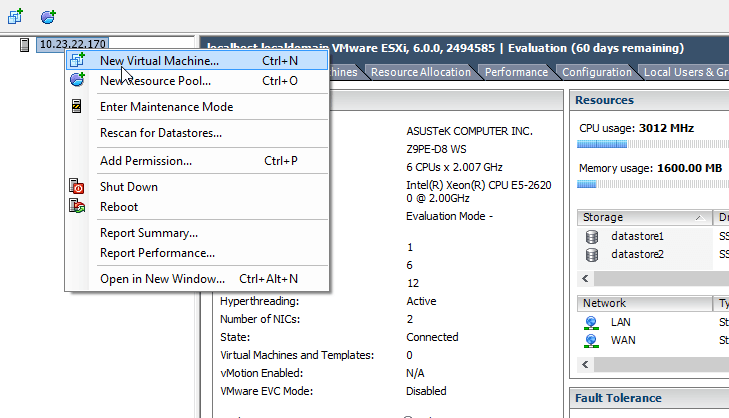
Step 1 – New VM
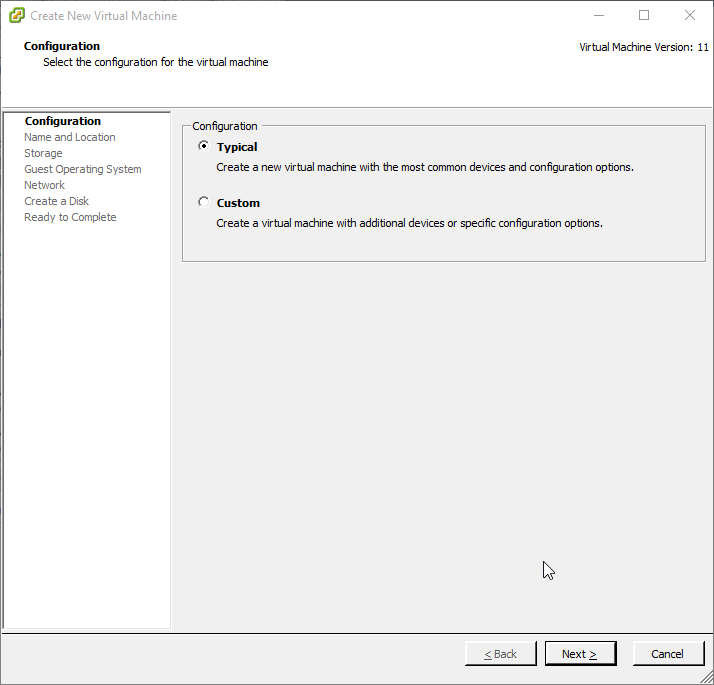
Step 2 – Typical Setup
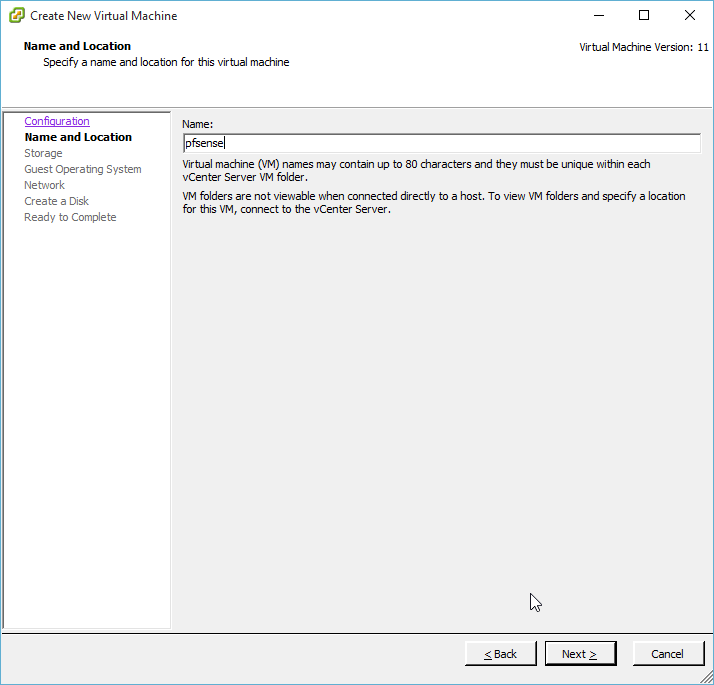
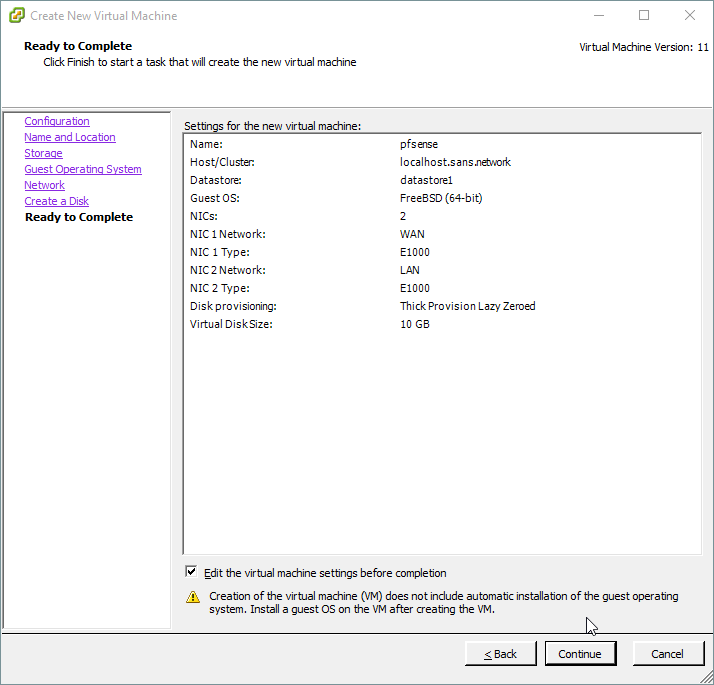
Step 3 – Name your VM
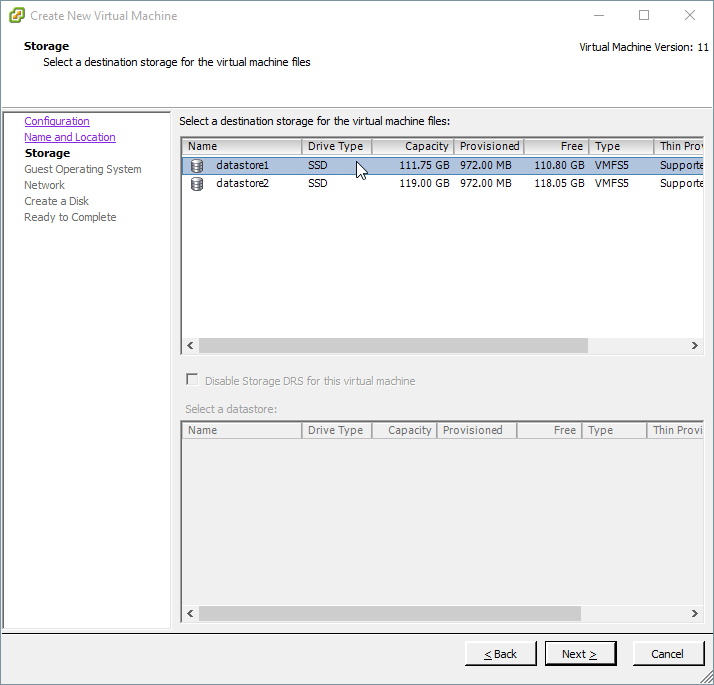
Step 4 – Select Datastore
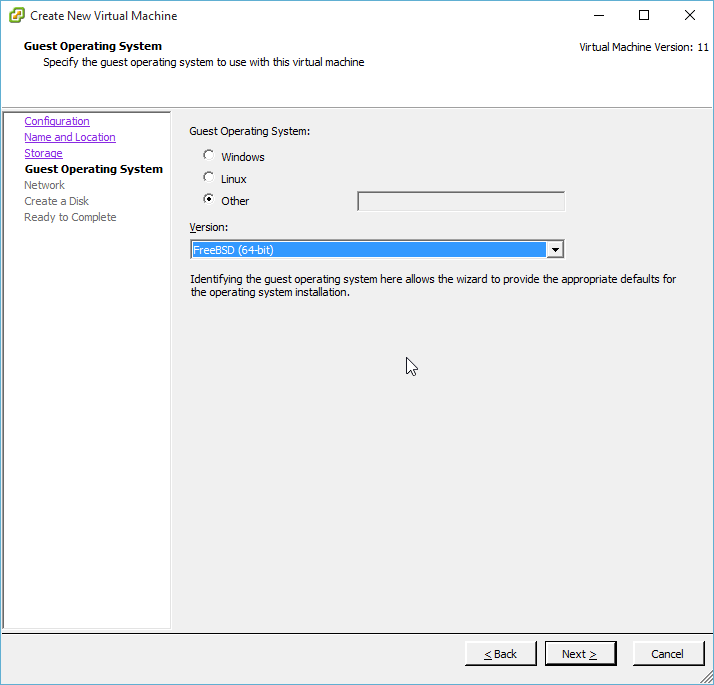
Step 5 – OS Type If you’re using PFSense, select “Other” and “FreeBSD 64bit”
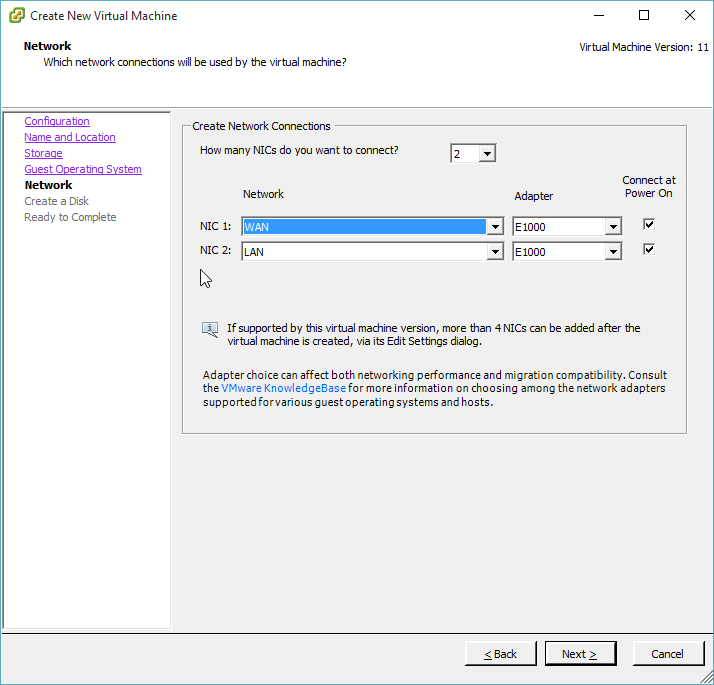
Step 6 – Two NICs Unlike most VMs with 1 NIC, add 2 NICs to this VM. Make sure one adapter is on “WAN” network and one adapter is on “LAN” network.
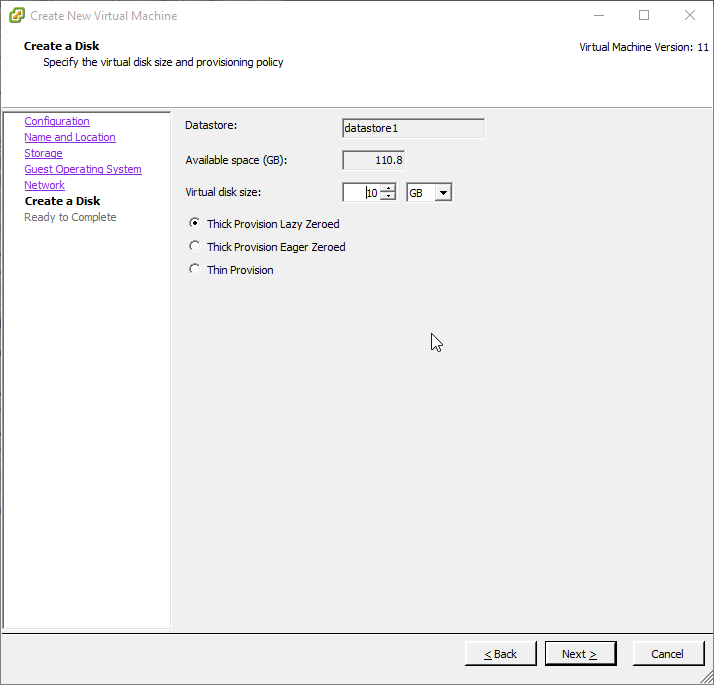
Step 7 – Allocated HD PFSense doesn’t need much space, but it should be allocated a 2:1 for swap (e.g. 4096 MB swap file for 2048 MB of RAM), plus some extra space for packages and logs may be useful.
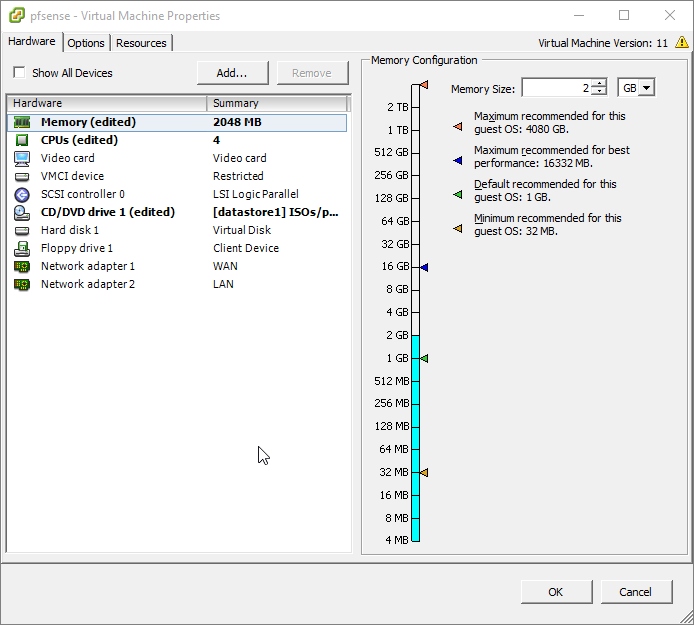
Step 8 – Edit before completion
Step 9 – Final settings As this is my firewall, I want to make sure it is plenty fast. So I opted for 4 cores and 2 GB RAM. Also attach the CD drive to PFSense installer (be it datastore ISO or real USB/Optical drive).
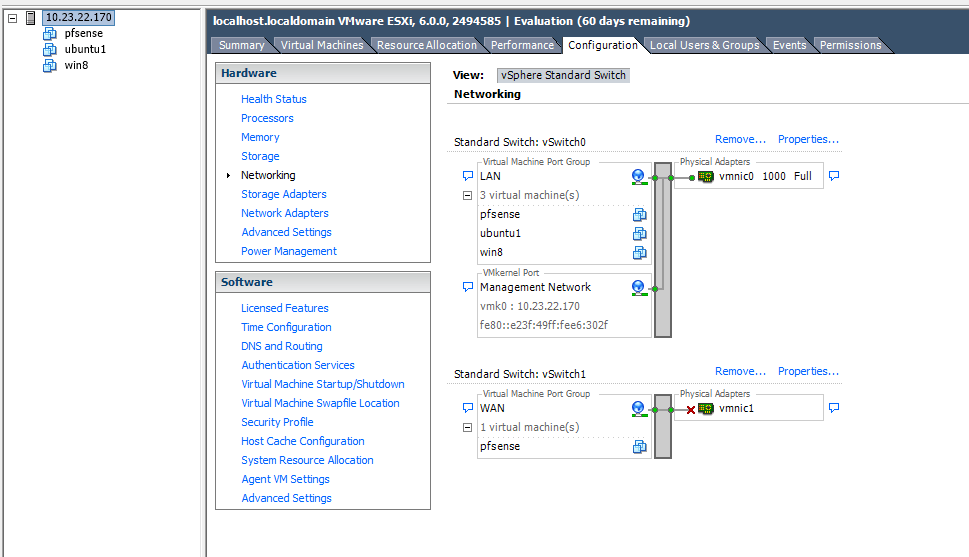
Step 8 – Verify Network Hop back to Configuration > Networking and you should see something like this. Note: various VMs are all attached to the LAN vSwitch, however only PFsense VM is attached to both WAN & LAN (just like a real firewall).
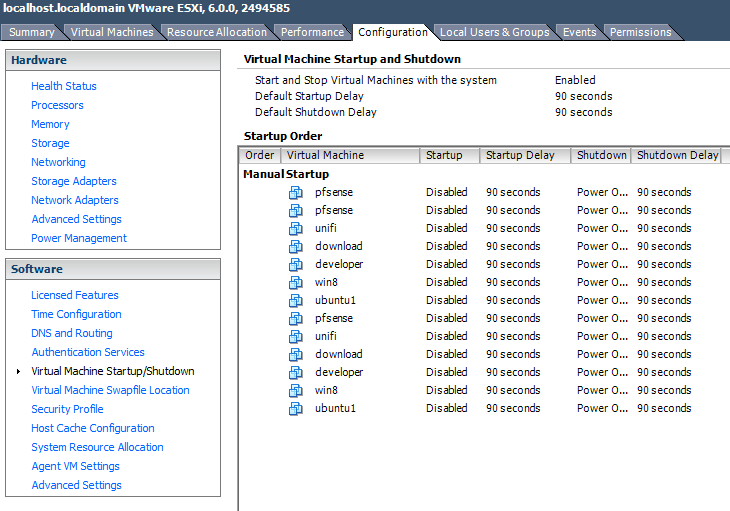
Step 9 – VM Startup Go to Configuration > VM Startup/Shutdown Click Properties
Step 10 – Set PFSense to first boot order You may have other VMs that you want to auto-start, but as this is your firewall, it should be the first to start.
Section 3 – PFSense
Step 1 – Install PFSense Once you’ve installed PFSense, it will automatically configure its local interface to 192.168.1.1
Step 2 (Optional) – Change local network You can reconfigure the local network either via web interface (at the aforementioned IP: http://192.168.1.1) or command line
Step 3 – Configure WAN Again, this can be configured either via the web, or command line.
Step 4 – Plug in WAN cable
Step 5 – Test If you’ve got the ports configured properly (i.e. WAN hardware is WAN in VMWare and WAN in PFSense), you should be able to connect to the internet.
There are two big questions after building a setup like this, the first is security. Since PFSense is the host to provide an interface on the WAN, it should be the only method of ingress into your network. With no VMware management interface on the WAN, there should be no way for an outside party to access ESXi directly. I’ve used this setup successfully (and safely) before, as have others. However, you always need to balance your particular security concerns with the cost of dedicated devices.
The second question is remote management/maintenance/failure. Managing ESXi remotely is easy, if you setup a VPN on your PFSense VM. Without that (or similar) you will not be able to remotely manage the box (by design). But what happens if there is a failure either in the VMWare hardware or the PFSense virtual machine? That’s the big failing point of this setup – you’re down. If, for whatever reason, PFsense dies – your network is offline and you cannot remotely manage it. If this hardware is installed in a dateacenter, you’d need to either get in there yourself or remote hands reboot. Something to keep in mind when balancing the cost issue. OF course, if it’s local (say you use this at home), then it’s not such a big deal. I will note that this is the setup I use in my home network, which doubles as my homelab. Having a VM for a firewall gives me a lot of flexibility, like adding an entirely separate vSwitched network for experimental VMs. I can also swap out the firewall VM for another one with next to no downtime. It also allows me to skip one more piece of hardware at home which would add to my otherwise hefty powerbill.
If your device has a frozen screen or doesn’t respond when you touch it, or becomes stuck when you turn it on, learn what to do.
If your screen is black or frozen
If your screen is black or frozen, you might need to force restart your device. A force restart won’t erase the content on your device. You can force restart your device even if the screen is black or the buttons aren’t responding. Follow these steps:
On an iPhone 8 or iPhone 8 Plus: Press and quickly release the Volume Up button. Then press and quickly release the Volume Down button. Finally, press and hold the Side button until you see the Apple logo.
On an iPhone 7 or iPhone 7 Plus: Press and hold both the Side and Volume Down buttons for at least 10 seconds, until you see the Apple logo.
On an iPhone 6s and earlier, iPad, or iPod touch: Press and hold both the Home and the Top (or Side) buttons for at least 10 seconds, until you see the Apple logo.
If your device still won’t turn on or start up
Plug in your device and let it charge for up to one hour.
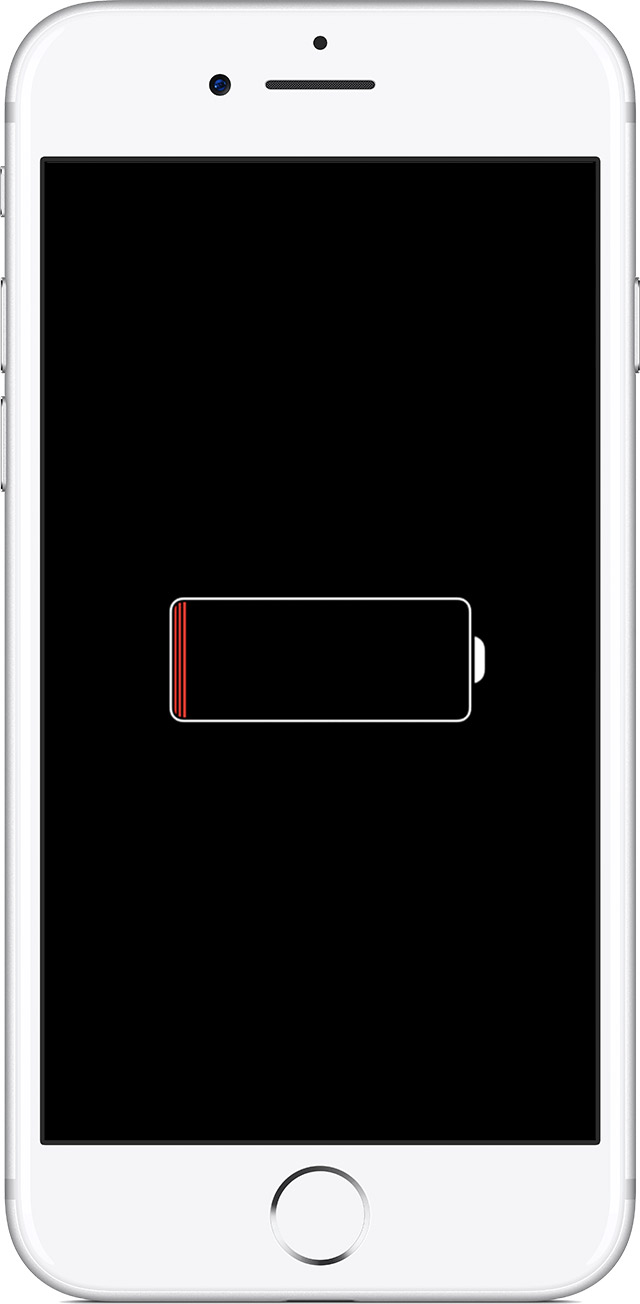
After a few minutes, you should see the charging screen.
If you don’t see the charging screen within an hour, or you see the connect to power screen, check the jack, USB cable, and power adapter. Make sure that everything is plugged in firmly, free of debris, and not damaged. You might want to try a different USB cable or power adapter.
While your device is connected, force it to restart.
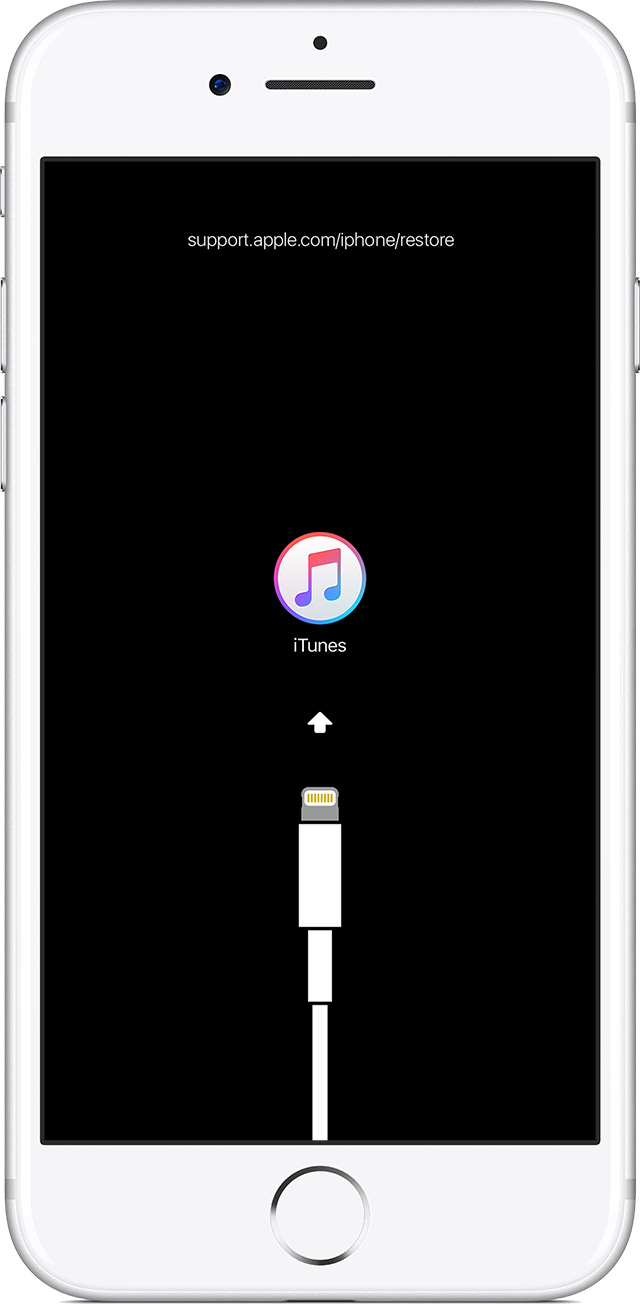
On an iPhone 8 or iPhone 8 Plus: Press and quickly release the Volume Up button. Then press and quickly release the Volume Down button. Finally, press and hold the Side button until you see the recovery-mode screen.
On an iPhone 7 or iPhone 7 Plus: Press and hold the Side and Volume Down buttons at the same time. Keep holding them until you see the recovery-mode screen.
On an iPhone 6s and earlier, iPad, or iPod touch: Press and hold both the Home and the Top (or Side) buttons at the same time. Keep holding them until you see the recovery-mode screen.
Don’t release the buttons when you see the Apple logo. Keep holding until you see the recovery mode screen.
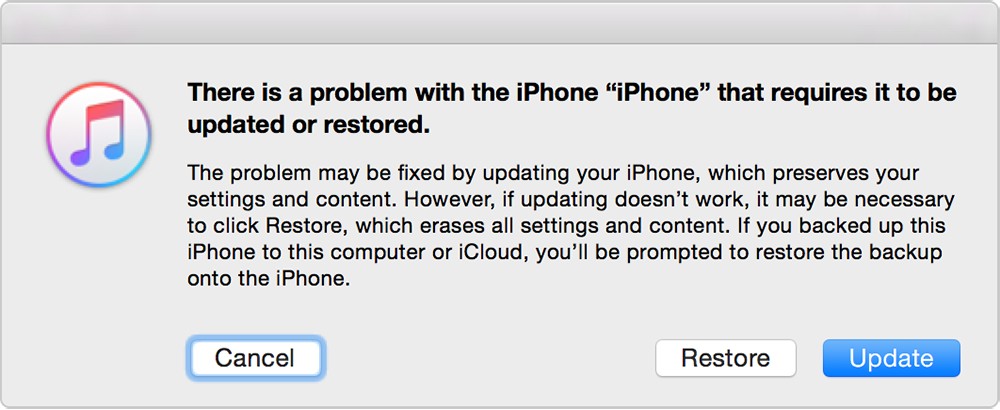
When you get the option to restore or update, choose Update. iTunes will try to reinstall iOS without erasing your data.
iTunes will download the software for your device. If it takes more than 15 minutes, your device will exit recovery mode and you’ll need to repeat steps 2 and 3.
To access some specialized Mac features you’ll need to hold down one or more keys during startup. If you’re having trouble with your Mac, this can be a great way to troubleshoot and analyze your options.
To use any of these boot keys, hold down the listed key combo as soon as you press your Mac’s power button. If you’re restarting your Mac, press and hold the keys immediately after your Mac begins to restart. Don’t release the keys until you see the described behavior.
macOS Boot Options
Shift: Start your Mac in Safe Mode. Since safe mode only loads essential software, you can determine whether a system process or a user-installed application is causing your problem.
Option: Boot into Startup Manager. From here you can select different startup disks if any bootable partitions are available.
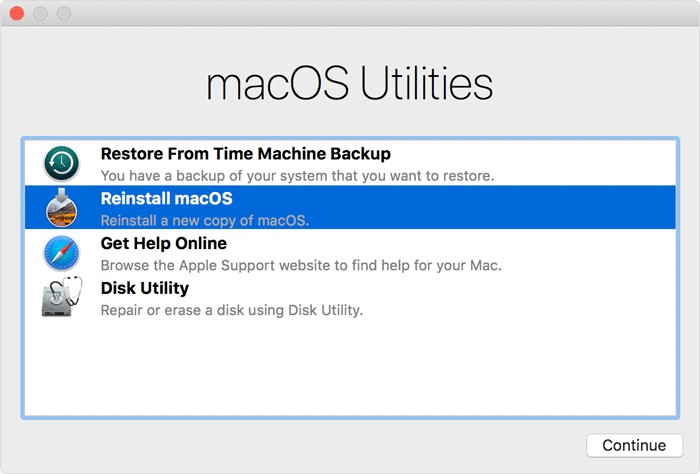
Command + R: Boot into Recovery Mode. Recovery Mode is macOS’s powerful recovery suite with a bunch of options for saving or wiping your Mac. You can use it to reinstall macOS, restore from a Time Machine backup or use Disk Utility to repair or format your hard drive.
Shift + Command + Option + R: Start in Internet Recovery Mode, skipping your system’s hard drive. This allows you to reinstall the build of macOS that came with your computer from the factory. macOS might do this one on its own if your installation is so messed up that you can’t boot into Recovery Mode.
Command + S: Start in single user, command-line-only mode. This is useful for running diagnostic Terminal commands or fsck, but it can’t do much beyond that.
Command + V: Boot in verbose mode. This mode displays logging and diagnostic messages as your Macboots. If your Mac is showing the Apple logo but failing to start completely, try this step to see where in the boot process the error occurs.