Archive

Archives pour la catégorie ‘Tutoriel’

Supervision de postfix via mailgraph avec le plugin check_mailstat.pl via Nagios/Centreon

28/03/2021 Comments off

Source:  l’admin sous GNU/Linux – blog libreCentreon_graph_mailstat_home
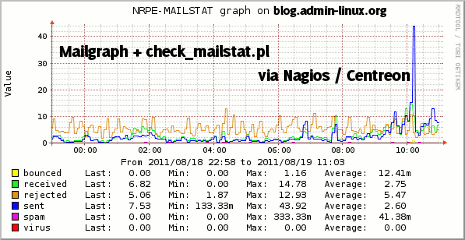
 

Voici une procédure permettant de contrôler l’activité d’un serveur de messagerie postfix via Nagios / Centreon.

Pour cela nous allons utiliser le plugins check_mailstat.pl avec une petite adaptation du script afin de le rendre compatible avec la génération de graphe sous Centreon.

Le plugin check_mailstat.pl va récupérer depuis des données depuis mailgraph qui permet de générer des graphes via RRDTool

Tout d’abord, il faut installer Mailgraph sur l’hôte à superviser, ici une Debian.

Installation de Mailgraph

aptitude install mailgraph

Si l’installation ne vous a pas poser les questions propres au paramétrage, lancer :

dpkg-reconfigure mailgraph

Voici les questions et réponse à fournir :

Mailgraph doit-il être lancé au démarrage ? OUI

Fichier de journalisation à utiliser par mailgraph : /var/log/mail.log (à adapter)

Faut-il compter les courriels entrants comme des courriels sortants ? NON (J’utilise Amavis, donc j’ai choisi cette option, encore une fois à adapter.

Lire la suite…

Howto: Performance Benchmarks a Webserver

27/03/2021 Comments off

source: nixCraft

You can benchmark Apache, IIS and other web server with apache benchmarking tool called ab. Recently I was asked to performance benchmarks for different web servers.

Apache benchmark

Apache benchmark

It is true that benchmarking a web server is not an easy task. From how to benchmark a web server:

First, benchmarking a web server is not an easy thing. To benchmark a web server the time it will take to give a page is not important: you don’t care if a user can have his page in 0.1 ms or in 0.05 ms as nobody can have such delays on the Internet.

What is important is the average time it will take when you have a maximum number of users on your site simultaneously. Another important thing is how much more time it will take when there are 2 times more users: a server that take 2 times more for 2 times more users is better than another that take 4 times more for the same amount of users. »

Here are few tips to carry out procedure along with an example:

Apache Benchmark Procedures

  • You need to use same hardware configuration and kernel (OS) for all tests
  • You need to use same network configuration. For example, use 100Mbps port for all tests
  • First record server load using top or uptime command
  • Take at least 3-5 readings and use the best result
  • After each test reboot the server and carry out test on next configuration (web server)
  • Again record server load using top or uptime command
  • Carry on test using static html/php files and dynamic pages
  • It also important to carry out test using the Non-KeepAlive and KeepAlive (the Keep-Alive extension to provide long-lived HTTP sessions, which allow multiple requests to be sent over the same TCP connection) features
  • Also don’t forget to carry out test using fast-cgi and/or perl tests

Lire la suite…

Howto: Geolocation for Fail2ban

14/03/2021 Comments off

source: fail2ban.org


Using geolocation to locate your attackers.

I use fail2ban on my servers to protect them from would-be attackers, if you don’t your either insanely nieve to the fact that somebody wants in your system, or your just wanting to see if you can get hacked. Most of the attackers I would assume are just after another « bot » in their « net », or maybe a place to host files.

Durzo hosts a script that allows you to log the attacks on you into a mysql database with geocoding, I thought this would be cool to use as I could see from where I was being attacked. I then got this working and another script to display the table in a web page so I could view the data easily.

I then found some scripts from Google to pull data from MySQL in a geolocation table and generate an XML file used to import into Google Maps. With some tweaking and customizing, I now have a map with the geolocation data as markers on the map. Not all the markers are right on a building, but they are close enough for me to see the areas from which attacks are coming.

Now on to the good stuff… Lire la suite…

Comment créer un tunnel SSH inverse

02/03/2021 Comments off

Parfois que nous avons besoin de vous connecter via SSH à un autre ordinateur, nous trouvons que cet ordinateur que nous comptions SSH dans (ce que nous allons appeler « destiny ») peuvent utiliser NAT et, par conséquent, il doesn ' t compte avec une adresse IP publique que nous pourrions utiliser pour se connecter à lui, ou il peut être derrière un pare-feu qui a gagné ' t permettent l'accès de l'extérieur.

Si le « destin » peut réussir à établir une connexion SSH vers un autre ordinateur qui n'est accessible, nous pouvons utiliser ce deuxième ordinateur afin d'établir un tunnel SSH inverse à notre ordinateur « destiny », nous allons appeler ce deuxième ordinateur « origine » (même si elle n'est pas réellement l'ordinateur que nous allons utiliser pour gérer à distance les « cibles », mais qu'un pont).

Un tunnel SSH inverse fonctionne en connectant « destinée » à « l'origine » et puis en se servant cette connexion SSH dans « destin » de n'importe quel ordinateur connecté à « l'origine ». Ce tunnel SSH inverse devrait fonctionner dans la plupart des distributions Linux sans problème.

Alors, laisse supposer que nous avons à présent deux ordinateurs :

« L'origine » IP : aaa.bbb.ccc.ddd

« Destiny » IP : inconnue ou non disponible

Tout d'abord, nous établissons la connexion SSH de "destinée" à « l'origine », qui permet la fonctionnalité SSH inverse avec le paramètre – r :

SSH r 61999:localhost:22 [email protected]

Le premier nombre (61999) indique quel port on va pour utiliser « origine » pour vous connecter à « destiny », localhost est le nom de domaine que nous utiliserons pour cela aussi bien, et le dernier numéro (22) indique quel port est le « destin » écouter pour SSH.

Une fois que cette connexion est établie, et être connecté à le "origine" (peu importe si nous sommes connectés local ou à distance), nous pouvons établir la connexion au « destin » :

SSH p 61999 destiny_user@localhost

Effectivement, nous pouvons utiliser un ordinateur avec un accès SSH permanent comme un pont entre des ordinateurs qui ne sont pas autrement accessibles par l'intermédiaire de SSH. N'importe quel ordinateur connecté à le « origine » peut se connecter à autres ordinateurs avec inversion de tunneling SSH activé.


Categories: Réseau, Système, Tutoriel Tags: , ,

8 Practical Examples of Linux Xargs Command for Beginners

28/01/2021 Comments off

The Linux xargs command may not be a hugely popular command line tool, but this doesn’t take away the fact that it’s extremely useful, especially when combined with other commands like findand grep. If you are new to xargs, and want to understand its usage, you’ll be glad to know that’s exactly what we’ll be doing here.

Before we proceed, please keep in mind that all the examples presented in this tutorial have been tested on Ubuntu 14.04 LTS. Shell used is Bash, and version is 4.3.11.

1. How Xargs command works?

Well, before jumping onto its usage, it’s important to understand what exactly Xargs does. In layman’s terms, the tool – in its most basic form – reads data from standard input (stdin) and executes the command (supplied to it as argument) one or more times based on the input read. Any blanks and spaces in input are treated as delimiters, while blank lines are ignored. 


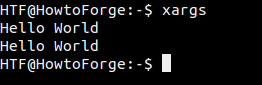
If no command is supplied as argument to xargs, the default command that the tool executes is echo. For example, in the following example, I just executed ‘xargs’ and entered ‘Hello World’ on stdin. As I pressed Ctrl+D (to tell xargs that we’re done with the input), the echocommand was automatically executed, and ‘Hello World’ was printed again.

How xargs command works

2. How to use xargs with another command?

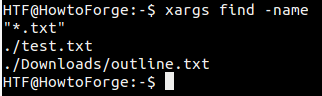
While echo is the default command xargs executes, you can explicitly specify any other command. For example, you can pass the find command along with its ‘-name’ option as argument to xargs, and then pass the name of the file (or type of files) you want find to search as input through stdin.

Here’s the complete command in question:

xargs find -name

For example, we provided « *.txt » in input through stdin, which means we want the find command to search all .txt files in the current directory (as well as its subdirectories).

Here’s the command in action:

Combine xargs with other commands

Lire la suite…

Categories: Système, Tutoriel Tags: , ,