Archive

Archives pour la catégorie ‘Système’

Using iptables and watch command

08/05/2024 Comments off

Using iptables to list filtering rules is OK. Running this command in a shell loop can help but it needs that you write a shell script.

Another convenient way is to use the watch command:

watch --interval 0 'iptables -nvL'

or

sudo watch --interval 0 'iptables -nvL'

depending on whether you’re logged as super-user or not.

This will show a permanent iptables -L with a refresh interval that can be specified:

watch --interval 0 'iptables -nvL'

will refresh every second.

Typical output will be:

Every 10,0s: iptables -nvL                                                                                         Tue Nov  3 16:35:19 2015

Chain INPUT (policy DROP 44001 packets, 2444K bytes)
 pkts bytes target     prot opt in     out     source               destination
    3   160 fail2ban-ssh  tcp  --  *      *       0.0.0.0/0            0.0.0.0/0            multiport dports 22
  11M 1770M ACCEPT     all  --  *      *       0.0.0.0/0            0.0.0.0/0            state RELATED,ESTABLISHED
 107K 6878K ACCEPT     tcp  --  *      *       78.193.xx.xx         0.0.0.0/0
    0     0 ACCEPT     tcp  --  *      *       195.154.xx.xx        0.0.0.0/0
 231K   14M ACCEPT     tcp  --  *      *       213.36.xx.xx         0.0.0.0/0
    0     0 ACCEPT     tcp  --  *      *       195.154.xx.xx        0.0.0.0/0
    2    92 ACCEPT     tcp  --  *      *       0.0.0.0/0            0.0.0.0/0            tcp dpt:548
    0     0 ACCEPT     icmp --  *      *       0.0.0.0/0            0.0.0.0/0            icmptype 0
 1475  139K ACCEPT     icmp --  *      *       0.0.0.0/0            0.0.0.0/0            icmptype 8
  134  9600 ACCEPT     tcp  --  *      *       0.0.0.0/0            0.0.0.0/0            tcp spt:80
  110  6563 ACCEPT     tcp  --  *      *       0.0.0.0/0            0.0.0.0/0            tcp spt:443
    0     0 ACCEPT     tcp  --  *      *       0.0.0.0/0            0.0.0.0/0            tcp spt:943
 136K 9529K ACCEPT     udp  --  *      *       0.0.0.0/0            0.0.0.0/0            udp dpt:1194
 1423 85360 ACCEPT     tcp  --  *      *       0.0.0.0/0            0.0.0.0/0            tcp dpt:4949
    3   120 ACCEPT     tcp  --  eth0   *       0.0.0.0/0            0.0.0.0/0            tcp dpt:873 state NEW,ESTABLISHED
   24  1910 ACCEPT     udp  --  *      *       0.0.0.0/0            0.0.0.0/0            udp dpt:161
    0     0 ACCEPT     udp  --  *      *       0.0.0.0/0            0.0.0.0/0            udp dpt:162
    0     0 ACCEPT     udp  --  *      *       0.0.0.0/0            0.0.0.0/0            udp dpt:119
    2    92 ACCEPT     tcp  --  *      *       0.0.0.0/0            0.0.0.0/0            tcp dpt:3000
  156  7584 ACCEPT     tcp  --  *      *       0.0.0.0/0            0.0.0.0/0            tcp dpt:8080
 2952  177K ACCEPT     all  --  lo     *       0.0.0.0/0            0.0.0.0/0
    0     0 ACCEPT     tcp  --  *      *       172.27.xx.xx/24      0.0.0.0/0
    0     0 ACCEPT     tcp  --  as0t0  *       0.0.0.0/0            0.0.0.0/0
    3   192 ACCEPT     tcp  --  as0t1  *       0.0.0.0/0            0.0.0.0/0
Ubuntu Linux /etc/network/interfaces networking example

04/05/2024 Comments off

Source: nixCraft

Q. Can you explain how to setup network parameters such as IP address, subnet, dhcp etc using /etc/network/interfaces file?

A. /etc/network/interfaces file contains network interface configuration information for the both Ubuntu and Debian Linux. This is where you configure how your system is connected to the network.

Defining physical interfaces such as eth0

Lines beginning with the word « auto » are used to identify the physical interfaces to be brought up when ifup is run with the -a option. (This option is used by the system boot scripts.) Physical interface names should follow the word « auto » on the same line. There can be multiple « auto » stanzas. ifup brings the named inter faces up in the order listed. For example following example setup eth0 (first network interface card) with 192.168.1.5 IP address and gateway (router) to 192.168.1.254:

iface eth0 inet static
address 192.168.1.5
netmask 255.255.255.0
gateway 192.168.1.254

Setup interface to dhcp

To setup eth0 to dhcp, enter:
auto eth0
iface eth0 inet dhcp

Lire la suite…

Categories: Réseau, Système Tags: ,

How To Use ProxySQL as a Load Balancer for MySQL on Ubuntu 16.04

02/05/2024 Comments off

Introduction

ProxySQL is an open-source MySQL proxy server, meaning it serves as an intermediary between a MySQL server and the applications that access its databases. ProxySQL can improve performance by distributing traffic among a pool of multiple database servers and also improve availability by automatically failing over to a standby if one or more of the database servers fail.

In this guide, you will set up ProxySQL as a load balancer for multiple MySQL servers with automatic failover. As an example, this tutorial uses a multi-primary replicated cluster of three MySQL servers, but you can use a similar approach with other cluster configurations as well.

Prerequisites

To follow this tutorial, you will need:

Lire la suite…
Categories: Bases de données, Système Tags: ,

Use a classic menu in Unity

28/04/2024 Comments off

Source: WebUpd8

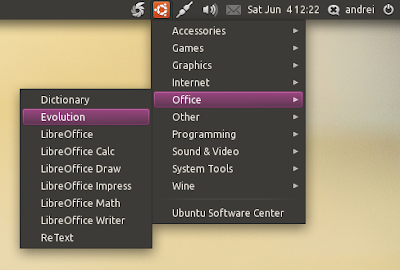
If you find Dash to be confusing and want to use a classic menu in Unity, you have at least two alternatives: Cardapio or a new ClassicMenu Indicator.

ClassicMenu Indicator

Classic Menu Indicator Ubuntu
While the idea is great, there are a few annoyances: you can’t move indicators in Ubuntu so you can’t move the menu to the position you want on the panel and also, ClassicMenu AppIndicator doesn’t display icons for the menu items. You can get it to display icons by using the commands posted here.
Still, ClassicMenu Indicator is a great menu alternative for those who don’t like Dash and I’m sure it will improve in the future (this is the first public release).

Update: there’s now a PPA too:

sudo add-apt-repository ppa:diesch/testing
sudo apt-get update
sudo apt-get install classicmenu-indicator

Cardapio

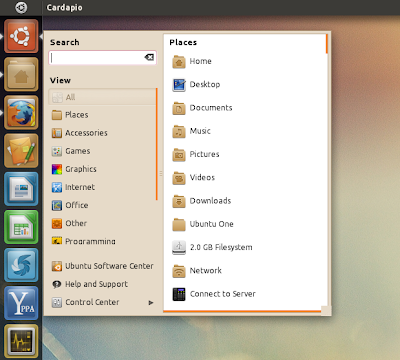
Cardapio Unity launcher

Cardapio is a main menu alternative with quite a few cool features: it comes with Zeitgeist integration, includes plugins for performing inline searches of Files (via Tracker), Software Center, Google, Wikipedia, and much more.

A long time ago, when Cardapio didn’t have an Avant Window Navigator applet, we posted about adding Cardapio to AWN using a feature that displays Cardapio near your mouse using a command (« cardapio show-near-mouse« ). Well, using the same command you can create an Unity panel launcher to run Cardapio, like you can see in the screenshot above.

To use the launcher, firstly install Cardapio:

sudo add-apt-repository ppa:cardapio-team/unstable
sudo apt-get update
sudo apt-get install cardapio
To make things easier, I’ve created the Unity launcher so all you have to do is download it and drag it to the Unity Launcher.
So download the Cardapio launcher from HERE, extract it and place the file under~/.local/share/applications/ (important: if you don’t place it here, it will disappear once you restart your computer). « .local » is a hidden folder in your home directory so press CTRL + H to see it. Then drag the file to the Unity Launcher.

This is an AppIndicator (so it’s displayed in the AppIndicator area) that behaves like a regular GNOME menu.


Categories: Logiciel, Système Tags:

Allow A Normal User To Run Commands As root Under Linux / UNIX Operating Systems

27/04/2024 Comments off

Source: nixCRAFT

You need to use the sudo command which is use to execute a command as another user. It allows a permitted user to execute a command as the superuser or another user, as specified in the /etc/sudoers (config file that defines or list of who can run what) file. The sudo command allows users to do tasks on a Linux system as another user.

sudo command

sudo is more more secure than su command. By default it logs sudo usage, command and arguments in /var/log/secure (Red Hat/Fedora / CentOS Linux) or /var/log/auth.log (Ubuntu / Debian Linux).

If the invoking user is root or if the target user is the same as the invoking user, no password is required. Otherwise, sudo requires that users authenticate themselves with a password by default. Once a user has been authenticated, a timestamp is updated and the user may then use sudo without a password for a short period of time (15 minutes unless overridden in sudoers).

/etc/sudoers Syntax

Following is general syntax used by /etc/sudoers file:

USER HOSTNAME=COMMAND

Where,

  • USER: Name of normal user
  • HOSTNAME: Where command is allowed to run. It is the hostname of the system where this rule applies. sudo is designed so you can use one sudoers file on all of your systems. This space allows you to set per-host rules.
  • COMMAND: A simple filename allows the user to run the command with any arguments he/she wishes. However, you may also specify command line arguments (including wildcards). Alternately, you can specify «  » to indicate that the command may only be run without command line arguments.

Lire la suite…

Categories: Système Tags: , ,