Archive

Archives pour la catégorie ‘Sécurité’

Detect Webcam & Microphone Activity on Mac with Oversight

09/12/2023 Comments off

Source: osxdaily.com

Though Mac users don’t usually have to worry excessively about “camfecting” malware and spyware, some security conscious users may find it nice to know if a process or application is attempting to access their computers web camera or microphone. 


With the help of a free third party security utility called Oversight, you can have your Mac alert you anytime an application or process tries to activate either recording device on the computer. 

The developer of Oversight explains why a tool like Oversight could be valuable to some users:

“One of the most insidious actions of malware, is abusing the audio and video capabilities of an infected host to record an unknowing user. Macs, of course, are not immune; malware such as OSX/Eleanor, OSX/Crisis, OSX/Mokes, and others, all attempt to spy on OS X users. OverSight constantly monitors a system, alerting a user whenever the internal microphone is activated, or the built-in webcam is accessed. And yes, while the webcam’s LED will turn on whenever a session is initially started, new research has shown that malware can surreptitious piggyback into such existing sessions (FaceTime, Sykpe, Google Hangouts, etc.) and record both audio and video – without fear of detection.” 

Sound good? If so, it’s a free download that is easy to install on a Mac with either macOS or Mac OS X:

If you’re interested in this app, simply download Oversight and run the installer (it can be just as easily uninstalled later if you decide you do not need it).

Once installed, Oversight is small and lightweight running quietly in the background, and it will alert you anytime the Mac microphone or webcam FaceTime camera are attempting to be activated. You can then directly intervene and either allow the webcam or microphone access (for legitimate use), or deny it (for theoretical illegitimate use).
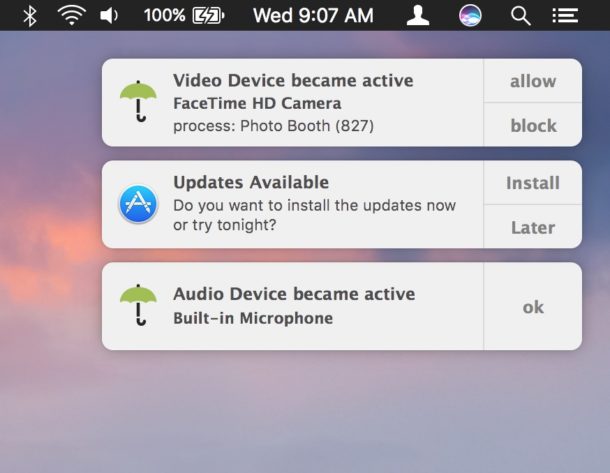
Oversight alerting to camera and microphone access on Mac

Keep in mind that Oversight does not differentiate between legitimate and illegitimate use of the webcam and microphone on your Mac, that is up to you. For example, you will get a notification alert that the microphone and FaceTime camera are trying to be accessed when you open an app like Skype, Photo Booth, FaceTime, or are recording a video on your Mac with the webcam, but since those applications legitimately use the computers microphone and camera they are probably nothing to be concerned about (assuming you have launched them yourself anyway). On the other hand, if out of the blue and with no provocation if you see a process has attempted to access your microphone, that could potentially be an unauthorized attempt to use the microphone and you could choose to reject it and block the device access with Oversight. Whenever possible, Oversight will attempt to notify you of the process name and PID, but sometimes you will see blank notifications of access anyway – again just think about what apps you are using and if they have any reason to use your camera or microphone, similar to how you can control this type of access in iOS for Photos, camera, and microphone. 
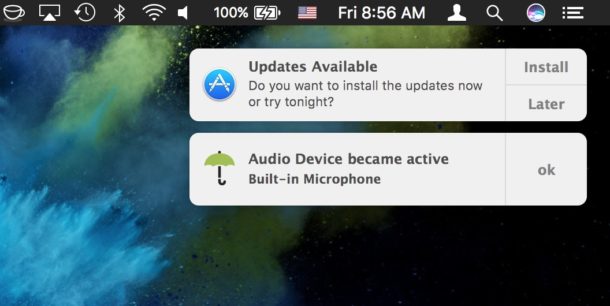
Microphone activated found by Oversight on Mac

This is a software solution which is quite a bit more fancy than the low-tech solution of putting tape on your web camera like the FBI Director does and many security professionals do. You could always use Oversight along with some tape too if you’re extra concerned about your Mac webcam or microphone access and want to be sure nothing fishy is going on from camfecting or otherwise. 

While apps like Oversight could be considered overboard and unnecessary for many Mac users, others who are privacy conscious or in fields where higher security matters may find them to be helpful. I’ve personally noticed a particular web browser will occasionally attempt to access the microphone on my Mac from time to time without an obvious reason which I find to be… curious… and Oversight notified me each time. It’s not for everyone, but if you want to be notified when something is trying to use your Mac camera or microphone, check out the app yourself. 
Easy Ubuntu 16.04 Server Firewall

08/12/2023 Comments off

If you read our previous article Easy Ubuntu Server Firewall, then you may have noted that on Ubuntu 16.04 the described method no longer works. This is due to systemd. In the article below we will walk through creating a persistent IPTables based firewall on Ubuntu 16.04 LTS. First we need to install some required software packages. As seen in the command below, install iptables-persistent. Next we will make netfilter-persistent run at boot. This is the most important step as it will ensure your rules are reloaded at boot time.

# Install IPTables Persistent Package
apt-get install -y iptables-persistent
# Add netfilter-persistent Startup
invoke-rc.d netfilter-persistent save
# Stop netfilter-persistent Service
service netfilter-persistent stop

Once the packages above are installed and the service is stopped, you will have a new directory at /etc/iptables/. This directory holds the IPTables filter rules that will be reloaded at boot time. These files are named rules.v4 and rules.v6 respectively. IPV4 rules are loaded into rules.v4 and IPV6 rules are loaded into rules.v6. For the purpose of this article we will focus on IPV4 rules. Next we will want to copy the rules below into our rules.v4 file. Of course the rules will need to be modified to fit your environment.

# Generated by iptables-save v1.3.3 on Wed Apr 9 10:51:08 2008
# Flush out any rules that are already in there
*filter
:INPUT ACCEPT [146:11332]
:FORWARD ACCEPT [0:0]
:OUTPUT ACCEPT [104:9831]
 
# Allow internal loopback connections
-A INPUT -i lo -j ACCEPT
-A OUTPUT -o lo -j ACCEPT
 
# Allow pinging
-A INPUT -p icmp -m icmp --icmp-type 8 -j ACCEPT
 
# Allow any outbound data, and any inbound data related to a connection that is already in use
-A INPUT -m state --state RELATED,ESTABLISHED -j ACCEPT
-A OUTPUT -m state --state NEW,RELATED,ESTABLISHED -j ACCEPT
 
# =========BEGIN SERVER SPECIFIC PORT OPEN RULES=========
# Allow SCP/SSH Access from Green & Blue Subnet
-A INPUT -s 172.16.12.0/255.255.255.0 -p tcp -m tcp --dport 22 -j ACCEPT
-A INPUT -s 10.10.12.0/255.255.255.0 -p tcp -m tcp --dport 22 -j ACCEPT
 
# Allow HTTP Access from Red Subnet/Internet
-A INPUT -p tcp -m state --state NEW,ESTABLISHED --dport 80 -j ACCEPT
 
# Allow HTTPS Access from Red Subnet/Internet
-A INPUT -p tcp -m state --state NEW,ESTABLISHED --dport 443 -j ACCEPT
 
# Allow MySQL Access from Red Subnet/Internet
-A INPUT -p tcp -m state --state NEW,ESTABLISHED --dport 3306 -j ACCEPT
 
# Allow FTP Access from Red Subnet/Internet
-A INPUT -p tcp -m state --state NEW,ESTABLISHED --dport 21 -j ACCEPT
-A INPUT -p tcp -m state --state NEW,ESTABLISHED --dport 58000:58010 -j ACCEPT
# =========END SERVER SPECIFIC PORT OPEN RULES=========
 
# Drop everything that hasn't been picked up by one of the rules above
-A INPUT -j DROP
-A FORWARD -j DROP
-A OUTPUT -j DROP
 
COMMIT
# Completed on Wed Apr 9 10:51:08 2008

Lastly, in order for our new rules to take affect, we simply need to start the netfilter-persistent service as seen below. That’s it, you now have a fully functional IPTables based firewall.

# Start netfilter-persistent Service
service netfilter-persistent start

# Check if IPTables were applied
iptables -L

Getting started with Let’s Encrypt SSL Certificates on Ubuntu

08/12/2023 Comments off

This tutorial will guide you through your very first configuration of an SSL website with Let’s Encrypt certification. Let’s Encrypt is a new SSL authority that provides free SSL certificates. We are going to use two existing tutorials (“How to setup an intermediate compatible SSL website with Let’s Encrypt certificate” and “The Perfect Server – Ubuntu 15.10 (Wily Werewolf) with Apache, PHP, MySQL, PureFTPD, BIND, Postfix, Dovecot and ISPConfig 3”).

The setup described here is compatible with any Ubuntu LAMP server, so you can use this one as the basis setup too.

This tutorial will show you how to setup Let’s Encrypt on Servers without ISPConfig 3 as there will be a direct implementation of the Let’s Encrypt service in the next ISPConfig 3 release (version 3.1) soon. So if you plan to use ISPConfig, wait for the 3.1 release and also a new tutorial.

Creating the website

The 1st step is to create the website configuration and directory and enable SSL (Apache mod_ssl) for it. It’s up to you if you use the default configuration for one website on a server or you plan to use multiple vhosts to host more than one domain. For more reliable and scalable usage, I’ll create a vhost configuration for my “lab” domain isp1.cloudapp.net from Azure.

Lire la suite…

Categories: Sécurité, Système Tags:

Inotify: Efficient, Real-Time Linux File System Event Monitoring

07/12/2023 Comments off

Summary – or why should I monitor the filesystem at all?

The need to scan a given filesystem for changes is a fairly common one, and there are a variety of common tasks which require this, including:

  • Notifying applications of changes in configuration files
  • Tracking changes in critical system files
  • Monitoring overall disk usage on a partition
  • Automatic cleanup after a crash
  • Automatic triggering of backup processes
  • Sending notifications when the upload of a file to a server completes

A common approach to doing this sort of change notification is file polling, however this tends to be inefficient for all but the most frequently-changed files (since you have a guaranteed I/O every X seconds) and can miss certain types of changes (e.g. if the modification timestamp on a file isn’t changed). Data integrity systems like Tripwire track file changes based on a fixed time schedule, but the time-scheduled approach doesn’t work if you want to be notified every time it changes in real-time – just as an event takes place. A framework which fulfills that requirement is Inotify. In this article we will walk through how to use Inotify to monitor directories and trigger alerts on changes and present tools you might want to add to your personal toolbox.

Lire la suite…

Categories: Sécurité, Système Tags:

Faille de sécurité : MySQL peut donner les privilèges root à des hackers

05/12/2023 Comments off

Et il n’y a toujours pas de correctif

mysql hackMySQL fait partie des systèmes de gestion de bases de données les plus utilisés du monde, que ça soit par le grand public ou par les professionnels. De nombreuses entreprises comme Google, Facebook, Yahoo, YouTube, Adobe, l’utilisent encore pour gagner du temps et faire tourner leurs larges sites web, malgré l’émergence et la montée en puissance de nouvelles solutions, notamment les systèmes de gestion de bases de données NoSQL. MySQL est également plébiscité par les petites entreprises en raison de son prix d’implantation nettement inférieur, qui fait de ce système une solution simple et peu onéreuse à mettre en œuvre pour des applications non critiques.

Le chercheur de sécurité polonais Dawid Golunsku a dévoilé deux vulnérabilités dans MySQL, compromettant la sécurité des serveurs. Le chercheur a détaillé l’une des failles de sécurité et a décrit sa méthode d’exploitation. Oracle n’a toujours pas corrigé les deux vulnérabilités, malgré le fait qu’elles ont été signalées il y a plus de quarante jours.

La première vulnérabilité affecte « tous les serveurs MySQL en configuration par défaut dans toutes les versions de MySQL (5.7, 5.6 et 5.5), dont les dernières versions ». Les variantes liées à MySQL, MariaDB et PerconaDB, n’ont pas été épargnées par cette vulnérabilité, néanmoins, des correctifs leur ont été appliqués.

« Une exploitation réussie [de la vulnérabilité CVE-2016-6662] permettrait à un attaquant d’exécuter du code arbitraire avec les privilèges root, ce qui lui permettrait de compromettre entièrement le serveur », explique le chercheur. La faille CVE-2016-6662 peut être exploitée si un hacker a accès à une connexion authentifiée à une base de données MySQL (à travers une connexion réseau ou une interface web comme phpMyAdmin) ou une injection SQL, même avec les modules SELinux et AppArmor installés. Les attaquants peuvent injecter des réglages malicieux dans les fichiers de configuration MySQL, my.cnf, le but étant d’acquérir l’accès root et d’exécuter un code malicieux additionnel. Cette vulnérabilité fait surface 13 ans après qu’un correctif avait été déployé pour remédier à un problème similaire.

Le chercheur a révélé également l’existence d’une seconde faille, néanmoins il n’est pas entré en détail sur la méthode de son exploitation. « Il est à noter que des attaquants peuvent utiliser l’une des autres failles découvertes par l’auteur de ce bulletin, auquel a été assigné l’identifiant CVE CVE-2016-6663 et est en attente de publication. Cette faille facilite la création d’un fichier /var/lib/mysql/my.cnf au contenu arbitraire, sans besoin du privilège FILE ».

Oracle n’a toujours pas adressé officiellement ces vulnérabilités, même si un correctif de sécurité a été publié il y a quelques jours, afin de limiter le risque. Il parait qu’Oracle a secrètement corrigé quelques bogues révélés par Golunski, en limitant les emplacements valides pour charger une bibliothèque au démarrage du service incriminé et en empêchant la génération des fichiers de configuration .ini ou .cnf par la base de données. Même avec ce correctif (MySQL 5.6.33, 5.7.15 et 5.5.52 ?) , le risque reste élevé, surtout avec la persistance d’une deuxième faille non encore détaillée. Si Golunski a révélé l’existence de la vulnérabilité après un mois et demi, avec un prototype limité, c’est pour mettre en garde les utilisateurs afin qu’ils puissent se protéger.

Il faut rappeler que des forks de MySQL, comme par exemple MariaDB et PerconaDB, ont été aussi notifiés de l’existence de la vulnérabilité, et ont déjà pu déployer des correctifs pour corriger les deux failles.

Source : Legalhackers