Archive

Archives pour 10/2026

What is a Distributed Firewall?

24/10/2026 Aucun commentaire

In the post “What is Network Virtualization?” I described a model where the application’s complete L2-L7 virtual network is decoupled from hardware and moved into a software abstraction layer for the express purpose of automation and business agility. In this post I’ll focus on network security, and describe an imminent firewall form factor enabled by Network Virtualization — the Distributed Firewall.

ALL YOUR PACKET ARE BELONG TO US

If InfoSec ruled the world … well, OK, maybe not the world … if InfoSec ruled the data center network design, and if money was no object, we would probably have something like this. Every server in the data center directly connected to its own port on one massive firewall. Every packet sent from every server would be inspected against a stateful security policy before going anywhere. And every packet received by every server would pass one final policy check before hitting the server’s NIC receive buffer. The firewall wouldn’t care about the IP address of the servers, for the simple reason that it’s directly connected to every server. E.g. “The server on this port can talk to the server on that port, on TCP port X”. And if that wasn’t good enough, the firewall knows everything about the servers connected to it, and can create rules around a rich set of semantics. All of this with no performance penalty. That would be awesome, right?

Let’s pretend money was not the issue. How would you design this massive omnipresent data center firewall? I can think of three ways off hand.

  1. You design a monstrous power sucking stateful firewall chassis with thousands of line-rate ports. At this point it’s time to route a ghastly mess of cables from every server to this centralized mega firewall core chassis – but that’s somebody else’s problem. Oh, and don’t forget you’ll need two of those bad boys for “redundancy”. Your monster firewall is pretty freaking awesome at security, but only so-so at basic L2 and L3 networking. But so what — the network team can learn to like it or find a new job. And if you run out of ports … no worries; just wait another few years for a bigger chassis and do the rip/replace routine.
  2. You design a line rate stateful firewall ToR switch. Rip out the network team’s favorite ToR and put this one in its place. Tell them to stop throwing a fit and just deal with it. You’ll have hundreds of these ToR firewalls to manage and configure consistently. No problem … just let the network team re-apply for their jobs as firewall engineers.

Go ahead and pinch yourself now. This is nothing but a fantasy nightmare.

The interests of security often poorly translate into networking. Comprehensive security ~= Compromisednetworking.

What about design #3? More on that in a minute. (Hint: title of the post)

In the real world, rest assured we do have firewalls to provide some security. But this security is not ubiquitous, nor is it assured. Instead, we have firewalls (physical or virtual) hanging off the network somewhere catching steered packets – and we can only hope the network was configured correctly to steer the right traffic to the right policy.

In this post we’ll briefly review the physical and virtual firewall, followed by a discussion on the Distributed Firewall.

Lire la suite…

Categories: Logiciel, Réseau Tags:

/etc/hosts vs. /etc/resolv.conf

23/10/2026 Comments off

From Wikipedia:

resolv.conf is the name of a computer file used in various operating systems to configure the system’s Domain Name System (DNS) resolver. The file is a plain-text file usually created by the network administrator or by applications that manage the configuration tasks of the system. The resolvconf program is one such program on FreeBSD or other Unix machines which manages the resolv.conf file.

When an application performs DNS lookup as part of its operations on Linux, it can leverage both /etc/hosts and /etc/resolv.conf configuration files to resolve DNS names. How these configuration files are used for DNS lookup can vary among different applications, complicating system administration. But Linux libc library and the GNU C Library (glibc) provides a clean solution to this problem, by defining DNS lookup orders with Name Service Switch (NSS). NSS defines a set of databases and their lookup order in NSS configuration file (/etc/nsswitch.conf in Linux). Applications built with those libraries will then perform DNS lookups in a consistent manner.

In /etc/nsswitch.conf, the database for DNS lookup is called « hosts« . For example:

$ cat /etc/nsswitch.conf | grep "hosts"
hosts: files dns

The above means that DNS lookup refers to /etc/hosts first, and then DNS servers specified in /etc/resolv.conf

gethostbyname() in glibc will follow the DNS lookup order specified in /etc/nsswitch.conf. So do other programs like wget and curl.

Note that DNS lookup tools such as nslookup/dig which are made to query DNS servers, will ignore /etc/nsswitch.conf, and always refer to DNS servers in /etc/resolv.conf

Source: Xmodulo

Categories: Réseau, Système Tags:

How to set up web-based network traffic monitoring system on Linux

23/10/2026 Comments off

When you are tasked with monitoring network traffic on the local network, you can consider many different options to do it, depending on the scale/traffic of the local network, monitoring platforms/interface, types of backend database, etc.

ntopng is an open-source (GPLv3) network traffic analyzer which provides a web interface for real-time network traffic monitoring. It runs on multiple platforms including Linux and MacOS X. ntopng comes with a simple RMON-like agent with built-in web server capability, and uses Redis-backed key-value server to store time series statistics. You can install ntopng network traffic analyzer on any designated monitoring server connected to your network, and use a web browser to access real-time traffic reports available on the server.

In this tutorial, I will describe how to set up a web-based network traffic monitoring system on Linux by using ntopng.

Features of ntopng

  • Flow-level, protocol-level real-time analysis of local network traffic.
  • Domain, AS (Autonomous System), VLAN level statistics.
  • Geolocation of IP addresses.
  • Deep packet inspection (DPI) based service discovery (e.g., Google, Facebook).
  • Historical traffic analysis (e.g., hourly, daily, weekly, monthly, yearly).
  • Support for sFlow, NetFlow (v5/v9) and IPFIX through nProbe.
  • Network traffic matrix (who’s talking to who?).
  • IPv6 support.

Install ntopng on Linux

The official website offers binary packages for Ubuntu and CentOS. So if you use either platform, you can install these packages.

If you want to build the latest ntopng from its source, follow the instructions below. (Update: these instructions are valid for ntopng 1.0. For ntopng 1.1 and higher, see the updated instructions).

To build ntopng on Debian, Ubuntu or Linux Mint:

$ sudo apt-get install libpcap-dev libglib2.0-dev libgeoip-dev redis-server wget libxml2-dev
$ tar xzf ntopng-1.0.tar.gz -C ~
$ cd ~/ntopng-1.0/
$ ./configure
$ make geoip
$ make

In the above steps, « make geoip » will automatically download a free version of GeoIP databases with wget from maxmind.com. So make sure that your system is connected to the network.

To build ntopng on Fedora:

$ sudo yum install libpcap-devel glib2-devel GeoIP-devel libxml2-devel libxml2-devel redis wget
$ tar xzf ntopng-1.0.tar.gz -C ~
$ cd ~/ntopng-1.0/
$ ./configure
$ make geoip
$ make

To install ntopng on CentOS or RHEL, first set up EPEL repository, and then follow the same instructions as in Fedora above.

Configure ntopng on Linux

After building ntopng, create a configuration directory for ntopng, and prepare default configuration files as follows. I assume that « 192.168.1.0/24 » is the CIDR address prefix of your local network.

$ sudo mkir /etc/ntopng -p
$ sudo -e /etc/ntopng/ntopng.start
--local-networks "192.168.1.0/24"
--interface 1
$ sudo -e /etc/ntopng/ntopng.conf
-G=/var/run/ntopng.pid

Lire la suite…

How to check Internet speed from the command line on Linux

22/10/2026 Comments off

check internet speedWhen you are experiencing slow Internet access, you may want to test the Internet speed of your upstream ISP (often called « last mile » in the residential broadband networks) as part of troubleshooting. For that matter, Speedtest.net is probably the most widely used broadband speed testing website.

Underneath it, Speedtest.net loads JavaScript code in your web browser, which then automatically detects the closest Speedtest.net server from you, and measures download/upload speed by sending HTTP GET and POST requests to the server.

However, if you are trying to check Internet speed from a remote headless server, VPS or an otherwise desktop-less system, Speedtest.net’s Flash-based user-friendly interface would be no good. For those of you, there is a command-line interface (CLI) version of Speedtest.net, known as speedtest-cli. Here I will demonstrate how to use speedtest-cli to check Internet speed from the command line in Linux.

Install speedtest-cli on Linux

speedtest-cli is a simple CLI client written in Python for measuring bidirectional Internet bandwidth by using Speedtest.net infrastructure. It works with Python 2.4-3.4. Installing the latest speedtest-cli is nothing more than downloading the Python script.

$ wget https://raw.github.com/sivel/speedtest-cli/master/speedtest_cli.py
$ chmod a rx speedtest_cli.py
$ sudo mv speedtest_cli.py /usr/local/bin/speedtest-cli
$ sudo chown root:root /usr/local/bin/speedtest-cli

Test Internet Connection Speed with speedtest-cli

It is straightforward to check your Internet speed with speedtest-cli. Running speedtest-cli command without any argument gets its job done.

$ speedtest-cli

This will automatically discover the closest Speedtest.net server (in terms of geographic distance), and report download and upload speed measured from the server.


If you want to share the speed test result, you can use « --share » option, which will allow you to share speed test result with others in an image format via Speedtest.net.

The following is a sample image automatically generated and uploaded to Speedtest.net by speedtest-cli.

Lire la suite…

Categories: Réseau Tags:

How to look up the geographic location of an IP address from the command line

22/10/2026 Comments off

geographic location ipIf you want to find out where a given IP address is physically located on earth, there are quite a few online GeoIP lookup services you can try (e.g. geoiptool.com). These online services are mostly powered by freely available GeoIP databases such as those from MaxMind. Besides using such web-based services, there are different ways to query the GeoIP databases, notably via the Linux command line.
In this tutorial, I am going to describe how to geolocate an IP address from the command line in Linux.

Method One

The first method is to use geoiplookup tool which is a command-line client for MaxMind’s GeoIP databases. geoiplookup allows you to look up the geography or network information of an IP address (or hostname). You can install the tool (along with the free GeoIP database used by the tool) as follows.

To install geoiplookup on Debian, Ubuntu or Linux Mint:

$ sudo apt-get install geoip-bin

To install geoiplookup on Fedora:

$ sudo yum install geoip

To install geoiplookup on CentOS, first enable EPEL repository, and then use yum command:

$ sudo yum install geoip

The default installation of geoiplookup comes with GeoIP.dat database file which is located in /usr/share/GeoIP. With this database, you can look up the country information only.

 
$ geoiplookup 23.66.166.151
GeoIP Country Edition: US, United States

You can download additional GeoIP databases from MaxMind, which give you more detailed information about IP addresses beyond country info. You can also download more up-to-date GeoIP.dat from the site. This is recommended because GeoIP.dat may have already been outdated by the time you install it from Linux repositories. The GeoIP databases available on MaxMind website are updated every month.

To install additional GeoIP databases from MaxMind, do the following. You may want to set up a monthly cronjob to automate this process.

$ wget http://geolite.maxmind.com/download/geoip/database/GeoLiteCountry/GeoIP.dat.gz
$ wget http://geolite.maxmind.com/download/geoip/database/GeoLiteCity.dat.gz
$ wget http://download.maxmind.com/download/geoip/database/asnum/GeoIPASNum.dat.gz
$ gunzip GeoIP.dat.gz
$ gunzip GeoIPASNum.dat.gz
$ gunzip GeoLiteCity.dat.gz
$ sudo cp GeoIP.dat GeoIPASNum.dat GeoLiteCity.dat /usr/share/GeoIP/

Now if you re-run geoiplookup, you will see the additional AS number information of an IP address. This basically tells you which administrative domain the IP address belongs to.

$ geoiplookup 128.112.119.209
GeoIP Country Edition: US, United States
GeoIP ASNum Edition: AS88 Princeton University

When run without any parameter, geoiplookup tool automatically uses GeoIP.dat and GeoIPASNum.dat only, but not use GeoLiteCity.dat. The latter can give you city-level information.

To obtain city-level geolocation information, explicitly tell geoiplookup to use GeoLiteCity.dat database.

$ geoiplookup -f /usr/share/GeoIP/GeoLiteCity.dat 23.66.166.151
GeoIP City Edition, Rev 1: US, MA, Cambridge, 02142, 42.362598, -71.084297, 506, 617

The output includes state, city, zipcode, latitude and longitude. The accuracy of the inferred location varies across different countries and networks. For example, the geolocation result tends to be more accurate for broadband IP addresses, but not as accurate for mobile networks.

Method Two

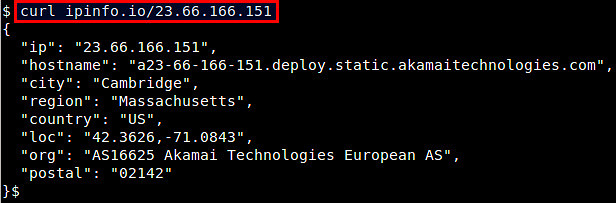
If you want to avoid the hassle of installing and updating GeoIP databases, you can try ipinfo.io online service. Unlike other services, ipinfo.io provides JSON-based geolocation API, so you can easily look up geolocation from the command line, using tools like curl.

$ curl ipinfo.io/23.66.166.151

13117907603_3cce4123de_z

Note that the access to their API is rate-limited at 1,000 API requests per day.

Source: Xmodulo

Categories: Réseau, Système Tags: ,