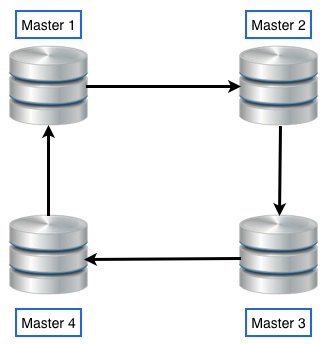
Setting the MySQL in Master-Master mode means in case of an instance failure the other one will transparently take over the client connections avoiding the need of any manual intervention. In Master-Slave mode we would need to manually promote the Slave to Master which will cause service interruption. MySQL circular replication can be used to scale out write nodes but there are certain considerations to be taken into account. The data will only be as complete as the speed of the replication. If data is inserted faster than the MySQL slave thread can run then each node can be missing data from the other node. This can be acceptable or not depending on the application and data requirements. For example if we use foreign keys in our database, inserts will fail if the data which the foreign key references has not yet been replicated. These issues need to be considered before we decide to employ Master-Master circular replication.
Setup
The hosts have been setup with two network interfaces, one on a public 192.168.100.0/24 network that will be used for incoming client connections and cluster communication and one on the private 10.10.1.0/24 network that will be used for the replication traffic only. We will start by setting the MySQL service on the nodes first.
I am a new Ubuntu Linux laptop user. I setup my computer name to ‘tom’ during installation but now I would like to change the computer name to ‘jerry’. Can you tell me how do I I remove tom and set it to jerry on Ubuntu Linux? How do I change the Ubuntu computer name from ‘ubuntu’ to ‘AvlinStar’? Can you tell me more about Ubuntu Linux change hostname command?
You can use the hostname command to see or set the system’s host name. The host name or computer name is usually at system startup in /etc/hostname file. Open the terminal application and type the following commands to set or change hostname or computer name on Ubuntu.
Display the current Ubuntu hostname
Simply type the following command: $ hostname Sample outputs:
Fig.01: Ubuntu Linux Show the hostname/computer name command
Ubuntu change hostname command
The procedure to change the computer name on Ubuntu Linux:
Type the following command to edit /etc/hostname using nano or vi text editor: sudo nano /etc/hostname Delete the old name and setup new name.
Next Edit the /etc/hosts file: sudo nano /etc/hosts Replace any occurrence of the existing computer name with your new one.
Reboot the system to changes take effect: sudo reboot
Sample outputs:
Gif 01: Ubuntu change the computer name demo
How to change the Ubuntu server hostname without a system restart?
Type the following commands: $ sudo hostname new-server-name-here Next edit the /etc/hostname file and update hostname: $ sudo nano /etc/hostname Finally, edit the /etc/hosts file and update the lines that reads your old-host-name: $ sudo nano /etc/hosts From: 127.0.1.1 old-host-name To: 127.0.1.1 new-server-name-here Save and close the file.
Ubuntu Linux Change Hostname Using hostnamectl
Systemd based Linux distro such as Ubuntu Linux 16.04 LTS and above can simply use the hostnamectl command to change hostname. To see current setting just type the following command: $ hostnamectl Sample outputs:
MySQL Master-Slave replication is natively supported by MySQL. However its configuration is not so simple. For each slave added as a replica, a few configuration steps must be done on both the master and itself.
So if you want to install a master instance on a machine or VM, and then install 5 other instances as slaves on other hosts, you will be doing quite a lot of back-and-forth configuration. I couldn’t find any way of configuring the replication automatically on the web, so I decided to create my own bash script to do it.
MySQL Master-Slave Replication
What is it and why use it ?
This form of replication is pretty simple: only a single instance, known as the master, creates or updates data. Each additional instance, called slave, simply keeps a copy of the master’s data, by replicating it each time the master has new data. Lire la suite…
We already had the opportunity to talk about Replication between MySQL Database in a previous article, where we described it as a great way to increase the security and reliability of data storage without spending a fortune. In this article we will see what to do when the Replication stops working: how to notice, what can I do to restore it and, most importantly, how to ensure that the data is re-synchronized.
Identify causes
The first thing to do is make sure that the Replication is actually broken. Although in most cases we can clearly see it by just looking at the replicated data, we need to check it in an objective way. In order to do this go to the Slave, issue the command SHOWSLAVE STATUS – or SHOWSLAVE STATUS\G if you prefer to read the results in human-readable format – and go read the column contents: Slave_SQL_Running and Slave_IO_Running: if there’s at least a NO, that means that the Replication is actually broken, otherwise the problem is attributable to other causes. Lire la suite…
Les bases de données SQL et plus particulièrement MySQL restent une des pierres angulaires de l’immense majorité des sites internet. MySQL fonctionne très bien out of the box, cependant, dès que la base se trouve assez sollicitée, on s’aperçoit que les réglages par défaut méritent une petite optimisation. Jetons un œil à tout ça !
Récemment, un des serveurs de Peerus commençait à avoir de sacrés pics de load lors des heures de forte charge, avec MySQL pour principal responsable. Une grosse centaine de connexions simultanées et quelques dizaines de requêtes par seconde sur des bases de plusieurs dizaines de giga. C’est un peu plus que le WordPress moyen, mais rien d’ingérable pour un MySQL bien réglé.
Dès lors, avant d’imaginer prendre un serveur plus puissant, sharder les tables ou je ne sais quoi encore, il faut tirer le maximum de notre cher SGBDR. Lire la suite…
 Setting the MySQL in Master-Master mode means in case of an instance failure the other one will transparently take over the client connections avoiding the need of any manual intervention. In Master-Slave mode we would need to manually promote the Slave to Master which will cause service interruption. MySQL circular replication can be used to scale out write nodes but there are certain considerations to be taken into account. The data will only be as complete as the speed of the replication. If data is inserted faster than the MySQL slave thread can run then each node can be missing data from the other node. This can be acceptable or not depending on the application and data requirements. For example if we use foreign keys in our database, inserts will fail if the data which the foreign key references has not yet been replicated. These issues need to be considered before we decide to employ Master-Master circular replication.