Archive

Articles taggués ‘performance’

How to receive a million packets per second

09/10/2026 Comments off

receive million packetsLast week during a casual conversation I overheard a colleague saying: « The Linux network stack is slow! You can’t expect it to do more than 50 thousand packets per second per core! »

That got me thinking. While I agree that 50kpps per core is probably the limit for any practical application, what is the Linux networking stack capable of? Let’s rephrase that to make it more fun:

On Linux, how hard is it to write a program that receives 1 million UDP packets per second?

Hopefully, answering this question will be a good lesson about the design of a modern networking stack.

First, let us assume:

  • Measuring packets per second (pps) is much more interesting than measuring bytes per second (Bps). You can achieve high Bps by better pipelining and sending longer packets. Improving pps is much harder.
  • Since we’re interested in pps, our experiments will use short UDP messages. To be precise: 32 bytes of UDP payload. That means 74 bytes on the Ethernet layer.
  • For the experiments we will use two physical servers: « receiver » and « sender ».
  • They both have two six core 2GHz Xeon processors. With hyperthreading (HT) enabled that counts to 24 processors on each box. The boxes have a multi-queue 10G network card by Solarflare, with 11 receive queues configured. More on that later.
  • The source code of the test programs is available here: udpsender, udpreceiver.

Prerequisites

Let’s use port 4321 for our UDP packets. Before we start we must ensure the traffic won’t be interfered with by the iptables:

receiver$ iptables -I INPUT 1 -p udp --dport 4321 -j ACCEPT  
receiver$ iptables -t raw -I PREROUTING 1 -p udp --dport 4321 -j NOTRACK  

A couple of explicitly defined IP addresses will later become handy:

receiver$ for i in `seq 1 20`; do   
              ip addr add 192.168.254.$i/24 dev eth2; 
          done
sender$ ip addr add 192.168.254.30/24 dev eth3  

1. The naive approach

To start let’s do the simplest experiment. How many packets will be delivered for a naive send and receive?

The sender pseudo code:

fd = socket.socket(socket.AF_INET, socket.SOCK_DGRAM)  
fd.bind(("0.0.0.0", 65400)) # select source port to reduce nondeterminism  
fd.connect(("192.168.254.1", 4321))  
while True:  
    fd.sendmmsg(["x00" * 32] * 1024)

While we could have used the usual send syscall, it wouldn’t be efficient. Context switches to the kernel have a cost and it is be better to avoid it. Fortunately a handy syscall was recently added to Linux: sendmmsg. It allows us to send many packets in one go. Let’s do 1,024 packets at once.

The receiver pseudo code:

fd = socket.socket(socket.AF_INET, socket.SOCK_DGRAM)  
fd.bind(("0.0.0.0", 4321))  
while True:  
    packets = [None] * 1024
    fd.recvmmsg(packets, MSG_WAITFORONE)

Similarly, recvmmsg is a more efficient version of the common recv syscall.

Let’s try it out:

sender$ ./udpsender 192.168.254.1:4321  
receiver$ ./udpreceiver1 0.0.0.0:4321  
  0.352M pps  10.730MiB /  90.010Mb
  0.284M pps   8.655MiB /  72.603Mb
  0.262M pps   7.991MiB /  67.033Mb
  0.199M pps   6.081MiB /  51.013Mb
  0.195M pps   5.956MiB /  49.966Mb
  0.199M pps   6.060MiB /  50.836Mb
  0.200M pps   6.097MiB /  51.147Mb
  0.197M pps   6.021MiB /  50.509Mb

With the naive approach we can do between 197k and 350k pps. Not too bad. Unfortunately there is quite a bit of variability. It is caused by the kernel shuffling our programs between cores. Pinning the processes to CPUs will help:

sender$ taskset -c 1 ./udpsender 192.168.254.1:4321  
receiver$ taskset -c 1 ./udpreceiver1 0.0.0.0:4321  
  0.362M pps  11.058MiB /  92.760Mb
  0.374M pps  11.411MiB /  95.723Mb
  0.369M pps  11.252MiB /  94.389Mb
  0.370M pps  11.289MiB /  94.696Mb
  0.365M pps  11.152MiB /  93.552Mb
  0.360M pps  10.971MiB /  92.033Mb

Now, the kernel scheduler keeps the processes on the defined CPUs. This improves processor cache locality and makes the numbers more consistent, just what we wanted.

Lire la suite…

ERROR 1040…again

03/10/2026 Comments off

A pretty common topic in Support tickets is the rather infamous error: ERROR 1040: Too many connections. The issue is pretty self-explanatory: your application/users are trying to create more connections than the server allows, or in other words, the current number of connections exceeds the value of the max_connections variable.

This situation on its own is already a problem for your end-users, but when on top of that you are not able to access the server to diagnose and correct the root cause, then you have a really big problem; most times you will need to terminate the instance and restart it to recover.

Root user can’t connect either! Why!?

In a properly set up environment, a user with SUPER privilege will be able to access the instance and diagnose the error 1040 problem that is causing connection starvation, as explained in the manual:

mysqld actually permits max_connections + 1 client connections. The extra connection is reserved for use by accounts that have the SUPER privilege. By granting the privilege to administrators and not to normal users (who should not need it), an administrator who also has the PROCESS privilege can connect to the server and use SHOW PROCESSLIST to diagnose problems even if the maximum number of unprivileged clients are connected.

But we see lots of people who give SUPER privileges to their application or script users, either due to application requirements (dan Lire la suite…

Optimiser les performances de MySQL

01/10/2026 Comments off

Source: Optimiser les performances de MySQL (Quentin Busuttil)

Les bases de données SQL et plus particulièrement MySQL restent une des pierres angulaires de l’immense majorité des sites internet. MySQL fonctionne très bien out of the box, cependant, dès que la base se trouve assez sollicitée, on s’aperçoit que les réglages par défaut méritent une petite optimisation. Jetons un œil à tout ça !

Récemment, un des serveurs de Peerus commençait à avoir de sacrés pics de load lors des heures de forte charge, avec MySQL pour principal responsable. Une grosse centaine de connexions simultanées et quelques dizaines de requêtes par seconde sur des bases de plusieurs dizaines de giga. C’est un peu plus que le WordPress moyen, mais rien d’ingérable pour un MySQL bien réglé.

Dès lors, avant d’imaginer prendre un serveur plus puissant, sharder les tables ou je ne sais quoi encore, il faut tirer le maximum de notre cher SGBDR. Lire la suite…

MySQL: Setting Account Resource Limits

27/09/2026 Comments off

mysql account resource limitsOne means of restricting client use of MySQL server resources is to set the global max_user_connections system variable to a nonzero value. This limits the number of simultaneous connections that can be made by any given account, but places no limits on what a client can do once connected. In addition, settingmax_user_connections does not enable management of individual accounts. Both types of control are of interest to MySQL administrators.
To address such concerns, MySQL permits limits for individual accounts on use of these server resources:

  • The number of queries an account can issue per hour
  • The number of updates an account can issue per hour
  • The number of times an account can connect to the server per hour
  • The number of simultaneous connections to the server by an account

Any statement that a client can issue counts against the query limit, unless its results are served from the query cache. Only statements that modify databases or tables count against the update limit.

An “account” in this context corresponds to a row in the mysql.user table. That is, a connection is assessed against the User and Host values in the user table row that applies to the connection. For example, an account 'usera'@'%.example.com' corresponds to a row in the user table that has User and Host values of usera and %.example.com, to permit usera to connect from any host in the example.com domain. In this case, the server applies resource limits in this row collectively to all connections by usera from any host in the example.com domain because all such connections use the same account.

Before MySQL 5.0.3, an “account” was assessed against the actual host from which a user connects. This older method of accounting may be selected by starting the server with the --old-style-user-limits option. In this case, if usera connects simultaneously from host1.example.com andhost2.example.com, the server applies the account resource limits separately to each connection. If usera connects again from host1.example.com, the server applies the limits for that connection together with the existing connection from that host.

To establish resource limits for an account at account-creation time, use the CREATE USER statement. To modify the limits for an existing account, use ALTER USER. (Before MySQL 5.7.6, use GRANT, for new or existing accounts.) Provide a WITH clause that names each resource to be limited. The default value for each limit is zero (no limit). For example, to create a new account that can access the customer database, but only in a limited fashion, issue these statements:

mysql> CREATE USER 'francis'@'localhost' IDENTIFIED BY 'frank'
    ->     WITH MAX_QUERIES_PER_HOUR 20
    ->          MAX_UPDATES_PER_HOUR 10
    ->          MAX_CONNECTIONS_PER_HOUR 5
    ->          MAX_USER_CONNECTIONS 2;

The limit types need not all be named in the WITH clause, but those named can be present in any order. The value for each per-hour limit should be an integer representing a count per hour. For MAX_USER_CONNECTIONS, the limit is an integer representing the maximum number of simultaneous connections by the account. If this limit is set to zero, the global max_user_connections system variable value determines the number of simultaneous connections. Ifmax_user_connections is also zero, there is no limit for the account.

Lire la suite…

How to measure packets per second or throughput on high speed network interface

30/06/2024 Comments off

throughput networkThere are many traffic monitoring tools available on Linux, which can monitor/classify network traffic, and report real-time traffic statistics in fancy user interfaces. Most of these tools (e.g., ntopng, iftop) are powered by libpcap, which is a packet capture library used to monitor network traffic in user space. Despite their versatility, however, libpcap-based network monitoring tools cannot scale to handle traffic on multi Gigabit rate network interfaces, due to the overhead associated with user-space packet capture.
In this tutorial, I will present simple shell scripts that can monitor network traffic on per-interface basis, without relying on slow libpcap library. These scripts are fast enough to support multi Gigabit rates, but only suitable if you are interested in « aggregate » network statistics on per interface basis.

The secret for the scripts lies in sysfs virtual filesystem which is used by the kernel to export device- or driver-related information to user space. Network interface related statistics are exported via /sys/class/net/<ethX>/statistics.

For example, the statistics on eth0 interface are found in these files:

  • /sys/class/net/eth0/statistics/rx_packets: number of packets received
  • /sys/class/net/eth0/statistics/tx_packets: number of packets transmitted
  • /sys/class/net/eth0/statistics/rx_bytes: number of bytes received
  • /sys/class/net/eth0/statistics/tx_bytes: number of bytes transmitted
  • /sys/class/net/eth0/statistics/rx_dropped: number of packets dropped while received
  • /sys/class/net/eth0/statistics/tx_dropped: number of packets dropped while transmitted

The numbers stored in the files are automatically refreshed in real-time by the kernel. Therefore, you can write scripts that calculate traffic statistics based on these files.

The following are two such scripts (thanks to joemiller). The first script counts the number of packets per second, received (RX) or sent (TX) on an interface, while the latter scripts measures the network bandwidth of incoming (RX) and outgoing (TX) traffic on an interface. For these scripts to work, you do not need to install anything.

Measure Packets per Second on an Interface

#!/bin/bash
INTERVAL="1"  # update interval in seconds
if [ -z "$1" ]; then
        echo
        echo usage: $0 [network-interface]
        echo
        echo e.g. $0 eth0
        echo
        echo shows packets-per-second
        exit
fi

IF=$1

while true
do
        R1=`cat /sys/class/net/$1/statistics/rx_packets`
        T1=`cat /sys/class/net/$1/statistics/tx_packets`
        sleep $INTERVAL
        R2=`cat /sys/class/net/$1/statistics/rx_packets`
        T2=`cat /sys/class/net/$1/statistics/tx_packets`
        TXPPS=`expr $T2 - $T1`
        RXPPS=`expr $R2 - $R1`
        echo "TX $1: $TXPPS pkts/s RX $1: $RXPPS pkts/s"
done
 

Measure Network Bandwidth on an Interface

#!/bin/bash
 
INTERVAL="1" # update interval in seconds
 
if [ -z "$1" ]; then
 echo
 echo usage: $0 [network-interface]
 echo
 echo e.g. $0 eth0
 echo
 exit
fi
 
IF=$1
 
while true
do
 R1=`cat /sys/class/net/$1/statistics/rx_bytes`
 T1=`cat /sys/class/net/$1/statistics/tx_bytes`
 sleep $INTERVAL
 R2=`cat /sys/class/net/$1/statistics/rx_bytes`
 T2=`cat /sys/class/net/$1/statistics/tx_bytes`
 TBPS=`expr $T2 - $T1`
 RBPS=`expr $R2 - $R1`
 TKBPS=`expr $TBPS / 1024`
 RKBPS=`expr $RBPS / 1024`
 echo "TX $1: $TKBPS kB/s RX $1: $RKBPS kB/s"
done
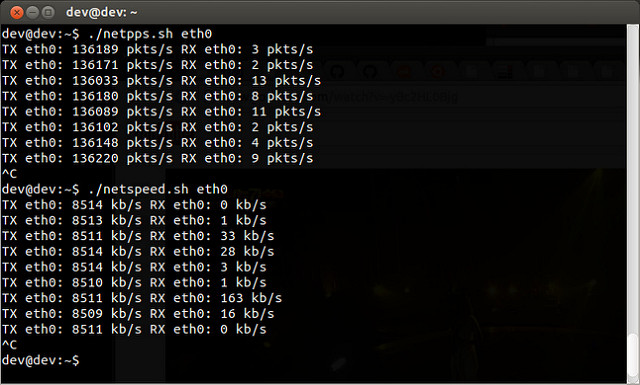
The following screenshot shows the above two scripts in action.

10700906313_cfa3cd1ed7_z

Source: Xmodulo