How to Protect Successfully your network against DDoS attacks: 5 steps

15/07/2021 Categories: Réseau, Sécurité, Tutoriel Tags: , , , , Comments off

Every business needs DDoS protection.

protect ddos attacksToday it’s important for the success of your business to have an online presence. You always thought that you would never be a victim of DDoS attacks. But, what would happen if your website or online application is down because of a DDoS attack?

Here are some facts taken from digitalattackmap:

  • Attacks are cheaper (150$ for a week long DDoS)
  • Their number are increasing every weeks (2000/day)
  • Increase attributed downtime (1/3 of all downtime incidents)

You can even block a 1TB DDoS attack!

With enough preparation, anybody can block a DDoS attack of any size and we will tell you how in 5 steps.

  1. Become invisible
  2. Filter aggressively
  3. Identify attack patterns
  4. Block traffic patterns
  5. Deploy counter-measures solutions

Lire la suite…

Comment contourner la censure sur Internet ?

14/07/2021 Categories: Logiciel, News, Tutoriel Tags: , , Comments off

contourner censure internetSource: Developpez.com

1. Introduction

Le 10 décembre 1948, l’adoption de la Déclaration universelle des droits de l’homme par l’Assemblée générale des Nations unies a marqué le début d’une nouvelle ère.

Un des droits fondamentaux décrits par l’article 19 de la Déclaration universelle est le droit à la liberté d’expression. Il y a 60 ans, lorsque ces mots ont été écrits, personne n’imaginait la façon dont le phénomène global qu’est Internet étendrait la capacité des gens à chercher, recevoir et transmettre des informations, pas seulement à travers les frontières, mais aussi à une vitesse hallucinante et sous des formes pouvant être copiées, éditées, manipulées, recombinées et partagées avec un petit nombre ou un large public, d’une manière fondamentalement différente des moyens de communication existant en 1948. Ce guide introduit et explique l’utilisation de quelques logiciels et techniques parmi les plus utilisés pour outrepasser la censure.

Il apporte aussi des informations pour éviter la surveillance et la détection lors du contournement de la censure. Attention, ce document n’est pas un document de hacking, vous n’y trouverer aucune technique par exemple pour contourner votre proxy d’entreprise. Ce livre vous est offert par Floss Manuals

1-1. Plus d’informations et autant d’endroits inimaginables▲

L’incroyable augmentation ces dernières années de ce qui est disponible sur Internet et des lieux où se trouve l’information a eu pour effet de mettre une partie incroyablement vaste du savoir humain et de ses activités à disposition, et à des endroits que nous n’imaginions pas : dans un hôpital d’un lointain village de montagne, dans la chambre de votre enfant de 12 ans, dans la salle de conférence où vous montrez à vos collègues le design du nouveau produit qui vous donnera de l’avance sur la concurrence, chez votre grand-mère. Dans tous ces endroits, se connecter au monde ouvre un nombre impressionnant d’opportunités pour améliorer la vie des gens. Si vous attrapez une maladie rare pendant vos vacances, le petit hôpital du village peut vous sauver la vie en envoyant vos analyses à un spécialiste de la capitale, voire dans un autre pays ; votre enfant de 12 ans peut faire des recherches pour son projet scolaire ou se faire des amis à l’étranger ; vous pouvez présenter votre nouveau produit à des responsables de bureaux du monde entier simultanément et ils pourront vous aider à l’améliorer ; votre grand-mère peut rapidement vous envoyer par mail sa recette spéciale de tarte aux pommes afin que vous ayez le temps de la faire pour le dessert de ce soir. Mais Internet ne contient pas seulement des informations pertinentes et utiles à l’éducation, l’amitié ou la tarte aux pommes. Comme le monde, il est vaste, complexe et souvent effrayant. Il est également accessible à des gens malveillants, avides, sans scrupules, malhonnêtes ou simplement malpolis, tout comme il est accessible à vous ainsi qu’à votre enfant de 12 ans et à votre grand-mère.

1-2. Personne ne veut laisser entrer chez soi le monde entier▲

Avec le meilleur et le pire de la nature humaine transposés sur Internet et certains types d’escroquerie et de harcèlement rendus plus faciles par la technologie, il n’est pas surprenant que la croissance d’Internet ait été accompagnée de tentatives de contrôle de l’utilisation qui en est faite. Les motivations sont nombreuses, telles que :

  • protéger les enfants de contenus perçus comme inappropriés ou limiter leur contact avec des gens pouvant leur nuire ;
  • réduire le flot d’offres commerciales non désirées dans les e-mails ou sur le web ;
  • contrôler la taille du flux de données auquel chaque utilisateur est capable d’accéder en même temps ;
  • empêcher les employés de partager des informations considérées comme la propriété de leur employeur, d’utiliser une ressource technique de ce dernier ou leur temps de travail dans le cadre d’activités personnelles ;
  • restreindre l’accès à des contenus ou activités en ligne bannis ou réglementés dans une juridiction spécifique (un pays ou une organisation comme une école) tels que du contenu explicitement sexuel ou violent, des drogues ou de l’alcool, des jeux et de la prostitution, des informations sur des groupes religieux, politiques ou autres groupes et idées réputés dangereux.

Certaines de ces préoccupations impliquent de permettre aux gens de contrôler leur propre expérience d’Internet, par exemple en utilisant des filtres bloquant les spams sur leur propre compte e-mail, mais d’autres préoccupations impliquent de restreindre la manière dont d’autres personnes peuvent utiliser Internet et ce à quoi elles peuvent ou non accéder. Ce dernier cas entraine d’importants conflits et désaccords lorsque les personnes dont l’accès est restreint ne pensent pas que le blocage soit approprié ou dans leur intérêt. Lire la suite…

Categories: Logiciel, News, Tutoriel Tags: , ,

How To Isolate Servers Within A Private Network Using Iptables

05/07/2021 Categories: Réseau, Sécurité, Tutoriel Tags: , , , , , Comments off

Source: DigitalOcean – Mitchell Anicas

Introduction

In this tutorial, we will teach you how to use a Iptables with shared private networking to simulate the network traffic isolation that a true private network can provide. We will also cover why you would want to do this, and provide an example of how to implement this in your own environment. The example should explain the concept well enough that you should be able to adapt the configuration to your own needs.

DigitalOcean’s private networking option grants a second networking interface to a VPS, which is only accessible to other VPSs in the same datacenter–which includes the VPSs of other customers in the same datacenter. This is known as shared private networking. This means that data sent over a VPS’s private interface does not leave the datacenter at all, and no billable bandwidth usage will be incurred.

At the time of this writing, DigitalOcean offers the private networking option for VPSs in the following data centers:

  • Amsterdam 2
  • New York 2
  • Singapore 1

Note: This tutorial covers IPv4 security. In Linux, IPv6 security is maintained separately from IPv4. For example, iptables only maintains firewall rules for IPv4 addresses but it has an IPv6 counterpart called ip6tables, which can be used to maintain firewall rules for IPv6 network addresses.

If your VPS is configured for IPv6, please remember to secure both your IPv4 and IPv6 network interfaces with the appropriate tools. For more information about IPv6 tools, refer to this guide: How To Configure Tools to Use IPv6 on a Linux VPS

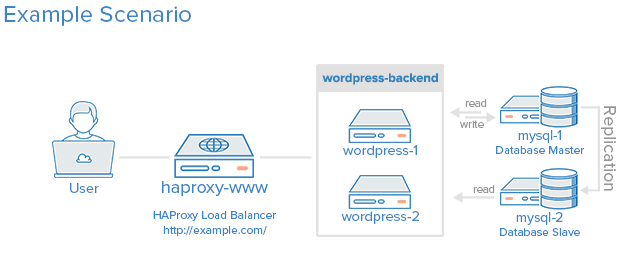
Example Scenario

For our example, we will use the environment created by the following tutorial: How To Optimize WordPress Performance With MySQL Replication On Ubuntu 14.04.

Here is a diagram of what the environment looks like:

prereq_no_private

The example environment uses five VPSs (and iptables are not configured):

  • haproxy-www: Reverse proxy load balancer
  • wordpress-1: First application server
  • wordpress-2: Second application server
  • mysql-1: Master MySQL database server
  • mysql-2: Slave MySQL database server

If your setup doesn’t look like this, you should still be able to follow along. Also, if you would like to read up on setting up a VPS with private networking or iptables basics, here are a few links that you might find to be useful (this tutorial assumes you know the basics of iptables):

If you are already familiar with the concepts, and would like to see the iptables setup, feel free to skip to the Overview of Iptables Configuration section.

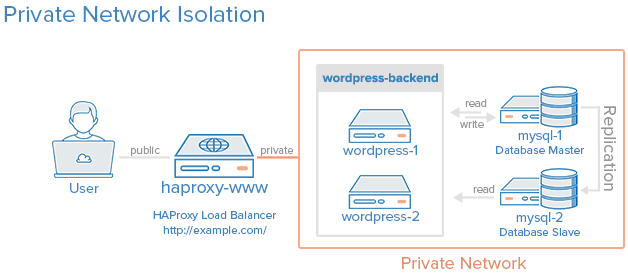
Our Goal

When we are finished with this tutorial, we should have an environment that looks something like the following diagram:

goal

All of the servers in the private network area can only be communicated with by other servers within this private network (the orange box). The load balancer will be accessible via the Internet and also be linked to the private network. The enforcement of this policy will be implemented via iptables on each server.

Note: To block traffic to your public interface, you can either disable your public interface or set up firewall rules to achieve a similar effect with Iptables. We will go with the firewall option because we can configure it block unwanted network traffic, while allowing our server to access the Internet when it initiates the connection (this is useful for things like downloading updates on the server).

How To Set Up a Firewall with UFW on Ubuntu 14.04

05/07/2021 Categories: Réseau, Sécurité, Tutoriel Tags: , , Comments off

Source: DigitalOcean – Mitchell Anicas

Introduction

UFW, or Uncomplicated Firewall, is an interface to iptables that is geared towards simplifying the process of configuring a firewall. While iptables is a solid and flexible tool, it can be difficult for beginners to learn how to use it to properly configure a firewall. If you’re looking to get started securing your network, and you’re not sure which tool to use, UFW may be the right choice for you.

This tutorial will show you how to set up a firewall with UFW on Ubuntu 14.04.

Prerequisites

Before you start using this tutorial, you should have a separate, non-root superuser account—a user with sudo privileges—set up on your Ubuntu server. You can learn how to do this by completing at least steps 1-3 in the Initial Server Setup with Ubuntu 14.04 tutorial.

UFW is installed by default on Ubuntu. If it has been uninstalled for some reason, you can install it with apt-get:

sudo apt-get install ufw

Using IPv6 with UFW

If your Ubuntu server has IPv6 enabled, ensure that UFW is configured to support IPv6 so that it will manage firewall rules for IPv6 in addition to IPv4. To do this, open the UFW configuration with your favorite editor. We’ll use nano:

sudo nano /etc/default/ufw

Then make sure the value of « IPV6 » is to equal « yes ». It should look like this:

/etc/default/ufw excerpt
...
IPV6=yes
...

Save and quit. Hit Ctrl-X to exit the file, then Y to save the changes that you made, then ENTER to confirm the file name.

When UFW is enabled, it will be configured to write both IPv4 and IPv6 firewall rules.

This tutorial is written with IPv4 in mind, but will work fine for IPv6 as long as you enable it.

Check UFW Status and Rules

At any time, you can check the status of UFW with this command:

sudo ufw status verbose

By default, UFW is disabled so you should see something like this:

Output:
Status: inactive

If UFW is active, the output will say that it’s active, and it will list any rules that are set. For example, if the firewall is set to allow SSH (port 22) connections from anywhere, the output might look something like this:

Output:
Status: active
Logging: on (low)
Default: deny (incoming), allow (outgoing), disabled (routed)
New profiles: skip

To                         Action      From
--                         ------      ----
22/tcp                     ALLOW IN    Anywhere

As such, use the status command if you ever need to check how UFW has configured the firewall.

Before enabling UFW, we will want to ensure that your firewall is configured to allow you to connect via SSH. Let’s start with setting the default policies.

Lire la suite…

Iptables Essentials: Common Firewall Rules and Commands

04/07/2021 Categories: Réseau, Sécurité, Tutoriel Tags: , Comments off

Source: DigitalOcean – Mitchell Anicas

Introduction

Iptables is the software firewall that is included with most Linux distributions by default. This cheat sheet-style guide provides a quick reference to iptables commands that will create firewall rules are useful in common, everyday scenarios. This includes iptables examples of allowing and blocking various services by port, network interface, and source IP address.

How To Use This Guide

  • If you are just getting started with configuring your iptables firewall, check out our introduction to iptables
  • Most of the rules that are described here assume that your iptables is set to DROP incoming traffic, through the default input policy, and you want to selectively allow traffic in
  • Use whichever subsequent sections are applicable to what you are trying to achieve. Most sections are not predicated on any other, so you can use the examples below independently
  • Use the Contents menu on the right side of this page (at wide page widths) or your browser’s find function to locate the sections you need
  • Copy and paste the command-line examples given, substituting the values in red with your own values

Keep in mind that the order of your rules matter. All of these iptables commands use the -A option to append the new rule to the end of a chain. If you want to put it somewhere else in the chain, you can use the -I option which allows you to specify the position of the new rule (or simply place it at the beginning of the chain by not specifying a rule number).

Note: When working with firewalls, take care not to lock yourself out of your own server by blocking SSH traffic (port 22, by default). If you lose access due to your firewall settings, you may need to connect to it via the console to fix your access. Once you are connected via the console, you can change your firewall rules to allow SSH access (or allow all traffic). If your saved firewall rules allow SSH access, another method is to reboot your server.

Remember that you can check your current iptables ruleset with sudo iptables -S and sudo iptables -L.

Let’s take a look at the iptables commands!

Lire la suite…