Change the firewall manually to make your Synology more safe!

08/03/2016 Categories: Matériel, Réseau, Sécurité Tags: , , Comments off

Source: Changzhou Chen

The default firewall in the Control Panel is so poor because of the poor design of Synology’s firewall policy. You can not use the white list in the global environment if you have both IPv4 or IPv6 network environment. To decrease the risk of being hacked, I’ve decided to change the firewall manually. We should use iptables and ip6tables to change both IPv4 and IPv6 firewall. If you don’t have the need for IPv6 network environment, you can ignore the ip6tables part.

Warning: If you don’t have enough IT experience, you should run the following sections carefully. Maybe you will lose your connection to your Synology and find it hard to connect to it again.

I wrote some IPv4 rules, the following code section is part of the rule file, you can run the iptables-save to export the rule file:

DiskStation> iptables-save > ipv4
# For your simple reference, I delete the
# unuseful part of rule file which exported by iptables-save. The following
# part is completely different from the file exported by iptables-save.
DiskStation> cat ipv4
*filter
:INPUT DROP # Drops all inbound connections that doesn't use the following rules
:FORWARD ACCEPT # It may be default, you can ignore it
:OUTPUT ACCEPT # It may be default, you can ignore it
-A INPUT -i lo -j ACCEPT # Allows all loopback (lo0) traffic
-A INPUT -m state --state ESTABLISHED,RELATED -j ACCEPT # Accepts all established inbound connections
-A INPUT -s 192.168.1.1/255.255.255.0 -j ACCEPT # Allows your Intranet inbound connections
-A INPUT -s 1.2.3.4 -j ACCEPT # Allows the specified ip address inbound connections
COMMIT

After run the iptables-restore and iptables -L, you can see the following result:

DiskStation> iptables-restore < ipv4
DiskStation> iptables -L
Chain INPUT (policy DROP)
target     prot opt source               destination
DEFAULT_INPUT  all  --  anywhere             anywhere
Chain FORWARD (policy ACCEPT)
target     prot opt source               destination
Chain OUTPUT (policy ACCEPT)
target     prot opt source               destination
Chain DEFAULT_INPUT (1 references)
target     prot opt source               destination
ACCEPT     all  --  anywhere             anywhere
ACCEPT     all  --  anywhere             anywhere             state RELATED,ESTABLISHED
ACCEPT     all  --  192.168.1.0/24       anywhere
ACCEPT     all  --  1.2.3.4              anywhere

Lire la suite…

Digital Equipment Corporation PDP-12

23/02/2016 Categories: Constructeur, Matériel Tags: Comments off

The PDP-12 was a 12 bit machine introduced in 1969. It sold for $27,900. The PDP-12 was designed as a successor to the LINC-8 and was compatible with LINC-8 software.

DEC.PDP-12.1963.102646098

Manuals at the end

Programmed Data Processor (PDP) was a series of minicomputers made and marketed by the Digital Equipment Corporationfrom 1957 to 1990. The name « PDP » intentionally avoided the use of the term « computer » because, at the time of the first PDPs, computers had a reputation of being large, complicated, and expensive machines, and the venture capitalists behind Digital (especially Georges Doriot) would not support Digital’s attempting to build a « computer »; the word « minicomputer » had not yet been coined.[citation needed] So instead, Digital used their existing line of logic modules to build a Programmed Data Processor and aimed it at a market that could not afford the larger computers.

The various PDP machines can generally be grouped into families based on word length.

Members of the PDP series include:

PDP-1

The original PDP, an 18-bit machine used in early time-sharing operating system work, and prominent in MIT’s early hacker culture, which was to lead to the (Massachusetts) Route 128 hardware startup belt (DEC’s second home, Prime Computer, etc.). What is believed to be the first video game, Spacewar!, was developed for this machine, along with the first known word processing program for a general-purpose computer, « Expensive Typewriter ».

PDP-2

A number reserved for an unbuilt, undesigned 24-bit design.

PDP-3

First DEC-designed (for US « black budget » outfits) 36-bit machine, though DEC did not offer it as a product. The only PDP-3 was built by the CIA’s Scientific Engineering Institute (SEI) in Waltham, MA to process radar cross section data for the Lockheed A-12 reconnaissance aircraft in 1960.[1][2] Architecturally it was essentially a PDP-1 controlling[citation needed] a PDP-1 stretched to 36-bit word width.[3] Lire la suite…

AppleKeyboard on Ubuntu

07/12/2015 Categories: Constructeur, Matériel, Système Tags: , , Comments off

Source: ubuntu.com

Preface

Since Ubuntu 8.04 (Hardy Heron) the USB aluminum Apple Keyboard has not worked correctly. A change was added to the Ubuntu Linux kernel to make Apple MacBook keyboards gain additional functionality to their limited laptop style keyboard (Ubuntu bug #162083). Unfortunately this code change has some side effects for owners of the full size USB aluminum Apple Keyboard:

  • Function keys have media functions as default (as the printing on the keycaps indicates). To access the regular F-key functionality, the « fn » key must be pressed and held (except for F5 and F6, which are inverted in this respect). (Ubuntu bug #201711)
  • On international (non-US) keyboards, two keys are swapped with respect to the printing on the keycaps. (Ubuntu bug #214786)

Both issues may be straightened out with two configurable module parameters (http://bugzilla.kernel.org/show_bug.cgi?id=10818), as shown below.

To make the keyboard behave more like a standard PC keyboard (but against the orinal printing on the keycaps), additional steps are necessary:

  • Map SysRQ, Scoll Lock, and Pause keys to F13-F15: This still requires a patch that adds a configurable option to the kernel module, or a « keyfuzz » workaround (#262408).
  • Swap the cmd and super keys: (hid_apple patch) or keyfuzz workaround.

A tar archive containing all workarounds can be found at (un-apple-keyboard)

If you would like to have a better integration, please help by enhancing the patches to implement proper module parameters, and submitting them to the upstream kernel developers. See also: Trouble With Apple Keyboard On Ubuntu

To find the the keycode of any key that you want to modify, simply run in a terminal

xev | sed -n ‘s/^.*keycode *\([0-9]\+\).*$/keycode \1 = /p’

Then you can find the List of Keysyms Recognised by Xmodmap:

http://wiki.linuxquestions.org/wiki/List_of_Keysyms_Recognised_by_Xmodmap

http://wiki.linuxquestions.org/wiki/ConfiguRing_keyBoards

Default Behavior

This section describe the default behavior of every Apple keyboard.

Apple slim aluminum keyboard (0220)

wired_1_20070813a.jpg

  • Characters that are not printed on the keycaps (~,{},[],…) can still be generated as on a standard PC keyboard.
  • Even if the @ is printed on another keycap as on the standard PC layout, that key will only behave like the standard PC layout key and not generate the @. Use your localized standard PC layout key (combination) to generate the @.
  • ‘fn’+’F-Key’ -> triggers the regular F-Key
  • ‘fn’+’Enter’ -> Insert
  • ‘fn’+’Backspace’ -> Delete
  • ‘fn’+’Up’ -> PageUp
  • ‘fn’+’Down’ -> PageDown
  • ‘fn’+’Left’ -> Home
  • ‘fn’+’Right’ -> End
  • ‘Clear’ behaves like ‘NumLock‘ (Numlock may also be switched by pressing fn-F6 twice)

(See #262408 as there is patch submit to map F13, F14 and F15 to the otherwise missing PrintScreen, ScrollLock and Pause keys.)

Lire la suite…

How to drive a 7 segment display directly on Raspberry Pi in Python

20/11/2015 Categories: Électronique, Matériel, Tutoriel Tags: Comments off

7 segment displayLast week I bought some 4-digit, 7-segment displays to experiment with. Strangely enough it was something I’d never tried before, so I was interested to see how they work. I googled around looking to see if someone else had done this before. It seems there are several different sorts of 7-segment displays, so you have to find a good match for the one you’ve bought.
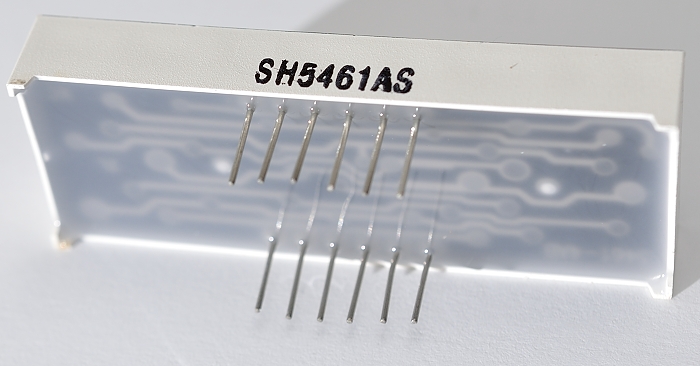
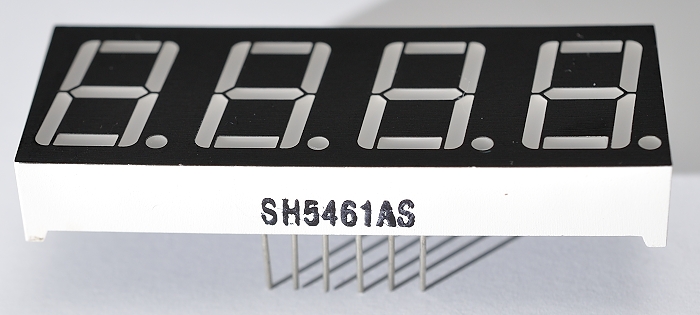
You can get them in various guises including: i2c backpack; 12 pins; 16 pins; resistors built-in; common anode; common cathode etc.

The ones I bought are 12 pin, bare, no backpack, no PCB, no resistors, common cathode. Here’s what they look like…


7-segment display – rear

7-segment display – rear

7-segment display

7-segment display

Lire la suite…

Une Time Capsule vraiment pas chère

22/10/2015 Categories: Matériel, Réseau Tags: , , Comments off

UN PC, UBUNTU, UN GROS DISQUE ET C’EST PARTI !

Si, comme moi, vous trouvez qu’avec un Mac, la solution de sauvegarde la plus simple et la plus efficace est Time Machine, vous devez certainement également penser que la Time Capsule est le meilleur périphérique pour la mettre en oeuvre.

Car si un simple disque dur externe (USB ou autre) peut très bien faire l’affaire, c’est certainement quand vous aurez oublié plusieurs fois de le brancher sur votre Macbook que vous effacerez un fichier par mégarde et qu’il sera impossible de le récupérer puisque jamais sauvegardé.

Mais voilà, si la Time Capsule de Apple offre le confort d’être disponible en permanence et donc, de ne jamais manquer une seule sauvegarde sans même devoir y penser, elle n’en reste pas moins un périphérique onéreux. La version 2 TO offre certes un bon rapport qualité/prix mais pas une capacité folichonne. Surtout, quand on s’adonne au montage vidéo ou quand on manipule de nombreuses photos en format RAW par exemple. Et si votre souhait est de pouvoir remonter très loin dans le temps, ajouter 200 € pour la version 3 TO, ça fait un peu mal.

Voici comment j’ai construit ma Time Capsule 3 TO personnelle à un coût bien moindre : 154 € dans mon cas (le prix du disque dur). A lire dans la suite si vous êtes en homepage…

Ce qu’il vous faut :

  • Un vieux PC (si vous en avez un qui ne sert plus par exemple)
  • Un disque 3 TO ou plus 😀
  • Une distribution Ubuntu récente (12.04 par exemple)
  • Une connexion réseau.

Le choix de la distribution de Ubuntu

L’utilisation des versions 11.10 et 12.04 ne pose pas de problème. Je vous conseillerai d’éviter une distribution plus ancienne si votre Mac est sous Lion ou plus récent car Apple a modifié le protocole AFP et une version plus ancienne de votre Ubuntu (ou des librairies qui gèrent AFP) pourrait poser problème.

J’ai choisi la 12.04 et je tourne sous Lion. Tout marche à la perfection. Je n’ai pas encore testé Moutain Lion. Si certains d’entre vous se lancent dans l’aventure avec Mountain Lion, leurs retours d’expériences sont les bienvenus dans les commentaires.

A vous de voir si vous préférez la version desktop ou server de Ubuntu. Cette dernière sera plus rapide au démarrage et plus légère en espace disque. Cependant, si comme moi, vous souhaitez pouvoir prendre la main en VNC (prise de contrôle avec une session graphique) même ponctuellement, la version desktop est indispensable.

Idéalement, je conseille d’avoir un disque dur séparé (dont la taille n’a pas d’importance) pour l’installation de Ubuntu et de destiner le disque de 3 TO aux sauvegardes Time Machine uniquement (ou tout autre stockage de données). Cela vous permettra de pouvoir extraire le disque de 3 TO et de le brancher en USB par exemple le jour où vous souhaitez faire une restauration totale de Mac OS X. Si restaurer quelques fichiers en Wifi ou en Ethernet ne pose pas trop de problème, une restauration totale sera plus rapide en local que via le réseau. (Attention toutefois, si vous formattez votre disque en ext4, il faudra utiliser des utilitaires comme MacFuse etfuse-ext2 pour le lire lorsqu’il est branché en USB sur un Mac).

Enfin, si vous devez réinstaller Ubuntu ou changer de machine vous n’impactez pas votre historique de sauvegarde en utilisant un disque séparé.

Lors de l’installation de Ubuntu, créez l’utilisateur de votre choix. Pour ma part, il s’appelle alex et donc, dans les lignes ci-dessous, pensez à remplacer alex par votre utilisateur.

Lire la suite…

Categories: Matériel, Réseau Tags: , ,