How to install PSAD Intrusion Detection on Ubuntu 16.04 LTS server

07/11/2023 Categories: Réseau, Sécurité, Système Tags: , , Comments off

Source: thefanclub.com

This guide is based on various community forum posts.

This guide is intended as a relatively easy step by step guide to:

  • Install CipherDyne PSAD Intrusion Detection and Log Analysis with iptables on Ubuntu 12.04 LTS or later.
  • psad is a collection of three lightweight system daemons that run on Linux machines and analyze iptables log messages to detect port scans and other suspicious traffic.
  • From version 2.2 it also offers full IPv6 support. 

Requirements:

  • Tested on Ubuntu 12.04 LTS – 16.04 LTS server.
  • Should work on most Ubuntu/Debian based ditro’s.

1. Download and install the latest version of PSAD.

  • Download and install the latest version from the Cipherdyne website.
  • Visit the CipherDyne PSAD download page and select the latest source tar archive, as of writing this the latest version is PSAD 2.4.3
  • To download and install the latest version open a Terminal and enter the following :
sudo su
mkdir /tmp/.psad
cd /tmp/.psad
wget http://cipherdyne.org/psad/download/psad-2.4.3.tar.gz
tar -zxvf psad-2.4.3.tar.gz
cd psad-2.4.3
./install.pl 
cd /tmp
rm -R .psad
exit


2. Edit the PSAD configuration file. 

  • Three main settings need to be set in the PSAD configuration file before we can complete the install, edit the others as required.
  • open a Terminal Window and enter :
vi /etc/psad/psad.conf
  • EMAIL_ADDRESSES – change this to your email address.
  • HOSTNAME – this is set during install – but double check and change to a FQDN if needed.
  • ENABLE_AUTO_IDS – set this to Y if you could like PSAD to take action – read configuration instructions before setting this to Y.
  • ENABLE_AUTO_IDS_EMAILS – set this to Y if you would like to receive email notifications of intrusions that are detected.

3. Add iptables LOG rules for both IPv4 and IPv6.

  • For an explanation of this step click here.
  • Add the following iptables policies :
iptables -A INPUT -j LOG
iptables -A FORWARD -j LOG
ip6tables -A INPUT -j LOG
ip6tables -A FORWARD -j LOG

4. Reload and update PSAD.

  • To restart, update the signature file and reload PSAD to complete the install open a Terminal Window and enter :
psad -R
psad --sig-update
psad -H
  • To check the status of PSAD, open a Terminal Window and enter :
psad --Status

Lire la suite…

How to force ssh login via public key authentication

06/11/2023 Categories: Sécurité, Système Tags: Comments off

Source: xmodulo

There is ongoing debate on the pros and cons of using passwords versus keys as ssh authentication methods. A main advantage of key authentication is that you can be protected against brute-force password guessing attacks. However, requiring a private key for ssh access means that you have to store the key somewhere on client system, which can be another avenue of attack.

Still, one can argue that the ramification of a cracked password is more significant than a compromised private key, because any single password tends to be used for multiple hosts and services, while the validity of a given private key is generally limited to a specific ssh server.

If you are using openssh, you can flexibly enable or disable password authentication and key authentication. Here is how to disable ssh password authentication so that you can force ssh login via public key only.

NOTE: This guide is about the SSH server side configuration for preventing password authentication and forcing key authentication. I assume that you already set up key authentication on the client side, so you can log in to SSH via key authentication (without using password). Before proceeding with the rest of this tutorial, make sure to verify this key authentication works. Otherwise, you may lose SSH access while testing this tutorial. So be careful!

Open sshd configuration file, and add the following line (or uncomment it if it’s commented out).

$ sudo vi /etc/ssh/sshd_config
PasswordAuthentication no

Make sure that you have the following in /etc/ssh/sshd_config, in order to allow private/public key authentication.

RSAAuthentication yes
PubkeyAuthentication yes

Finally, reload ssh server configuration to make the change effective.

$ sudo /etc/init.d/ssh reload

The above setting will disable ssh login via password, system-wide. If what you want is to disable ssh password login for individual users, you can do the following.

If you want to disable ssh password authentication for specific users only, add the following « Match User » block at the end of sshd config file.

Match User alice,bob,john
PasswordAuthentication no

If you want to disable ssh password login for specific Linux group(s), put « Match Group » block at the end of sshd config file. For example, to disable ssh password login for all users belonging to « sudoers » group:

Match Group sudoers
PasswordAuthentication no

If you want to force ssh key authentication for non-root normal users, place the following « Match User » block at the end of sshd config file.

Match User !root
PasswordAuthentication no
Categories: Sécurité, Système Tags:

5 Steps to Setup MySQL Master Master Replication on Ubuntu 16.04

06/11/2023 Categories: Bases de données Tags: , , Comments off

Source: linoxide.com

The Master-Slave replication in MySQL databases provides load balancing for the databases. But it does not provide any failover scenario. If the Master server breaks, we cannot execute queries directly on the slave server. In addition to load balancing, if we need failover in our scenario, we can setup 2 MySQL instances in Master-Master replication. This article describes how this can be achieved in 5 easy steps on Ubuntu 16.04 server.

In Master master replication, both the servers play the role of master and slave for each other like in the following diagram:

MySQL Master-Master configuration

Each server serves as Master for the other slave at the same time. So if you are familiar with the Master-Slave replication in MySQL, this must be a piece of cake for you.

Lire la suite…

Append TimeStamp to file name

05/11/2023 Categories: Système Tags: , Comments off

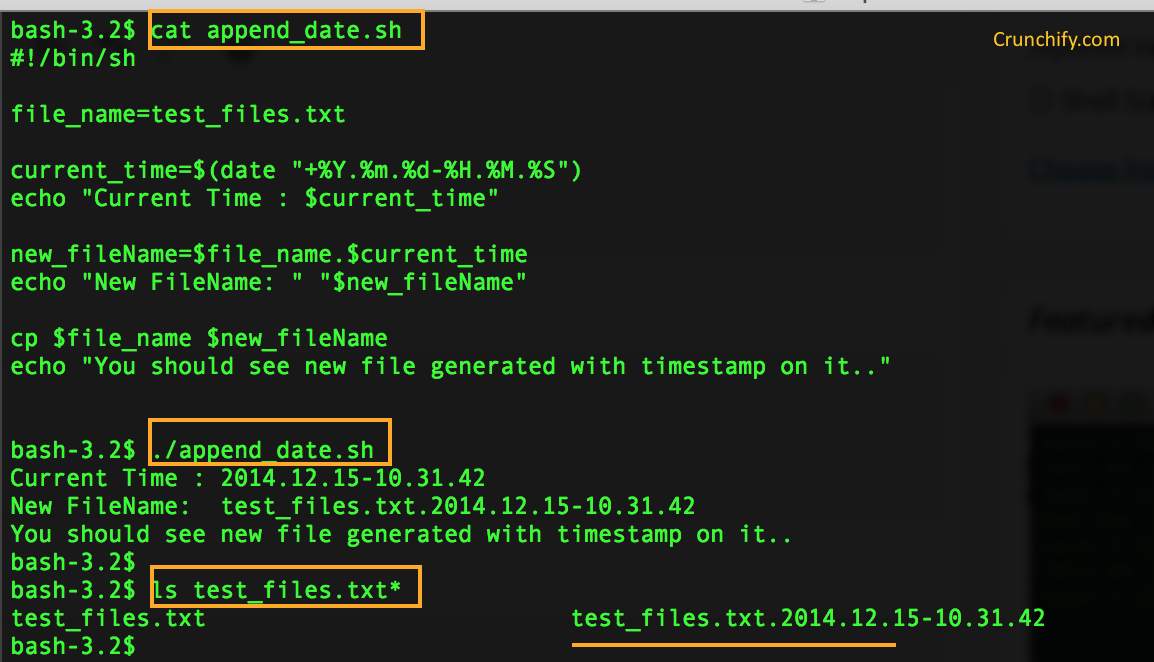
I need to create a shell script that appends a timestamp to existing file. I mainly use Mac OS X for development. Wanted to create the same on Mac Terminal.

Here are some basics on date command.

NAME

date -- display or set date and time

SYNOPSIS
date [-ju] [-r seconds] [-v [+|-]val[ymwdHMS]] ... [+output_fmt]
date [-jnu] [[[mm]dd]HH]MM[[cc]yy][.ss]
date [-jnu] -f input_fmt new_date [+output_fmt]
date [-d dst] [-t minutes_west]

Samples:

Script to append date stamp to file:

Categories: Système Tags: ,

How to Setup MySQL Master Master Replication

05/11/2023 Categories: Bases de données Tags: , Comments off

MySQL master master replication, also known as “mysql chained replication”, “multi master replication or “mysql daisy chaining replication” is an extension of mysql replication allowing the creation of multiple master servers that can then be masters of multiple slaves. In this post, I demonstrate how to setup mysql master master replication.

In a multi master mysql configuration, bar the first master server, each additional master acts as both a master and slave. Therefore, it is possible to create new masters from each additional slave added.

Take a look at this diagram which helps to illustrate one possible configuration.

mysql master master replication

Lire la suite…

Categories: Bases de données Tags: ,