A residual-current device (RCD), or residual-current circuit breaker (RCCB), is a device that instantly breaks an electric circuit to prevent serious harm from an ongoing electric shock. Injury may still occur in some cases, for example if a human falls after receiving a shock. In the United States and Canada, the device is more commonly known as a ground fault circuit interrupter (GFCI), ground fault interrupter (GFI) or an appliance leakage current interrupter (ALCI). In the United Kingdom, these are better known by their initials RCD, and a combined RCD+MCB (miniature circuit breaker) is known as a RCBO (residual-current circuit breaker with overcurrent protection). In Australia, they are sometimes known as safety switches or an RCD. An earth leakage circuit breaker (ELCB) may be a residual-current device, although an older type of voltage-operated earth leakage circuit breaker also exists. In German-speaking countries the device is sometimes known as FI where the F stands for fault (Fehler) and I for the symbol that represents electric current.
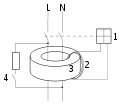
These electrical wiring devices are designed to quickly and automatically disconnect a circuit when it detects that the electric current is not balanced between the energized (line) conductor(s) and the return (neutral) conductor. Under normal circumstances, these two wires are expected to carry matching currents, and any difference can indicate a short circuit or other electrical anomaly is present, such as leakage. Leakage can indicate a shock hazard (or shock in progress) which is a potential danger to a person. Current leakage can result in harm or death due to electric shock, especially if the leaking electric current passes through the torso of a human. A current of around 30 mA (0.030 amperes) is potentially sufficient to cause cardiac arrest or serious harm if it persists for more than a small fraction of a second. RCDs are designed to disconnect the conducting wires quickly enough to prevent serious injury from such shocks, commonly described as the RCD being « tripped ».
An RCD does not provide protection against unexpected or dangerously high current (called spikes or surges) when current is flowing in the usual wires in the circuit, therefore it cannot replace a fuse or protect against overheating or fire risk due to overcurrent (overload) or short circuits if the fault does not lead to current leakage. Therefore, RCDs are often used or integrated as a single product along with some kind of circuit breaker, such as a fuse or miniature circuit breaker (MCB), which adds protection in the event of excessive current in the circuit (the resulting RCD with overcurrent protection called an RCBO). RCDs also cannot detect the situation where a human accidentally touches both conductors at the same time, since the flow of current through an expected device, an unexpected route, or a human, are indistinguishable if the current returns through the expected conductor.
RCDs are usually testable and resettable devices. Commonly they include a button that when pressed, safely creates a small leakage condition, and a switch that reconnects the conductors when a fault condition has been cleared. Depending upon their design, some RCDs disconnect both the energized and return conductors upon a fault, while others only disconnect the energized conductor and rely upon the return conductor being at ground (earth) potential. The former are commonly known as « double-pole » designs; the latter as « single-pole » designs. If the fault has left the return wire « floating » or not at its expected ground potential for any reason, then a single-pole RCD will leave this conductor still connected to the circuit when it detects the fault.
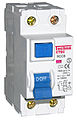
[one-third-first]A two-pole, or double-pole, residual-current device. The test button and connect/disconnect switch are colored blue. A fault will trigger the switch to its down (off) position, which in this device would disconnect both conductors.[/one-third-first] [one-third]
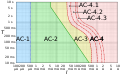
Log-log graph of the effect of alternating current I of duration Tpassing from left hand to feet as defined in IEC publication 60479-1.[1]
Advanced Mac users may find it useful to run macOS or Mac OS X in a virtual machine atop their existing Mac operating system. Creating a virtual machine for Mac OS is now easier than ever before, and we’ll show you how to set up easy Mac virtual machines on a Mac.
For some quick background, virtualization allows you to run another operating system in a confined virtual machine atop an existing operating system through an application layer. This means there is no disk partitioning involved, the virtualized operating system runs just like any other application on your computer. We have covered this broad topic many times before for purposes like running Windows 10 on a Mac with a VM, to running Ubuntu Linux in VirtualBox, to Snow Leopard in a VM, and others. In the guide here, we will be creating a Macintosh virtual machine for running Mac OS on top of Mac OS, which can be helpful for testing out different apps and operating system versions, amongst other purposes.
Apple uses its App Store to distribute its software, like new Mac operating systems. It’s convenient, but sometimes it can take a while for a download to finish. And if you have multiple Macs, it’s inefficient to download the new OS to each and every Mac.
That’s why I like to make a bootable external drive for the sole purpose of installing the Mac operating system. When I need to tend to a bunch of Macs, it’s much faster to use a bootable drive instead of going to each Mac, launching the App Store, searching for the operating system, downloading it (after entering my Apple ID), and then running the installer.
You can create a bootable USB flash drive with the macOS Sierra installer that’s now available. The installer software will take up nearly 5GB of storage space. Here’s how to create a bootable macOS Sierra installer drive.
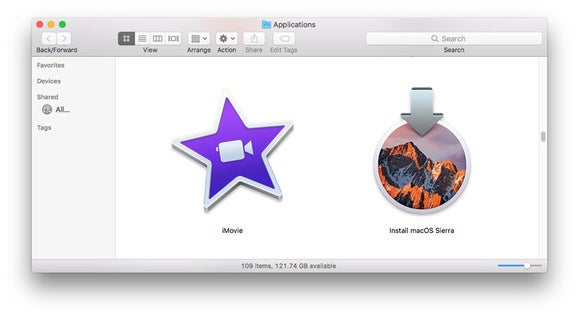
Launch the App Store app, then look for macOS Sierra in the store. (Here’s a link.) Click on the Download button, and your Mac will download the installer to your Applications folder. If it automatically launches after download, quit the installer.
Keep the installer in the Applications folder.
If you’ve already upgraded your Mac to Sierra, the installer is removed from the Applications folder. You can download it again if you go to Purchased in the App Store. Look for macOS Sierra in the list of apps that you’ve bought, and click on the Download button. If it automatically launches after download, quit the installer.
En coutellerie on utilise des aciers spécifiques suivant l’usage de chaque lame. Sont pris en compte la dureté, le tranchant, la facilité d’affutage, l’oxydation…
Tous les aciers sont identifiés par des codes qui prennent en compte leurs teneurs en carbone, mais aussi en chrome et autres composés. Comme toute norme, celle des acier va varier selon la provenance, la marque… Deux aciers peuvent avoir la même composition mais une identification différente.
Voici un liste d’acier couramment utilisés en coutellerie.
DÉSIGNATION
ISO
INOX
HRC MIN*
HCR MAX*
ORIGINE
APPLICATION
12C27
–
oui
56
58
Suède
pliant
154CM
–
oui
58
60
USA
fixe, pliant
420
–
oui
55
58
USA
pliant
420J2
–
oui
57
59
USA
–
420HC
–
oui
57
59
USA
–
440A
–
oui
55
57
USA
–
440B
–
oui
–
–
USA
–
440C
–
oui
56
59
USA
fixe
A2
–
non
60
62
USA
fixe
ATS34
–
oui
58
60
Japon
pliant
AUS4
–
oui
55
57
Japon
–
AUS6
–
oui
–
–
Japon
–
AUS8
–
oui
58
59
Japon
pliant
AUS10
–
oui
59
60
Japon
–
BG42
–
oui
61
63
USA
pliant
D2
X153CrMoV12
non
57
61
USA
outils, pliant, fixe
H1
–
oui
–
–
USA
–
M2
–
non
60
65
USA
outils, fixe
N690Co
–
oui
58
60
Autriche
pliant
RWL34
–
oui
58
60
Suède
pliant
S30V
–
oui
58
60
USA
pliant
S60V
fonte
oui
56
60
USA
–
S90V
fonte
oui
56
58
USA
–
VG10
–
oui
59
60
Japon
cuisine, pliant
XC75
fonte
non
–
–
–
fixe
X15TN
–
oui
–
–
France
–
ZDP189
fonte
oui
65
68
Japon
cuisine, chasse, tactic
* HRC est le symbole normalisé pour la dureté Rockwell avec pénétrateur cône de diamant. Les valeurs ci-dessus sont représentatives des duretés rencontrées en coutellerie. Selon les procédés de traitements thermiques, les alliages peuvent être encore plus mous ou plus durs.
Many of these instructions were intentionally left out because used incorrectly they can confuse the calculator and cause either a lockup or a « Memory Lost » state. (If you get into the former state, you may need to remove the batteries to reset the calculator.)
You should backup anything important before first engaging in Synthetic Programming.
How Synthetic Instructions Work
HP-41 instructions are one or more bytes long. The calculator will only allow certain sequences, but with the tool below, you’ll be able create new sequences by entering code that the calculator allows and then grabbing bytes out of this code to create different instructions. These new sequences allow access to additional characters, additional sounds, more alpha editing commands, easy control of the calculator through direct access to system registers, etc. They make it possible to do new things and to reduce the size and execution time of programs. The byte grabber described below will allow you to remove individual bytes from programs you create so the the bytes that remain are interpreted differently.
Creating a Byte Grabber
You can use the following steps to create a Byte Grabber. Make sure to follow the steps exactly. If it doesn’t work the first time, try again. Note that the first step is a master clear so save anything important to cards, tape, or disk now!
Remove any accessory modules.
Do a Master clear by holding down the backspace key while turning on the calculator. The Display will show MEMORY LOST.
Assign « + » to the LN key by pressing ASN ALPHA + ALPHA LN.
Assign « DEL » to the LOG key by pressing ASN ALPHA D E L ALPHA LOG.
Press PRGM to witch to program mode. The display should show 00 REG 45.
Start catalog 1 by pressing CATALOG 1 and press R/S immediately before the display blinks. If the display blinks, you waited too long. Repeat this step as many times as necessary to get the R/S pressed before the display blinks. (The display will show the .END. instruction both before and after the blink, but you must press R/S before the blink.)
Press the ALPHA key to go into Alpha mode.
Press the backspace key. The display should now show 4094 RCL 01.
Press ALPHA to leave Alpha mode.
Press GTO .005 and you should see 05 LBL 03.
Press USER (if necessary) to enter User mode.
Press LOG 003 which uses the assignment you made earlier to DEL 3 steps. You should now see 04 STO 01.
Press ALPHA to go back into Alpha mode.
Press ? A A A A A A (Everything after the first A will probably display as « -« s.) Press exactly 6 A’s!
Press PRGM to leave program mode and ALPHA to leave Alpha mode.
Press GTO . . (press both dots)
The byte grabber should now be assigned to the LN key. Press AND HOLD the LN key which should display XROM 28,63. Keep holding the key until the calculator displays NULL because you don’t want to execute the byte grabber now. This would be a good time to save the calculator’s status on a card by pressing XEQ ALPHA W S T S ALPHA in case you accidentally destroy the byte grabber later.
Be careful in using the byte grabber. You may get a « MEMORY LOST » or lock the calculator if you use it incorrectly. If the latter happens, remove the batteries for a few seconds and return them. If that doesn’t work, try turning the calculator on a few times with the batteries out or leave them out for several hours. Lire la suite…